AWS Community Day 2025 Aotearoa New Zealand Slides
· One min read

Amazon Web Services
View All Tags

I was hungry and tried to feed myself but I forgot to bring cat food.
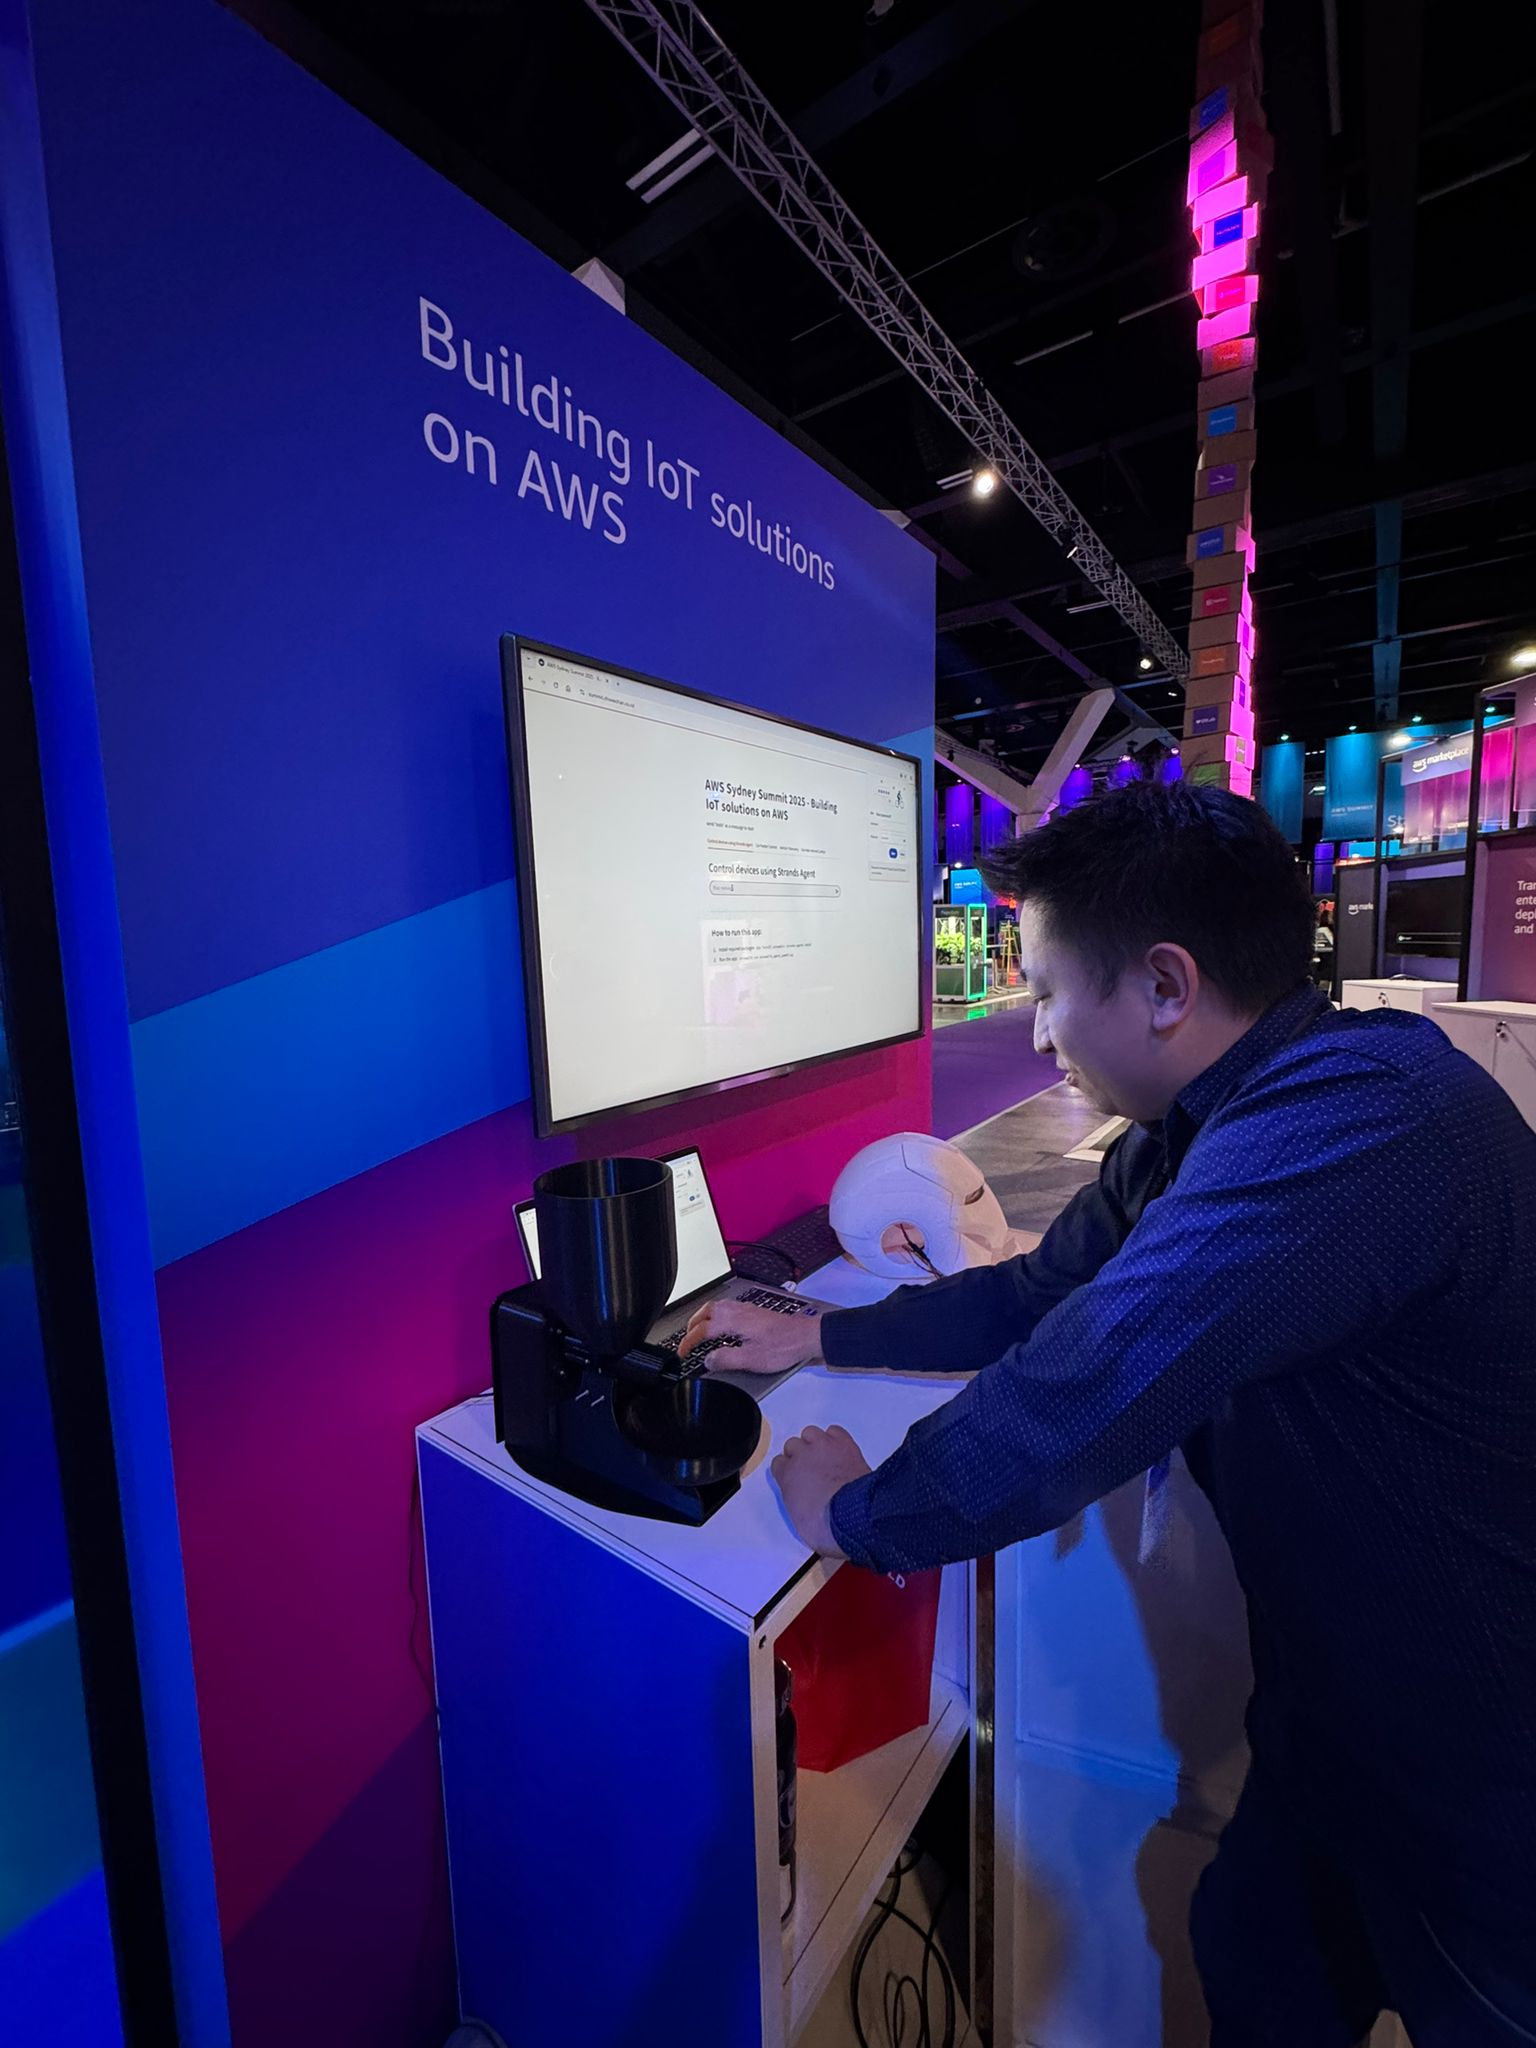
Here is the source-code Streamlit App I demoed at the AWS Sydney Summit, to demonstrate how to control IoT devices using the Strands Agents: https://github.com/chiwaichan/AWSSydneySummit2025Demo
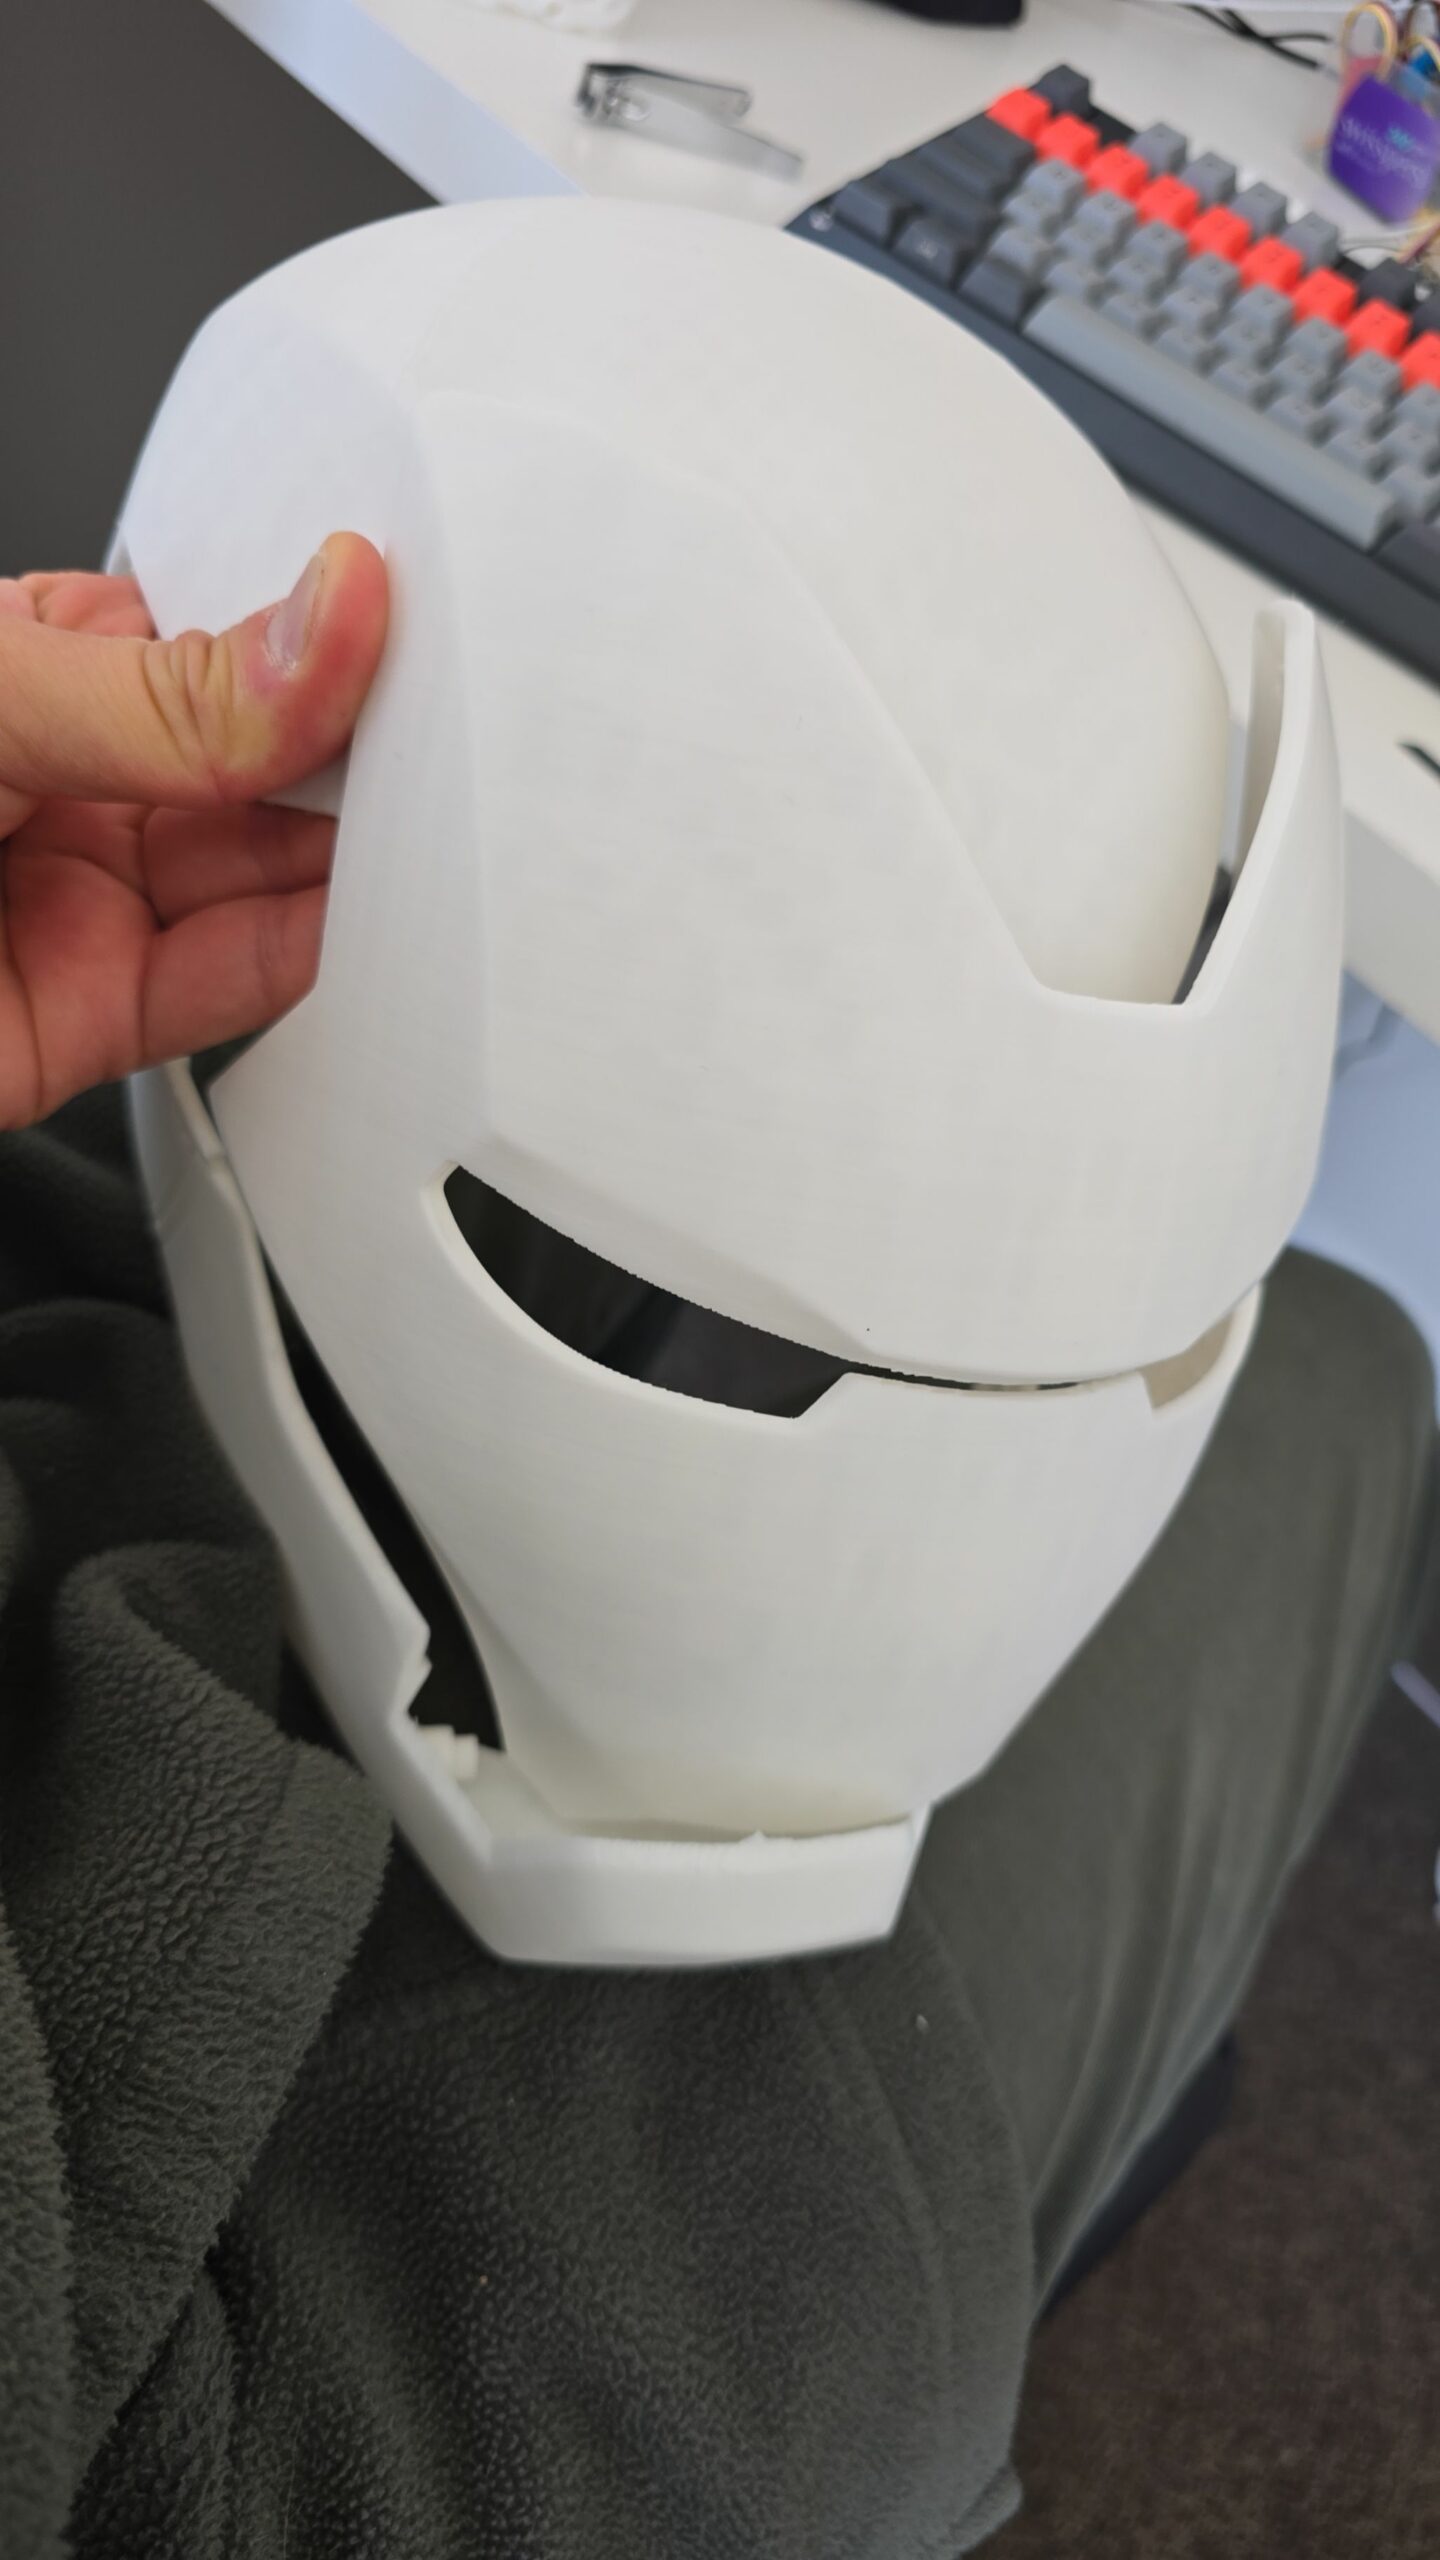
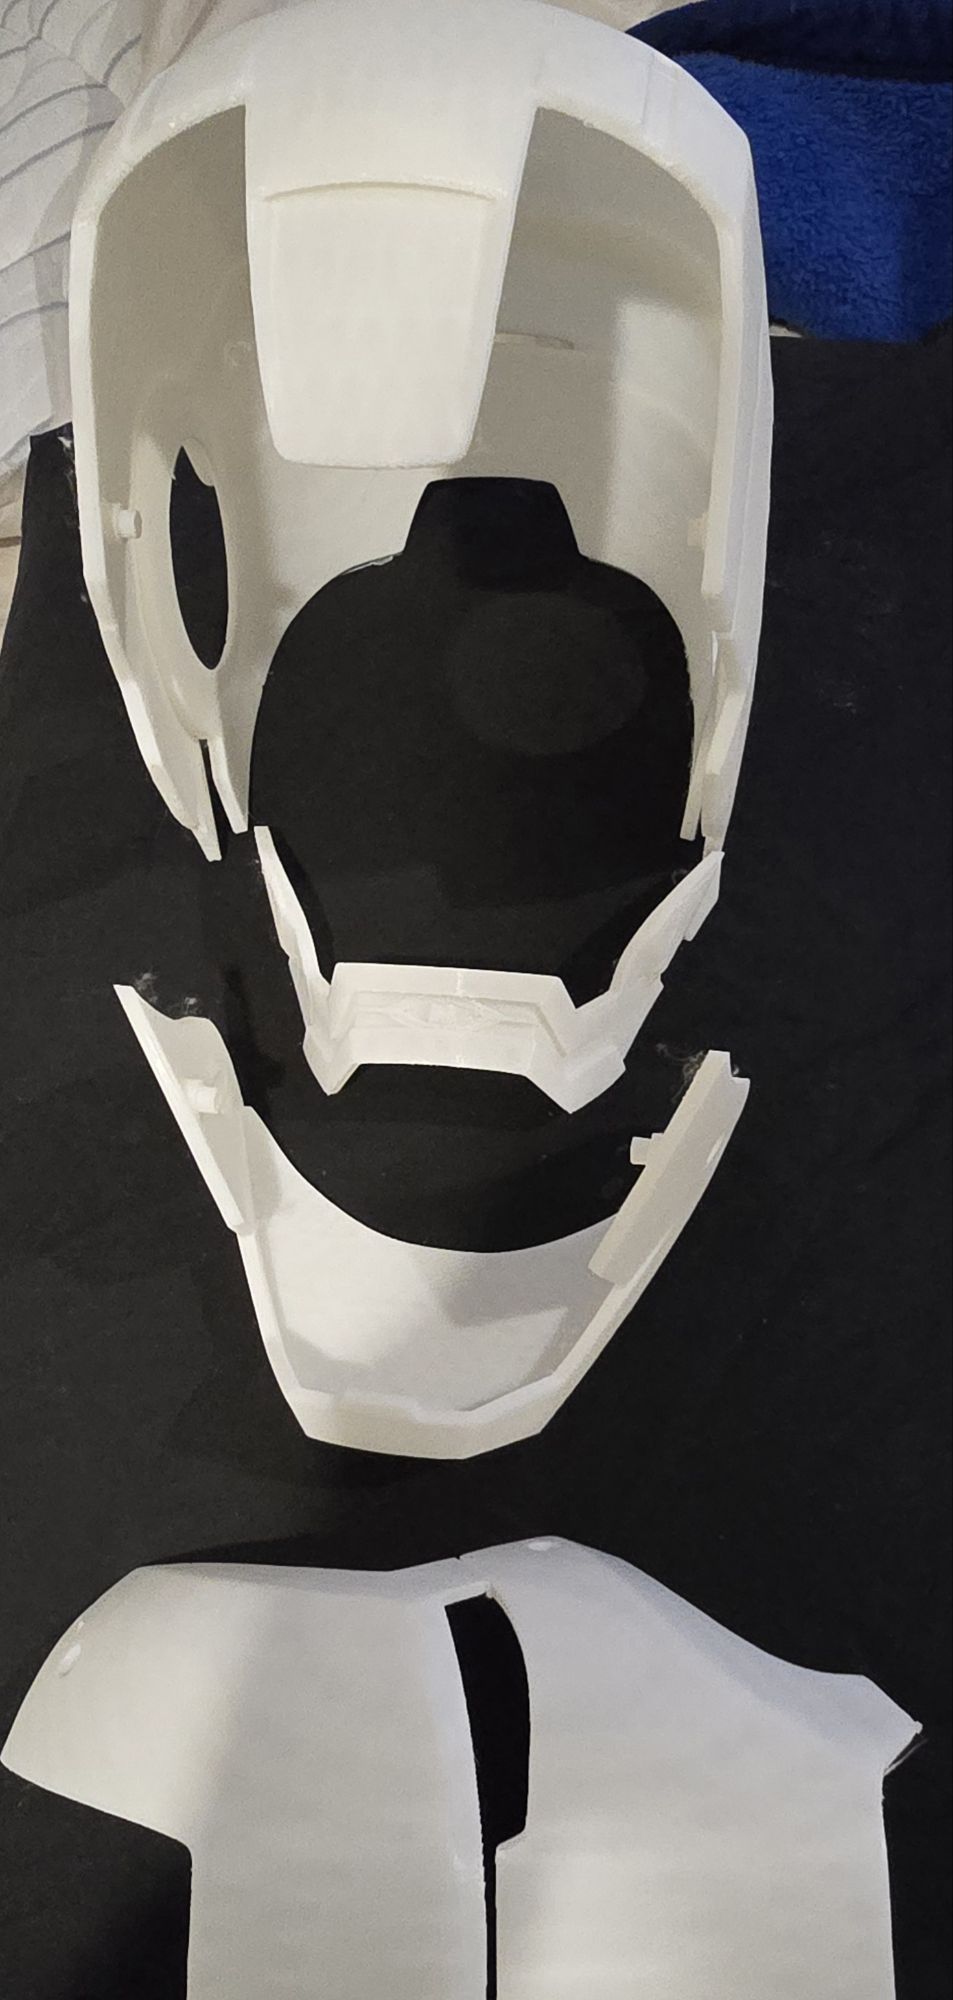
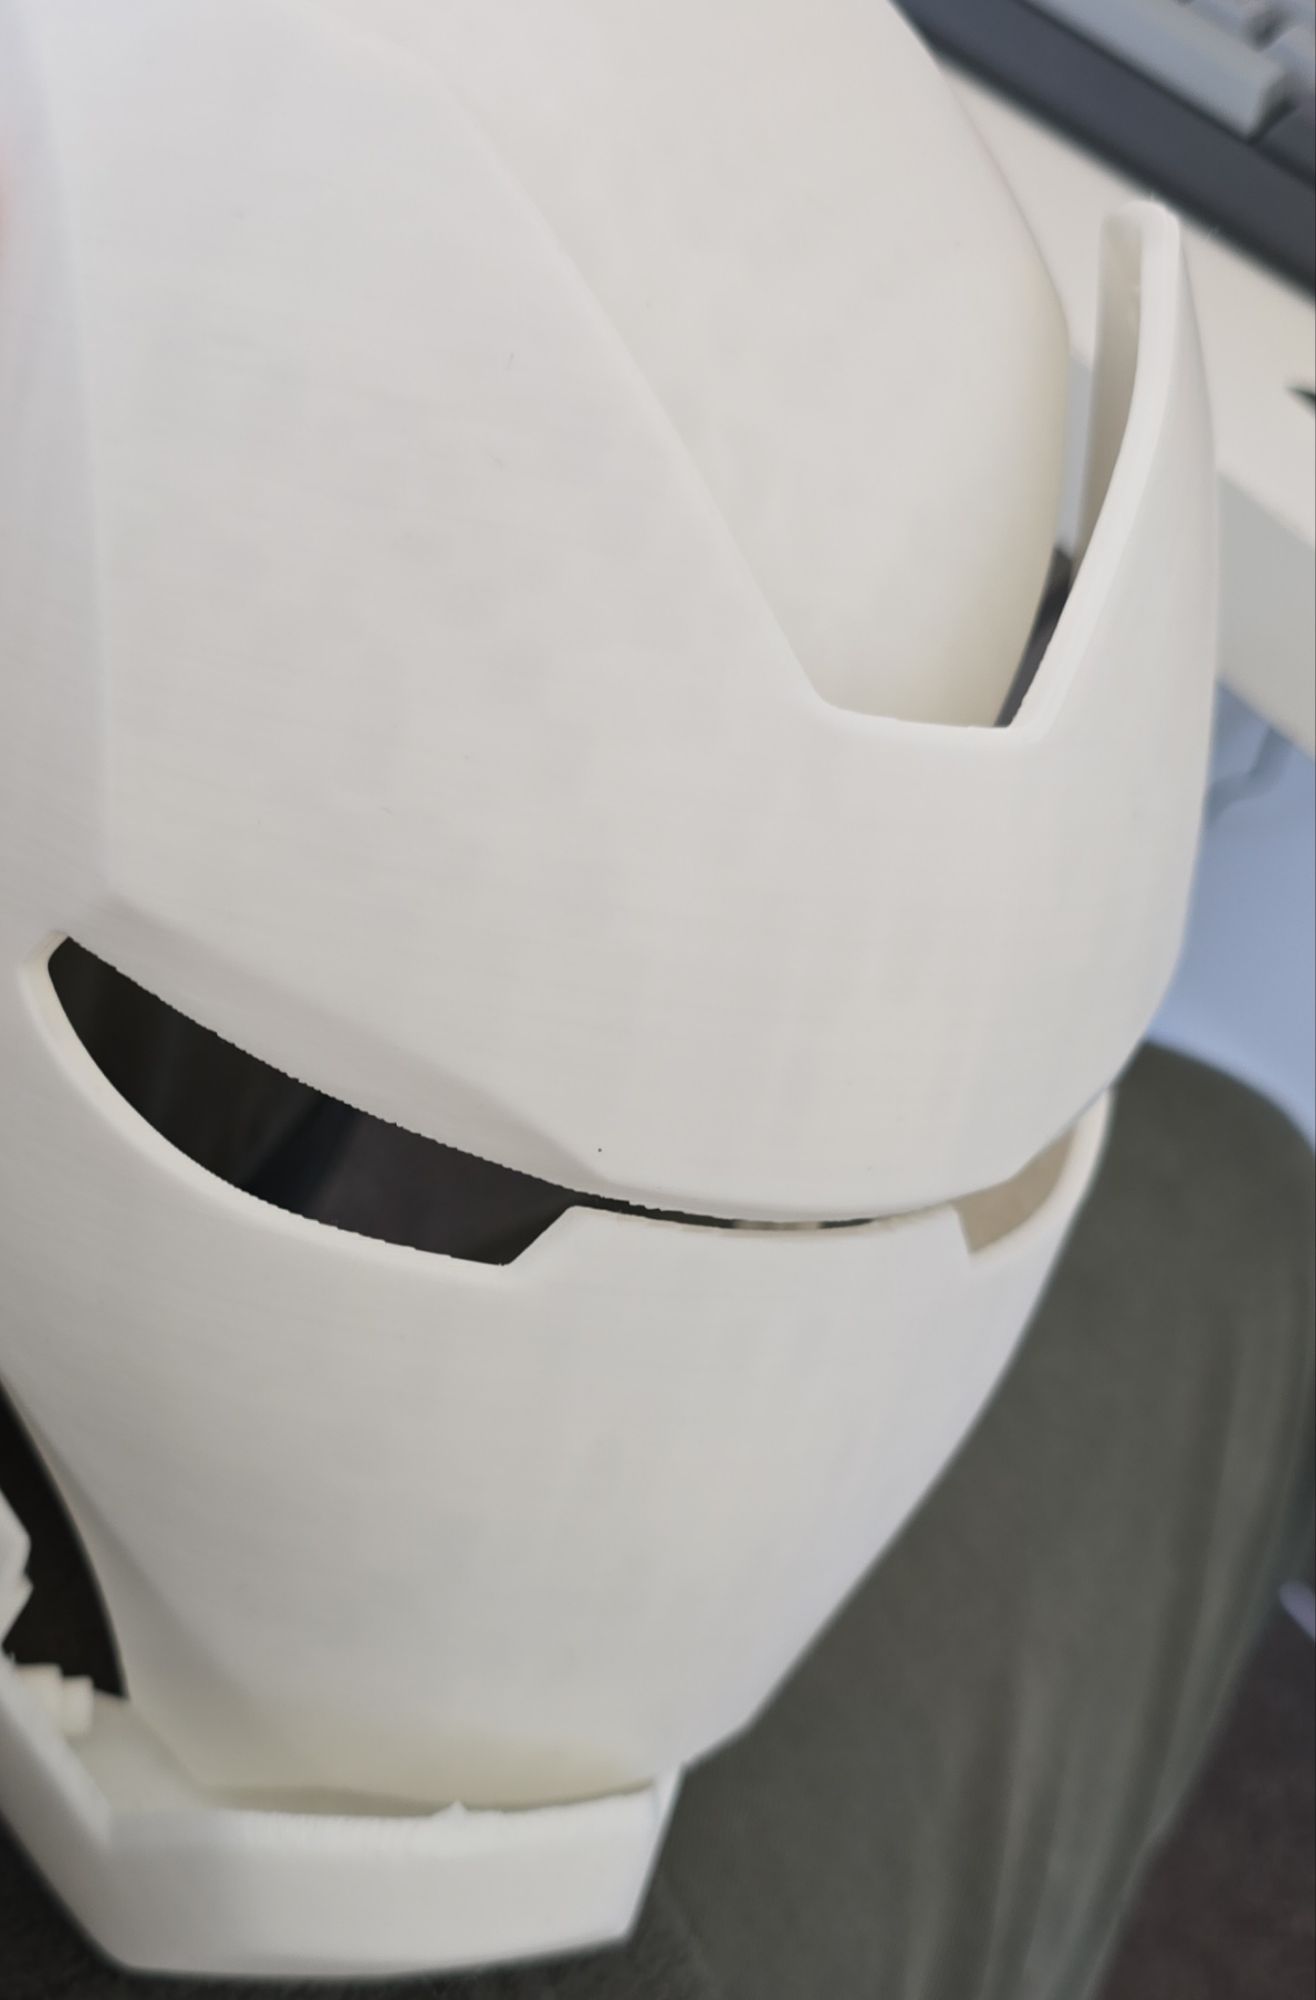
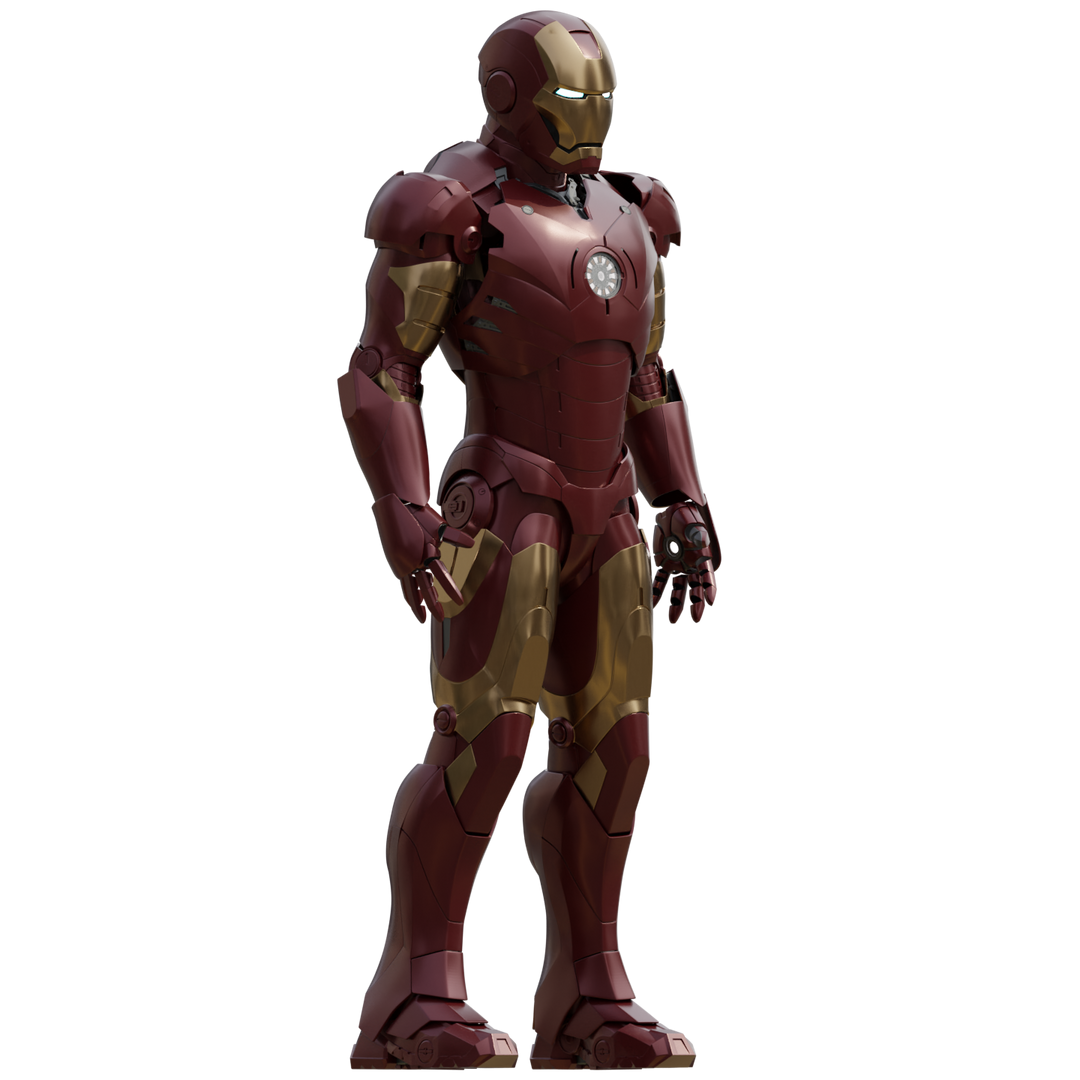
Bought the Iron Man Mark 3 3D Printing model designs from https://www.wf3d.shop/products/ironman-mark-3-suit-3d-printable-model by Walsh3D
Printed these so far:


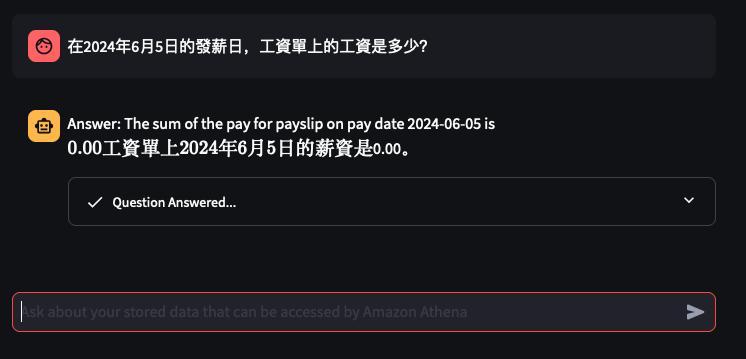
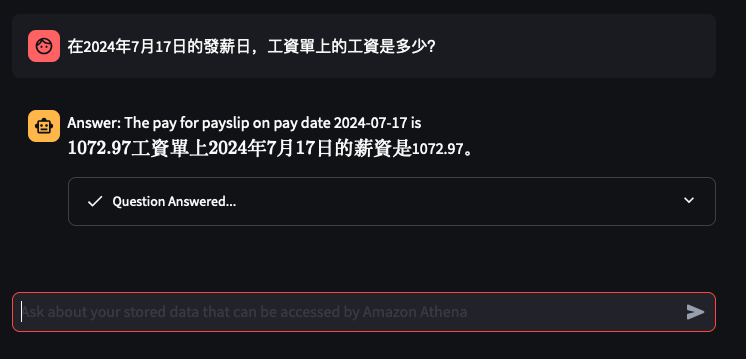
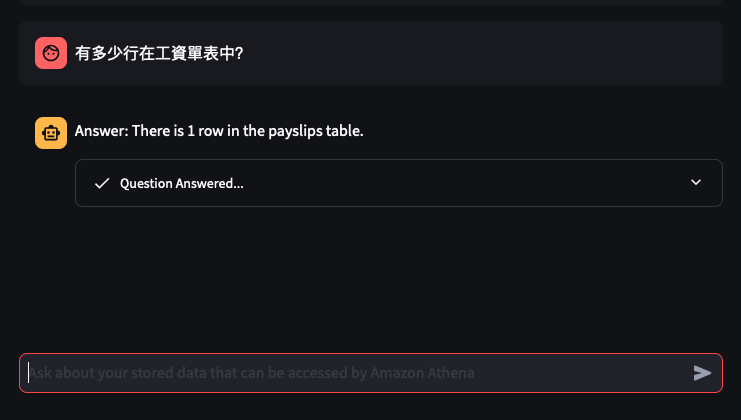
It's the time of year where I normally have to start doing taxes, not for myself but for my parents. Mum works at various fruit picking / packing places in Hawkes Bay throughout the year, so that means there are all sorts of Payslips from different employers for the last financial year. Occasionally mum would ask me specific details about her weekly payslips, and that usually means: download a PDF from and email -> open up the PDF -> find what's she asking for -> look at the PDF -> can't find it so ask what mum meant -> find the answer -> explain it to her.
The usual format,challenge: create a Generative AI conversational chat to enable mum to ask in her natural language specific details of,
And the goal: outsource the work to AI = more time to play. :-)
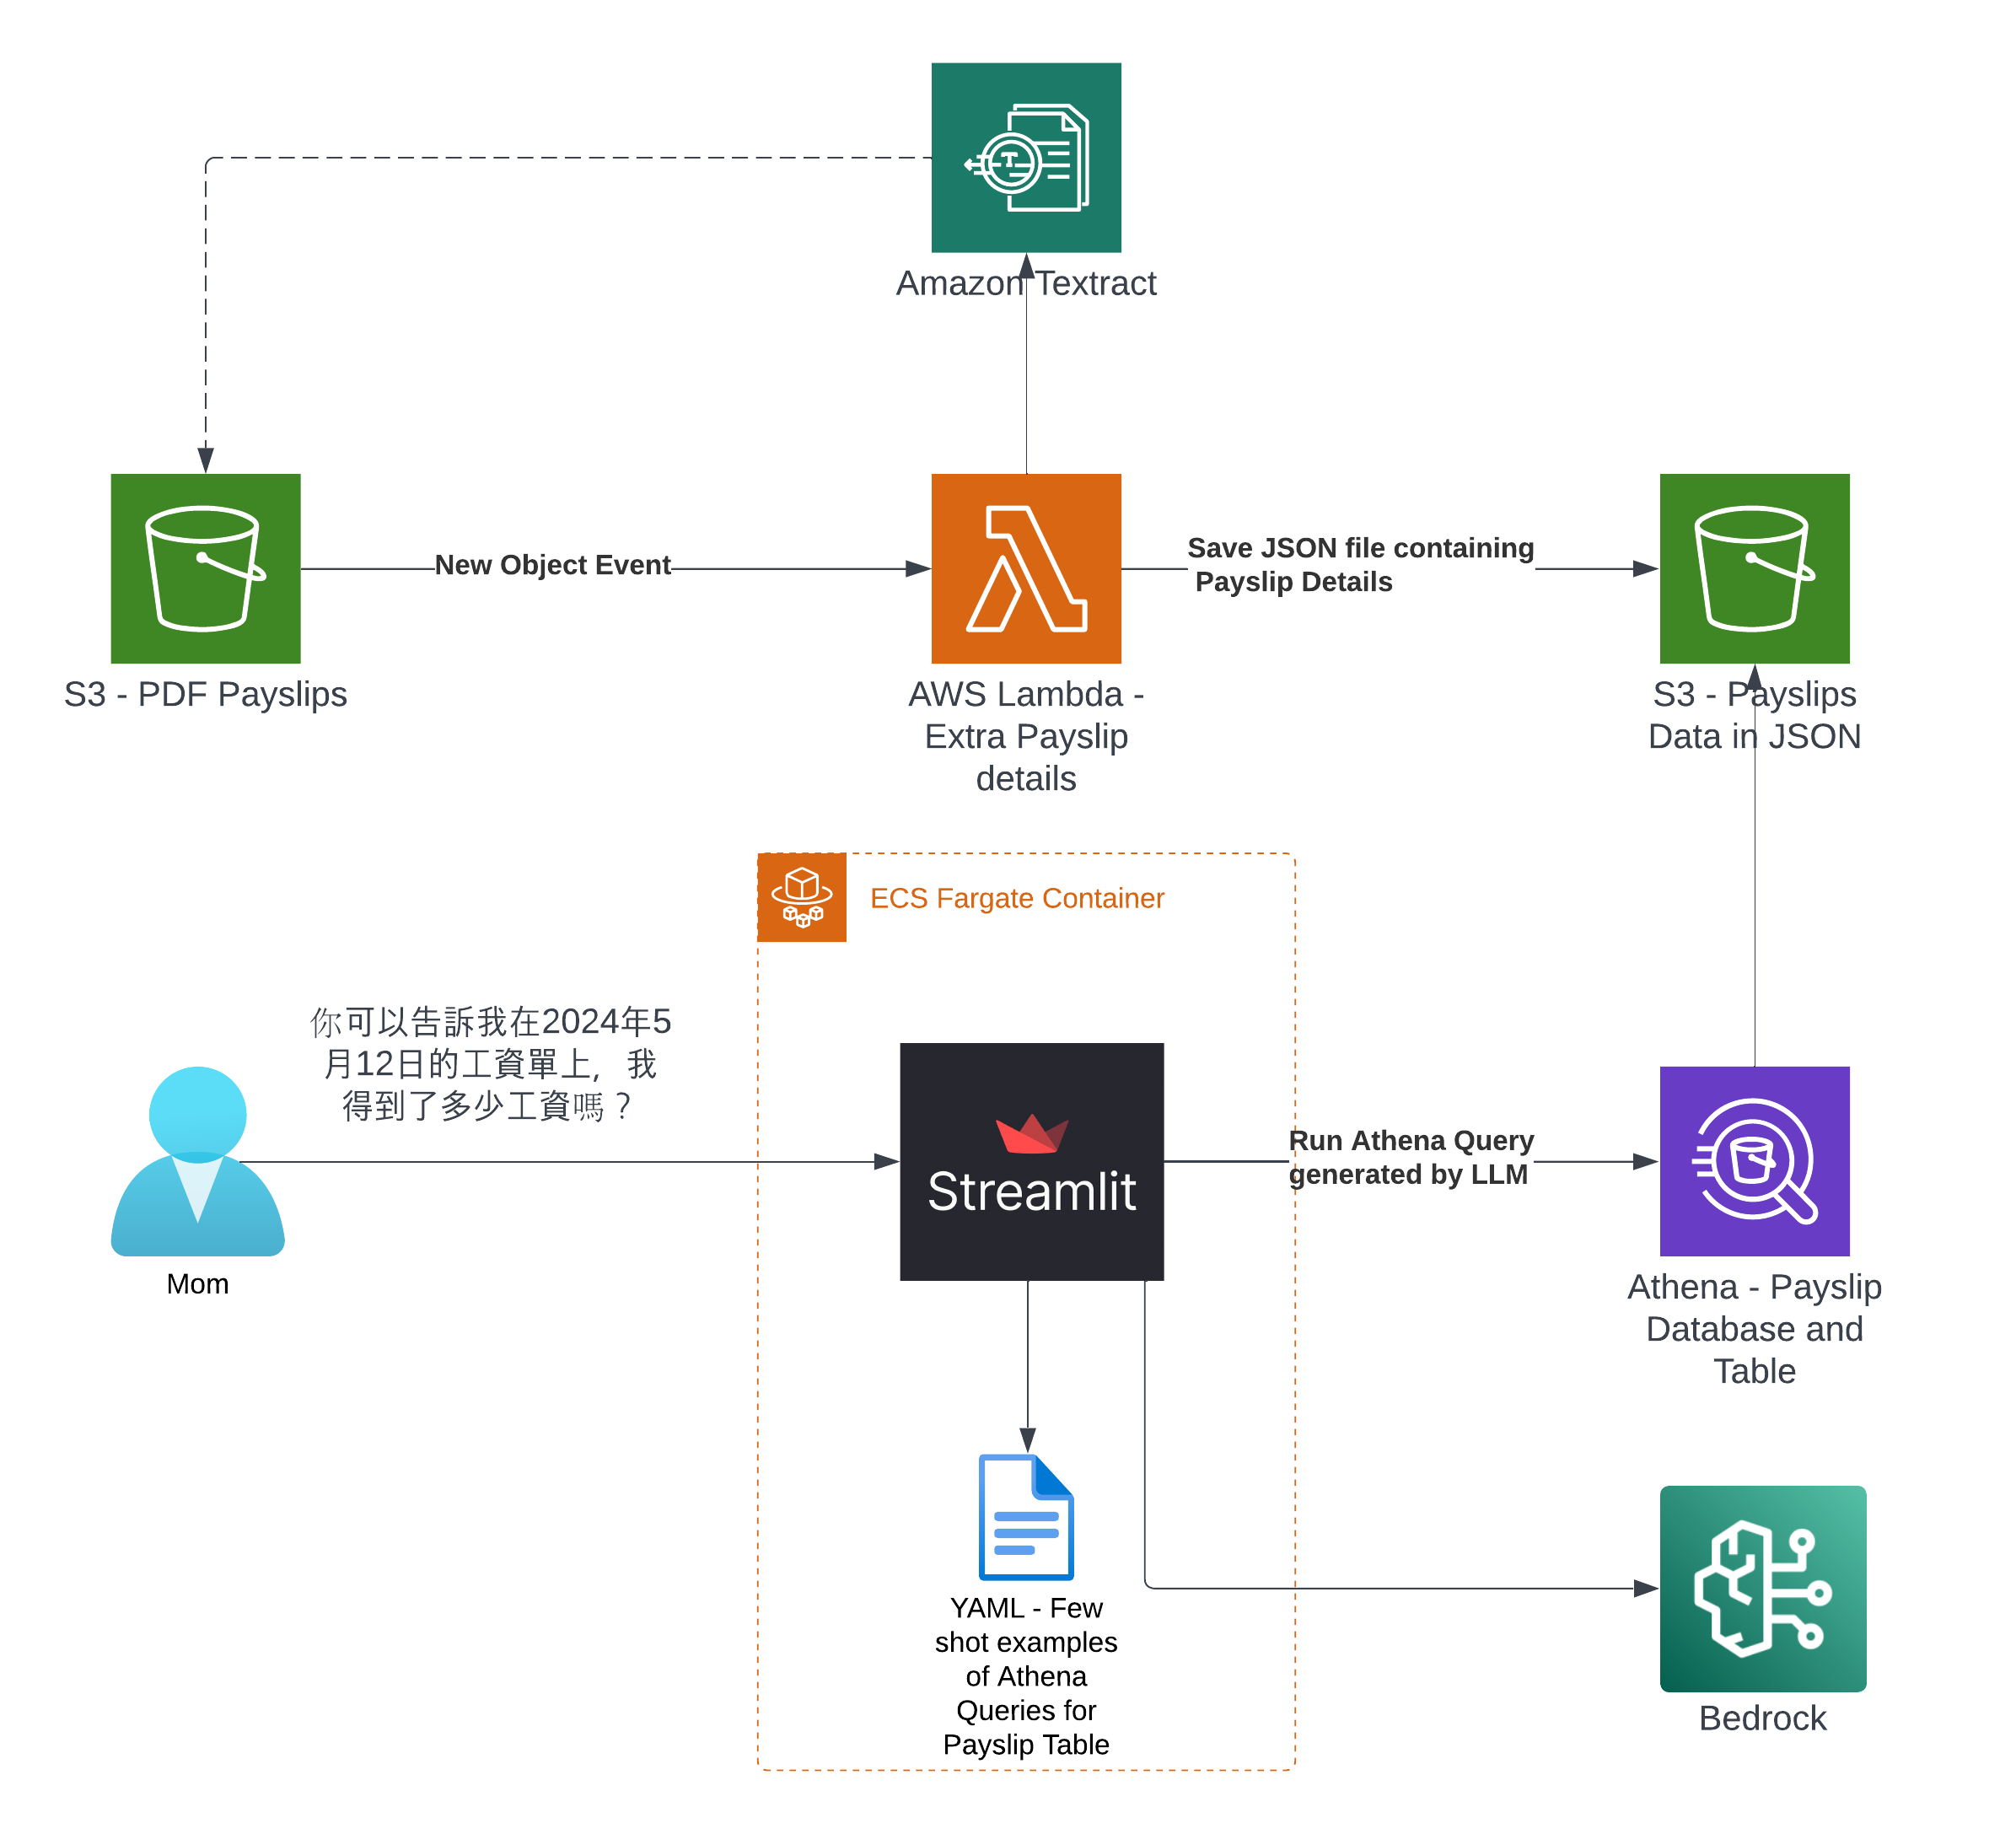
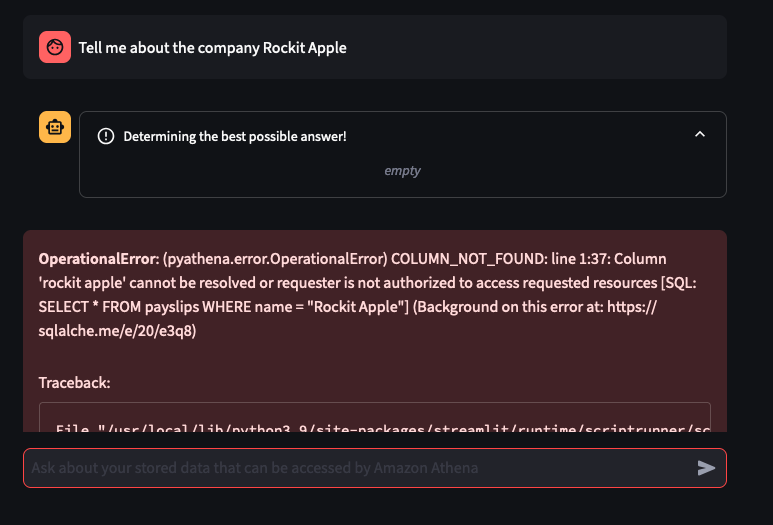
I've only tried it for Payslips generated by this employer: Rockit Apple
npm install -g aws-cdkgit clone git@github.com:chiwaichan/rockitapple-payslip-analyzer-with-genai-chatbot-using-bedrock-streamlit.git
cd rockitapple-payslip-analyzer-with-genai-chatbot-using-bedrock-streamlit
python3 -m venv venv
source venv/bin/activate
pip install -r requirements.txt
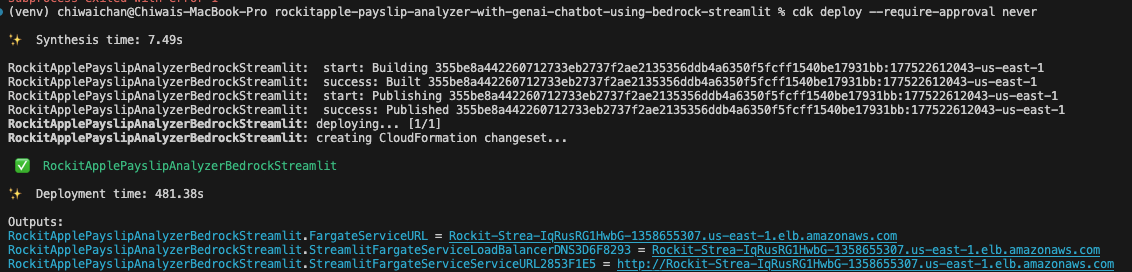
cdk deploy
You should see this as a result of calling the cdk deploy command
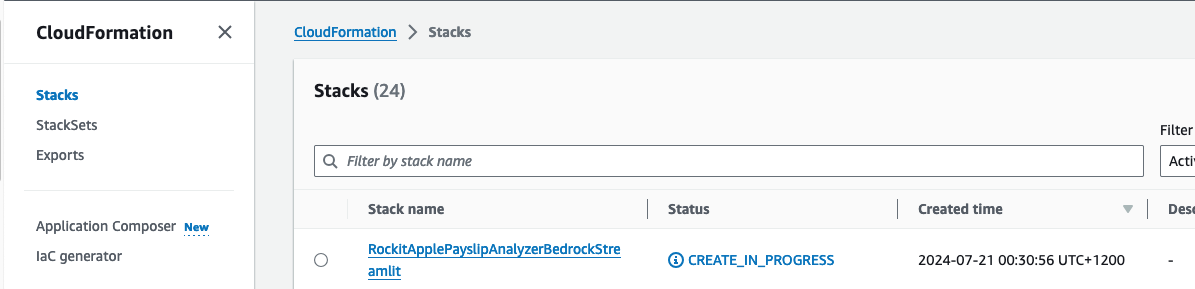
Check that the CloudFormation Stack is being created in the AWS Console
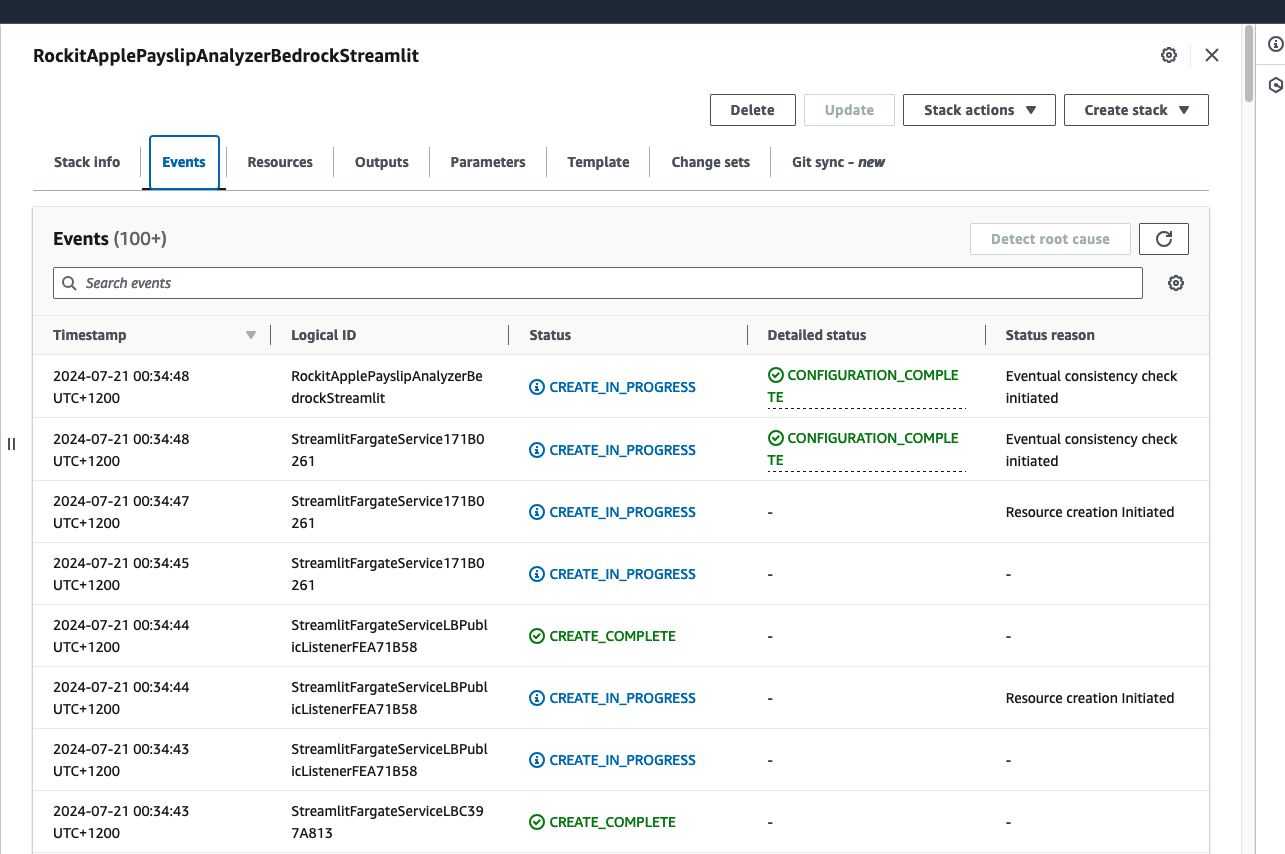
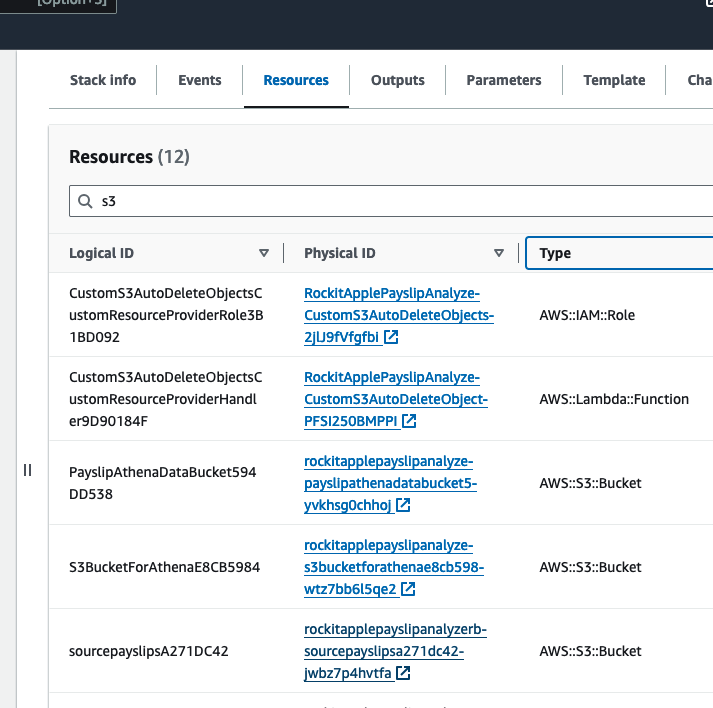
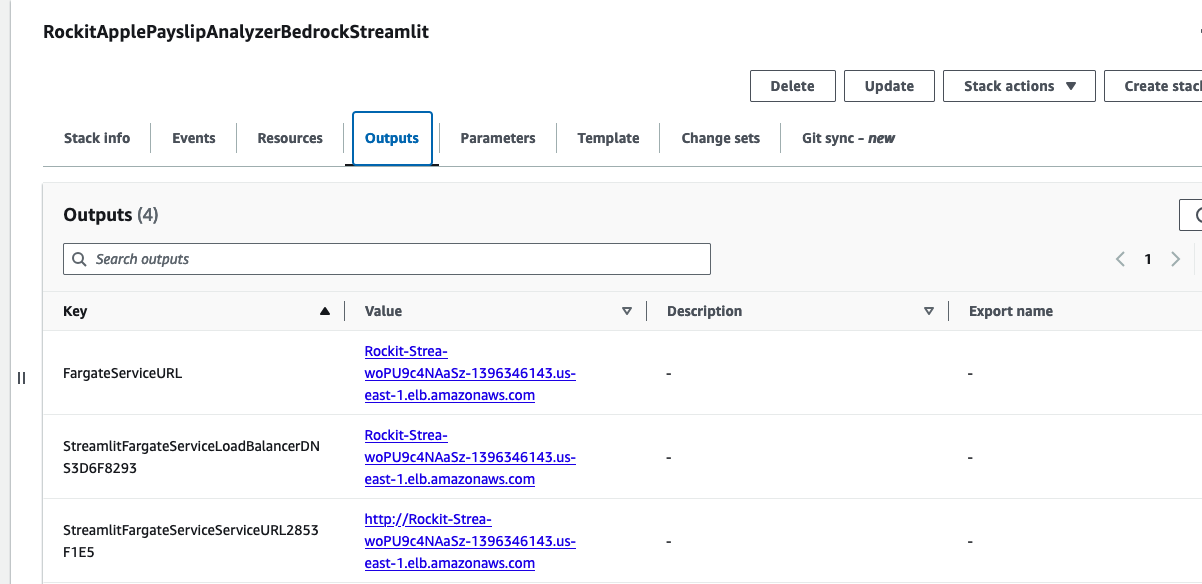
Click on it to see the Events, Resources and Output for the Stack
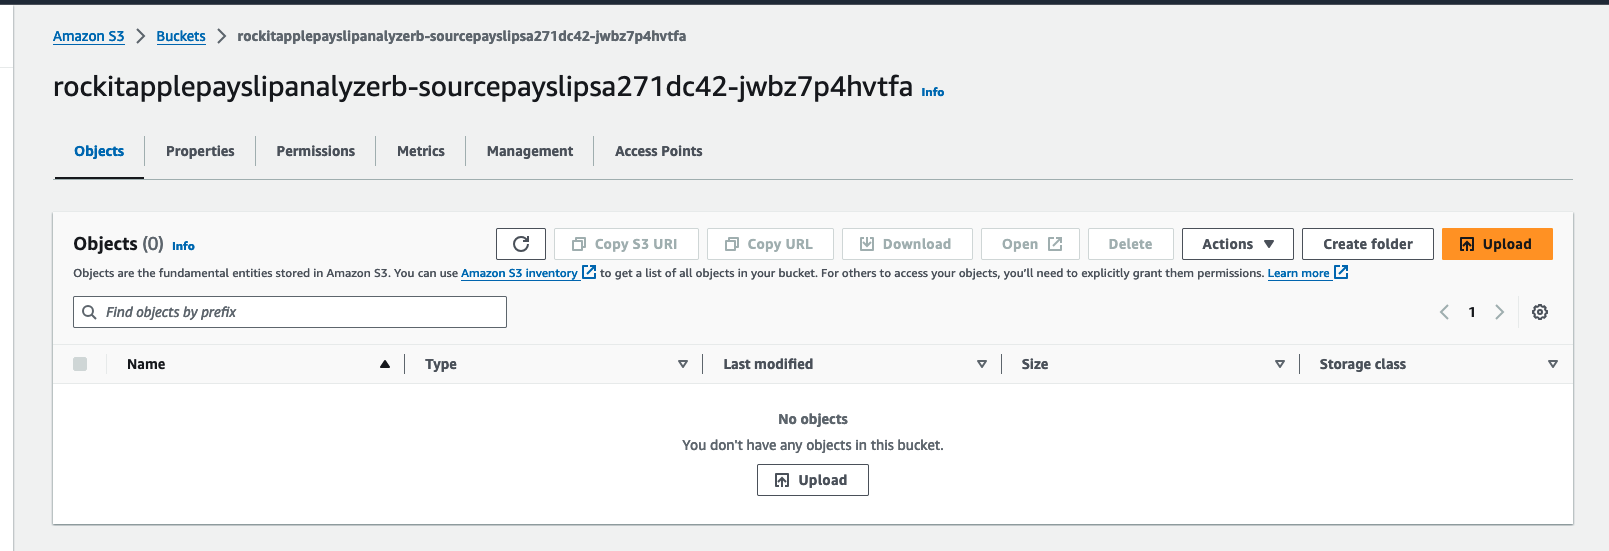
Find the link to the S3 Bucket to upload Payslip PDFs into, in the Stack's Resources, find the S3 Bucket with a with a Logical ID that starts with "sourcepayslips" and click on its Physical ID link.
Upload your PDF Payslips into here
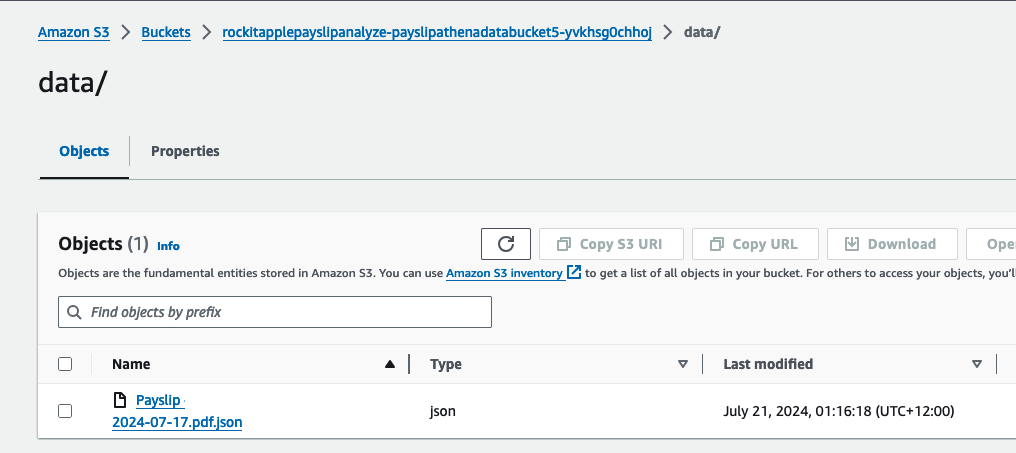
Find the link to the S3 Bucket where the extracted Data will be stored into for the Athena Table, in the Stack's Resources, find the S3 Bucket with a with a Logical ID that starts with "PayslipAthenaDataBucket" and click on its Physical ID link.
There you can find a JSON file, it should take about a few minutes to appear after you upload the PDF.
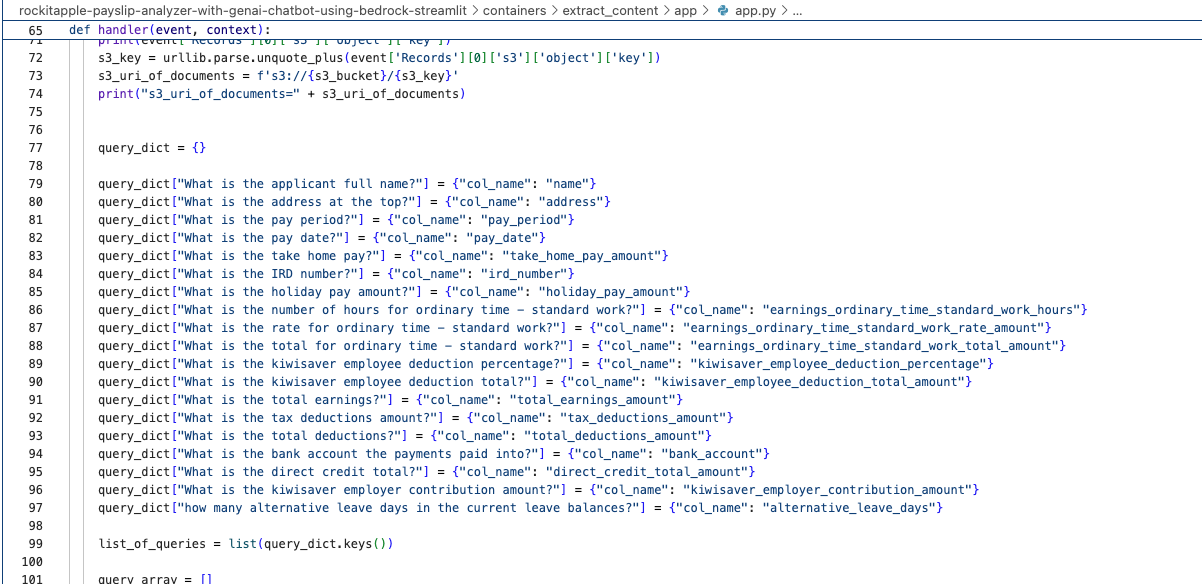
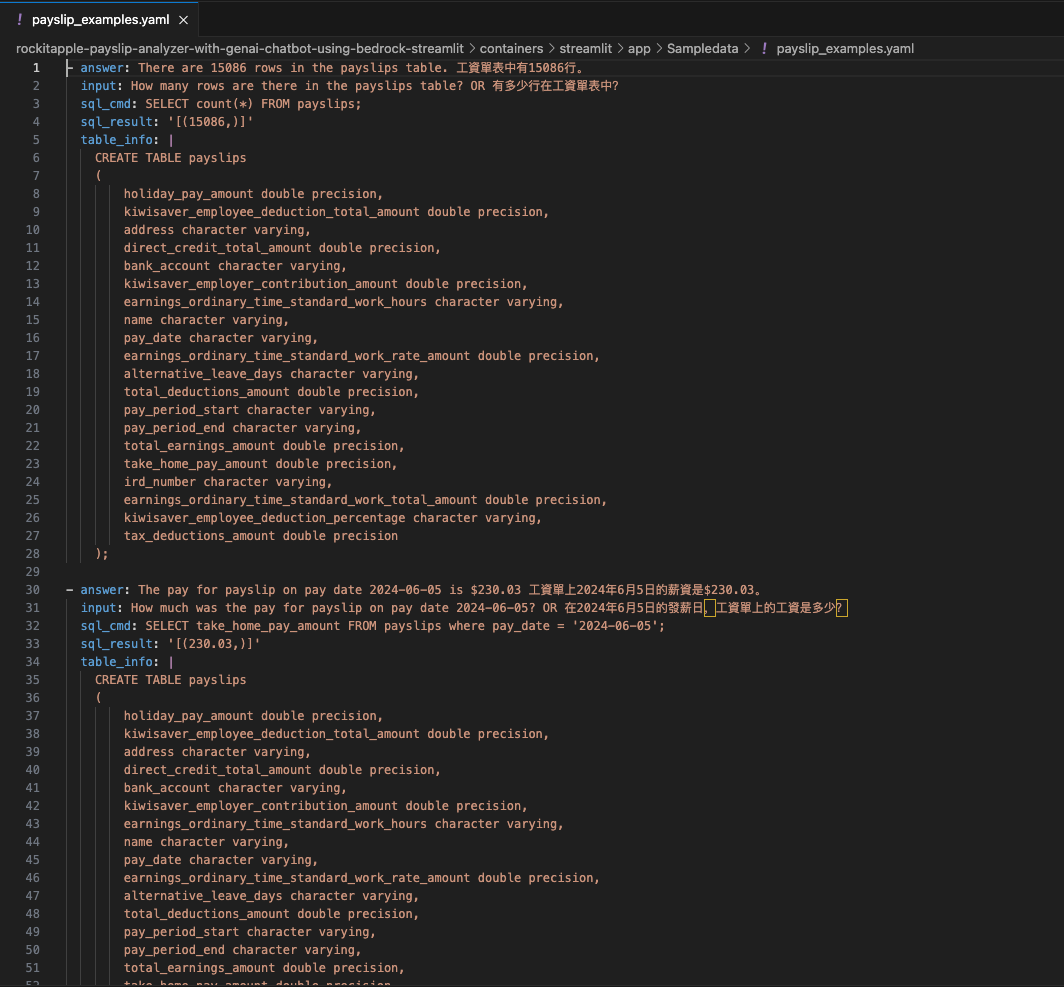
It was created by the Lambda shown in the architecture diagram we saw earlier, it uses Amazon Textract to extract the data from each Paylip using OCR, using the Queries based feature to extract the Text from a PDF by enabling us to use queries in natural language to configure what we want to extract out from a PDF. Find the "app.py" file shown in the folder structure in the screenshot below, you can modify the wording of the Questions the Lambda function uses to extract the details from the Payslip, to suit the specific needs based on the wording of your Payslip; the result of each Question extracted is saved to the Athena table using the column name shown next to the Question.
Go to the CloudFormation Stack's Outputs to get the URL to open the Streamlit Application's frontend.
Click the value for the Key "StreamlitFargateServiceServiceURL"
That will take you to a Streamlit App hosted in the Fargate Container shown in the architecture diagram
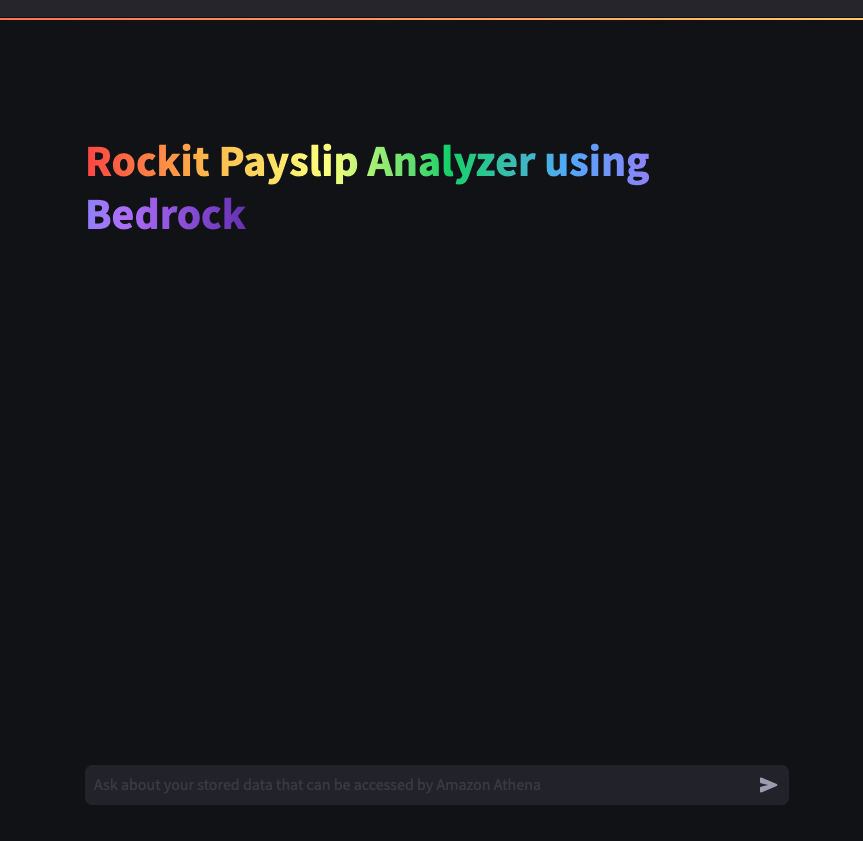
Lets try out some examples
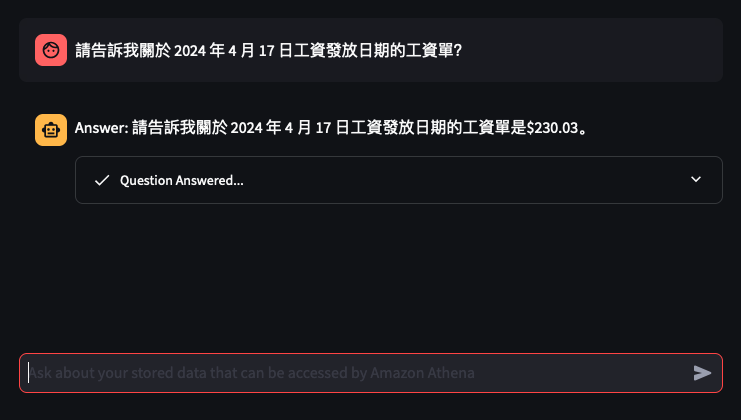
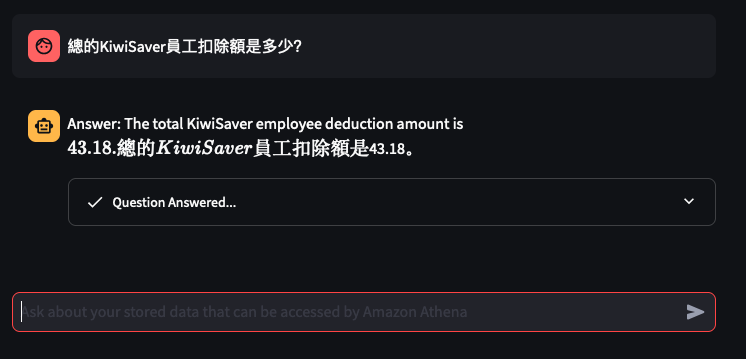
You can tweak the Athena Queries generated by the LLM by providing specific examples tailoured to your Athena Table and its column names and values - known as a Few-Shot Learning. Modify this file to tweak the Queries feed into the Few-shot examples used by Bedrock and the Streamlit app.
I was able to learn and build my first GenAI app: AWS Samples - genai-quickstart-pocs
I based my app on the example for Athena, I wrapped the Streamlit app into a Fargate Container and added Textract to extract Payslips details from PDFs and this app was the output of that.
Recently I switched my Cat Feeder project's IaC to AWS CDK in favour of increasing my focus and productivity on building and iterating, rather than constantly mucking around with infrastructure everytime I resume my project after a break; which is rare and far between these days.
Just as with coding IoT microcontrollers such as the ESP32s, I want to get straight back into building every opportunity I get; so I am also switching away from Arduino based microcontroller development written in C++ - I don't have a background in C++ and to be honest this is the aspect I struggled with the most because I tend to forget things after not touching it for 6 months or so.
So I am switching to MicroPython to develop the logic for all my IoT devices going forward, this means I get to use Python - a programming lanaguge I work with frequently so there is less chance of me being forgetful when I use it at least once a month. MicroPython is a lean and efficient implementation of the Python 3 programming language that includes a subset of the Python standard library and is optimized to run on microcontrollers and in constrained environments - a good fit for IoT devices such as the ESP32!
Good news is MircoPython is supported on all ESP32 devices - based on the ones I myself have purchased; all I need to do to each ESP32 device is to flash it with a firmware - if you are impatient, you can scroll down and skip to below to the flashing the firmware section. When I first started Arduino, MicroPython was available to use, but that was 2 years ago and there were not as many good blog and tutorial content out there as there is today; I couldn't at the time work out how to control components such as sensors, servos and motors as well as I could with C++ based coding using Arduino; nowdays there are way more content to learn off and I've learnt (by PoCing individual components) enough to switch to MicroPython. As far as I understand it, any components you have for Arduino can be used in MicroPython, provided that there is a library out there that supports it, if there isn't then you can always write your own!
By the end of this blog, you will be able to send and receive MQTT messages from AWS IoT core using MicroPython, I will also cover the steps involved in flashing a MicroPython firmware image onto an ESP32C3. Although this blog has a focus and example on using an ESP32, this example can be applied to any micro-controllers of any brand or flavours, provided the micro-controller you are using supports MicroPython.
The following instructions works for any generic ESP32C3 devices!
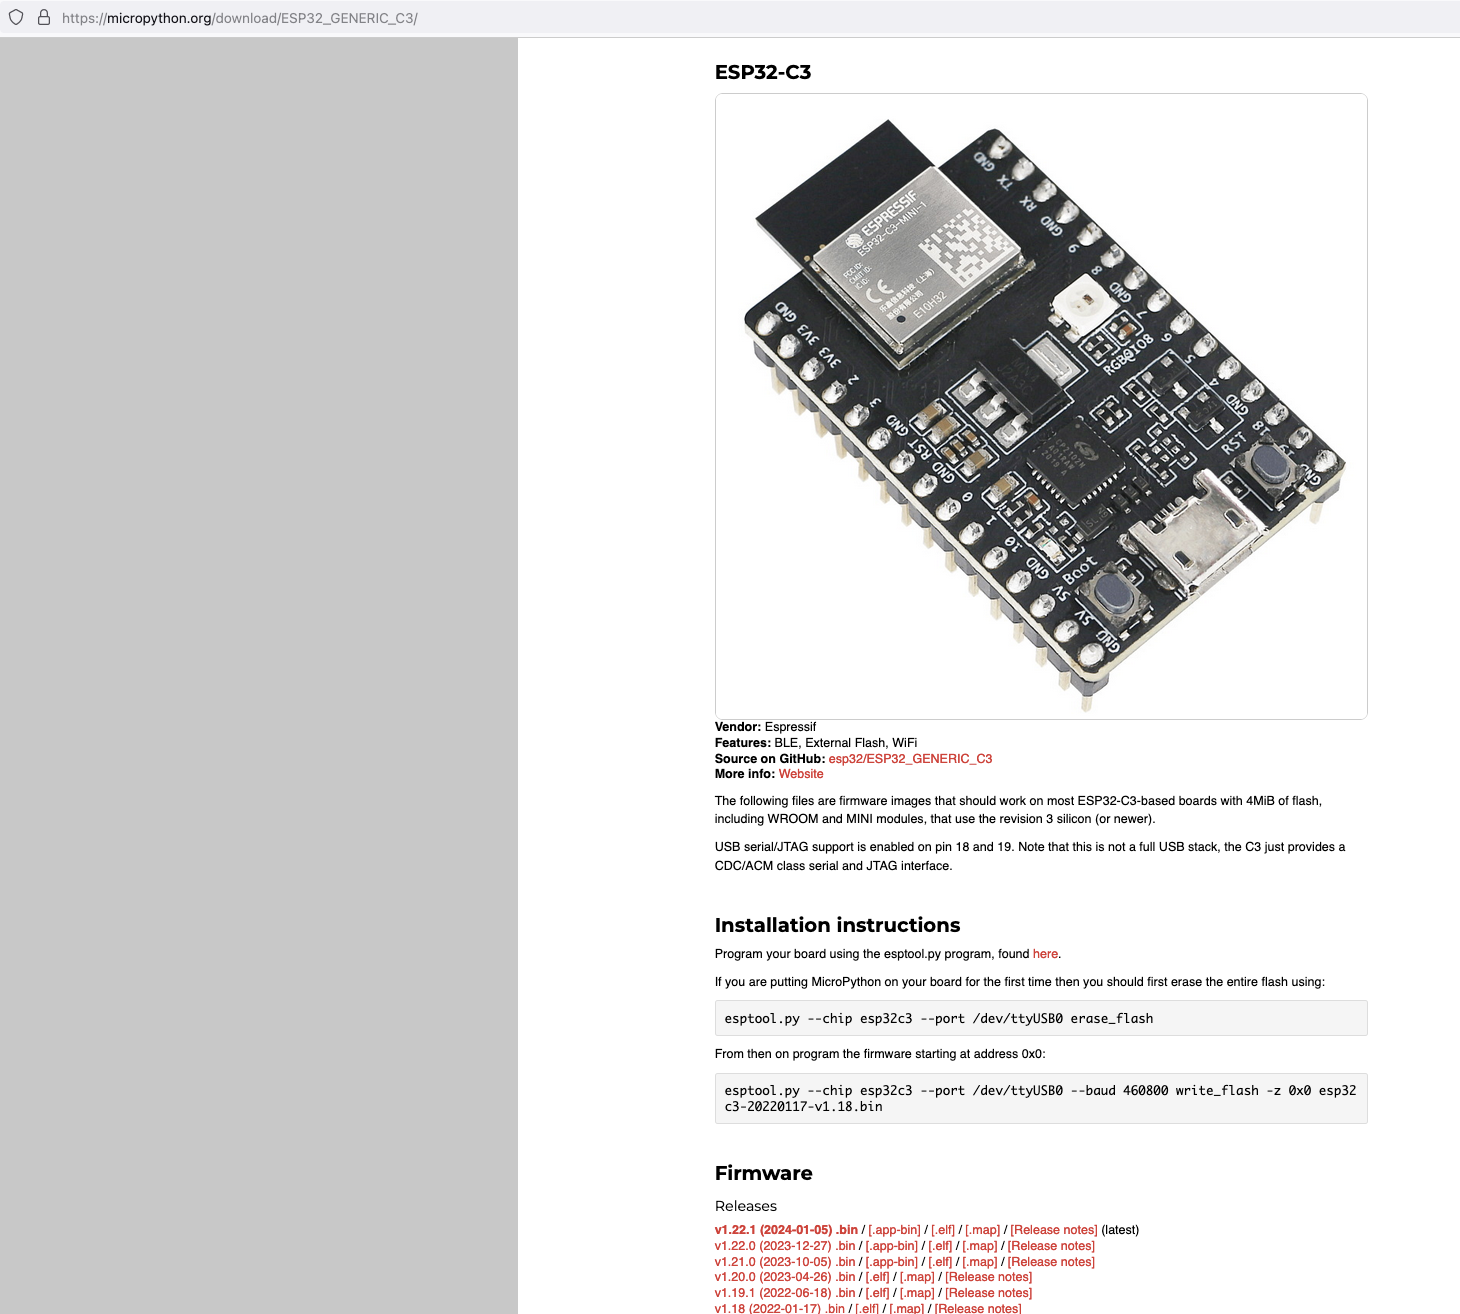
https://micropython.org/download/ESP32_GENERIC_C3/
Next, I connected my ESP32C3 to my Mac and ran the following command to find the name of the device port
/dev/ttyUSB0
![]()
My ESP32C3 is named "/dev/tty.usbmodem142401", the name for your ESP32C3 may be different.
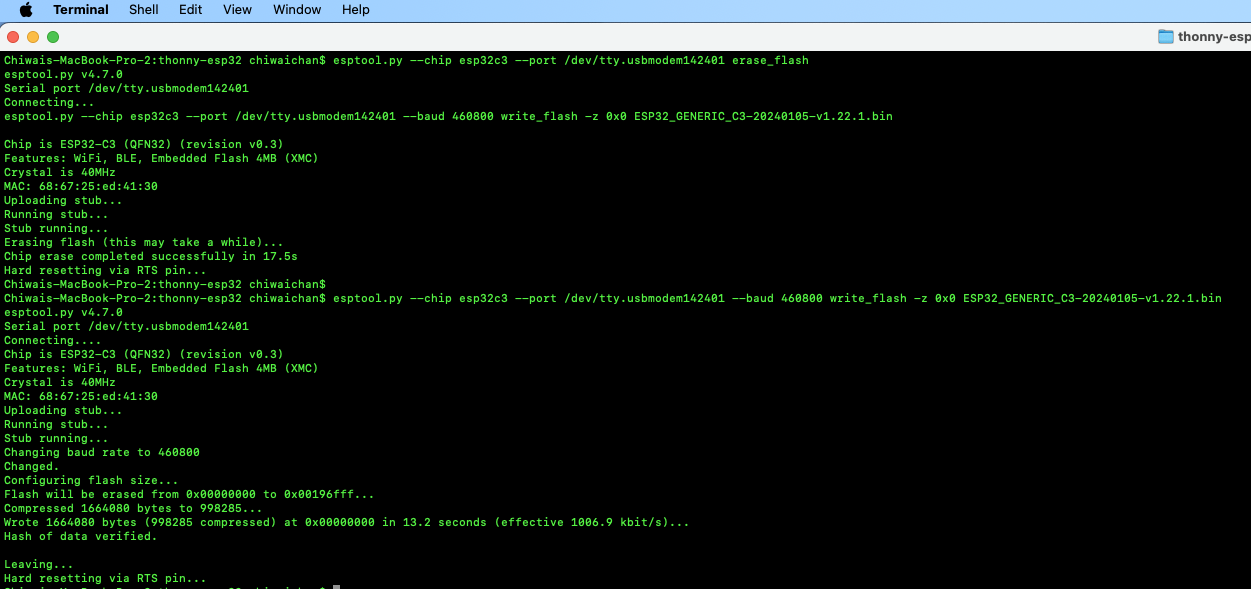
Next, install esptool onto your computer, then run the following commands to flash the MicroPython firmware onto the ESP32C3 using the bin file you've just downloaded.
esptool.py --chip esp32c3 --port /dev/tty.usbmodem142401 erase_flash

esptool.py --chip esp32c3 --port /dev/tty.usbmodem142401 --baud 460800 write_flash -z 0x0 ESP32_GENERIC_C3-20240105-v1.22.1.bin
It should look something like this when you run the commands.
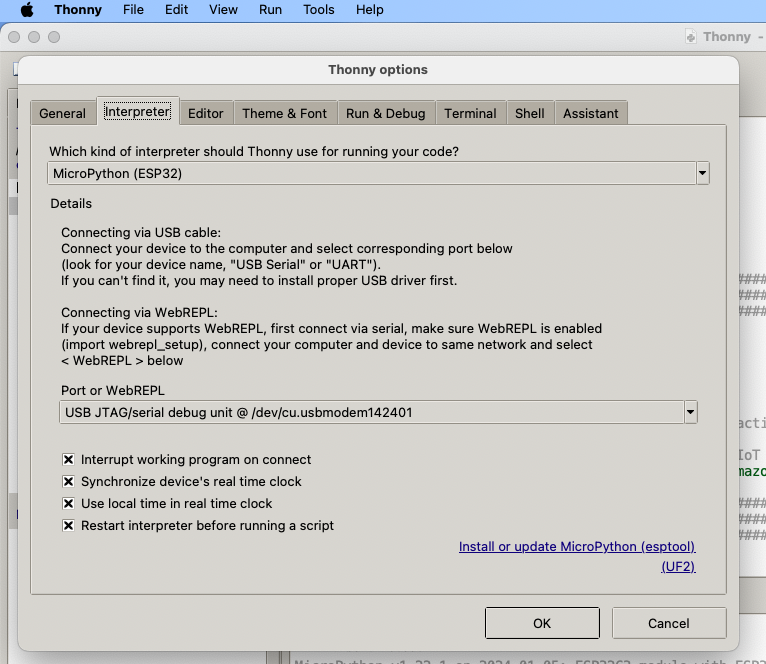
Install Thonny and run it. Then go to Tools -> Options, to configure the ESP32C3 device in Thonny to match the settings shown in the screenshot below.
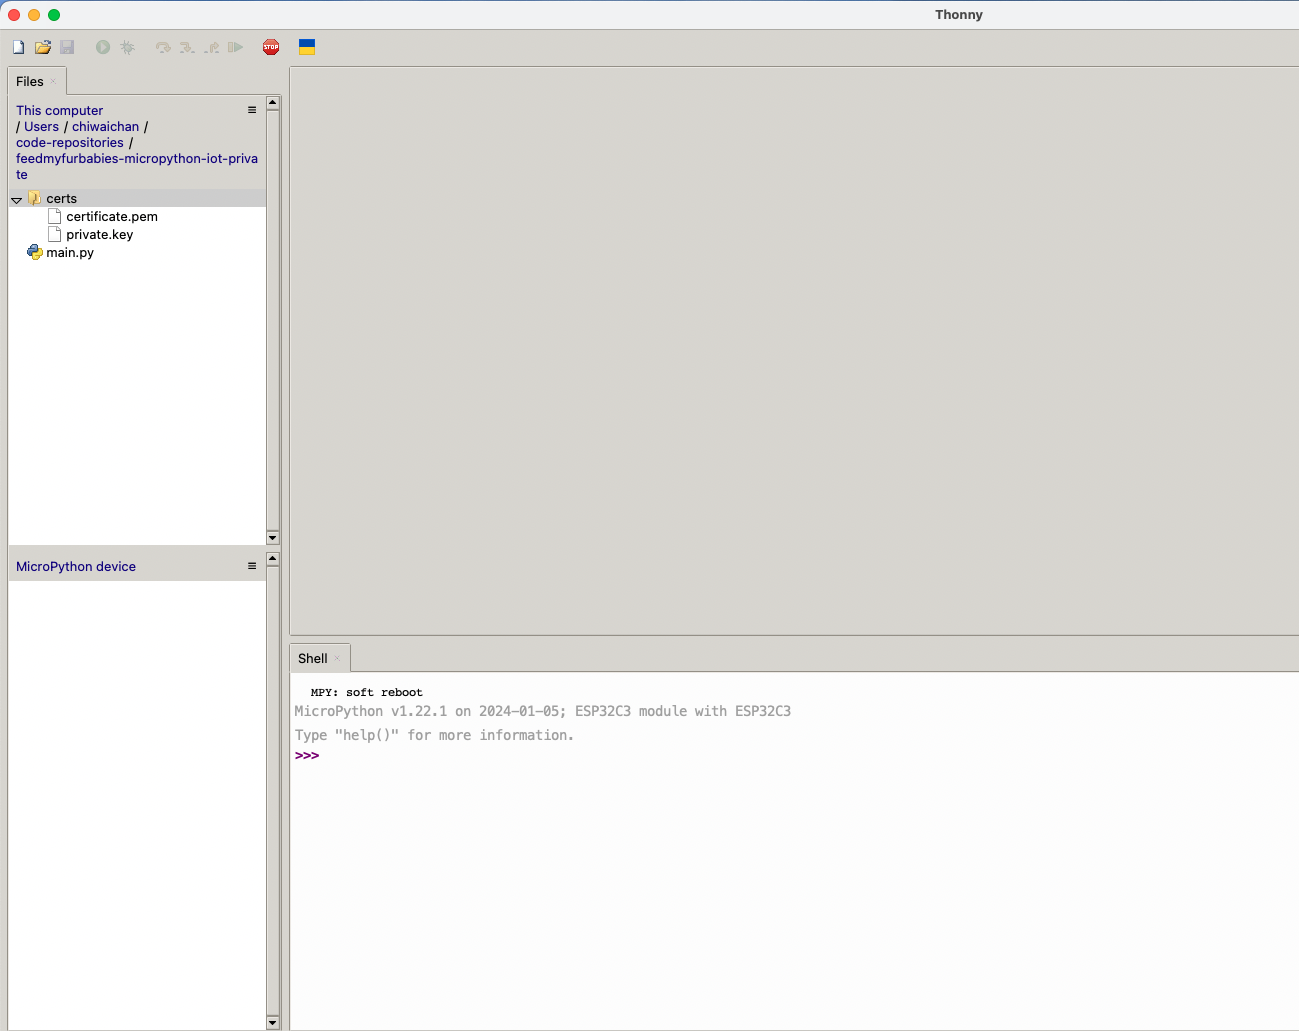
If everything went well, you should see these 2 sections in Thonny: "MicroPython Device" and "Shell", if not then try clicking on the Stop button in the top menu.
In order to send MQTT messages to an AWS IoT Core Topic, or to receive a message from a Topic in reverse, you will need a set of Certificate and Key\s for your micro-controller; as well as the AWS IoT Endpoint specific to your AWS Account and Region.
It's great if you have those with you so you can skip to the next section, if not, do not worry I've got you covered. In a past blog I have a reference architecture accompanied by a GitHub repository on how to deploy resources for an AWS IoT Core solution using AWS CDK, follow that blog to the end and you will have a set of Certificate and Key to use for this MicroPython example; the CDK Stack will deploy all the neccessary resources and policies in AWS IoT Core to enable you to both send and receive MQTT messages to two separate IoT Topics.
Reference AWS IoT Core Architecture: https://chiwaichan.co.nz/blog/2024/02/02/feedmyfurbabies-i-am-switching-to-aws-cdk/
Now lets upload the MicroPython code to your micro-controller and prepare the IoT Certificate and Key so we can use it to authenticate the micro-controller to enable it to send and receive MQTT messages between your micro-controller and IoT Core.
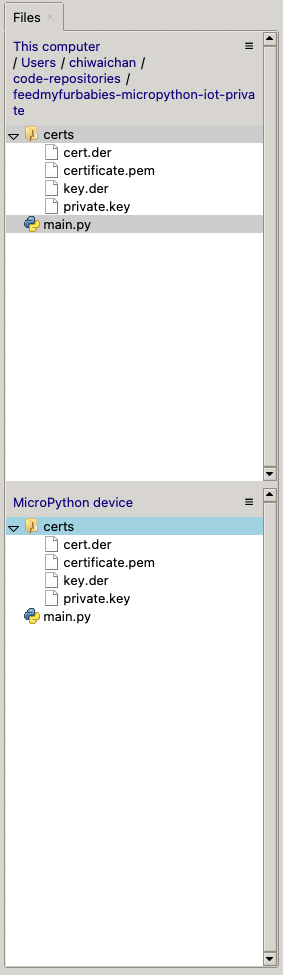
Clone my GitHub repository that contains the MicroPython example code to publish and receive MQTT message with AWS IoT Core: https://github.com/chiwaichan/feedmyfurbabies-micropython-iot
It should look something like this.
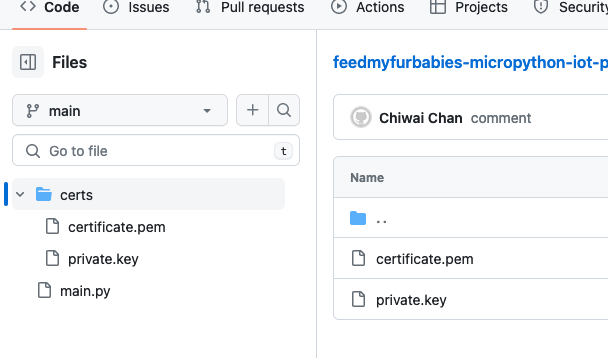
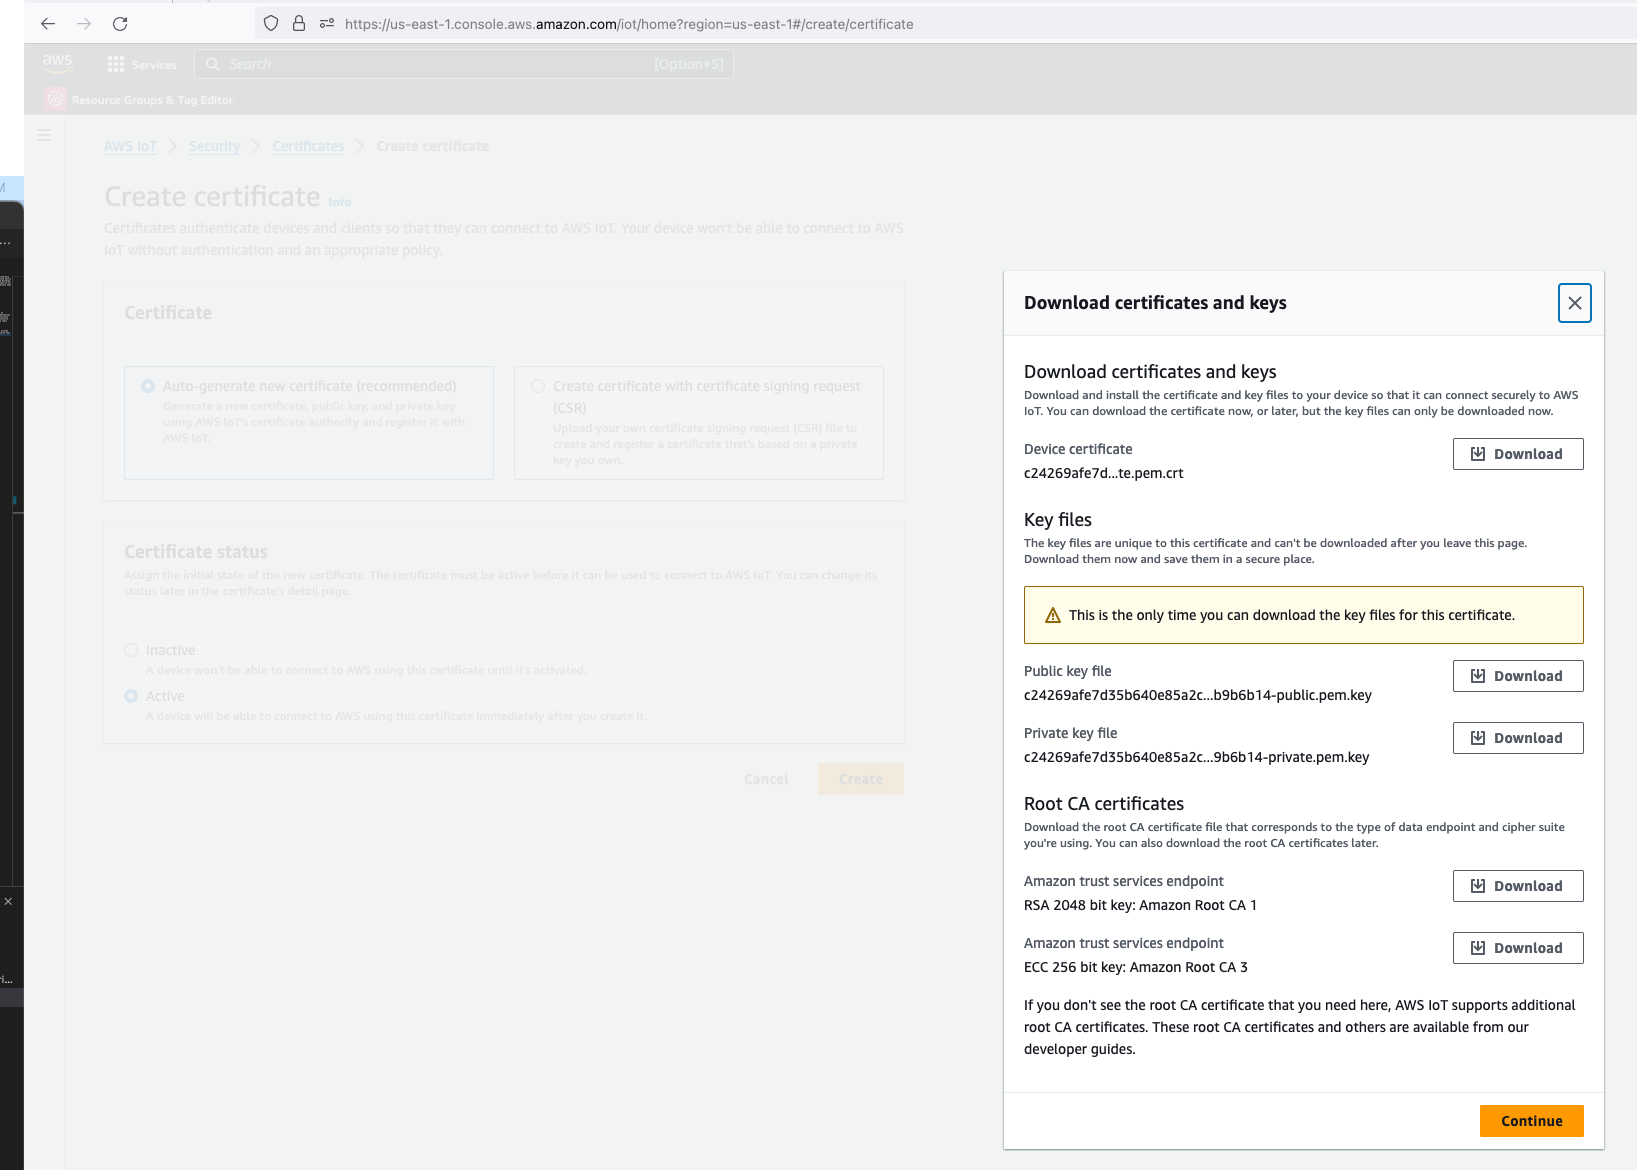
Copy your Certificate and Key into the respective files shown in the above screenshot; otherwise, if you are using the Certificate and Key from my reference architecture, then you should use the 2 Systems Manager Parameter Store values create by the CDK Stack.

Next we convert the Certificate and Key to DER format - converting the files to DER format turns it into a binary format and makes the files more compact, especially neccessary when we run use it on small devices like the ESP32s.
In a terminal go to the certs directory and run the following commands to convert the certificate.pem and private.key files into DER format.
openssl rsa -in private.key -out key.der -outform DER
openssl x509 -in certificate.pem -out cert.der -outform DER
You should see two new files with the DER extension appear in the directory if all goes well; if not, you probably need to install openssl.

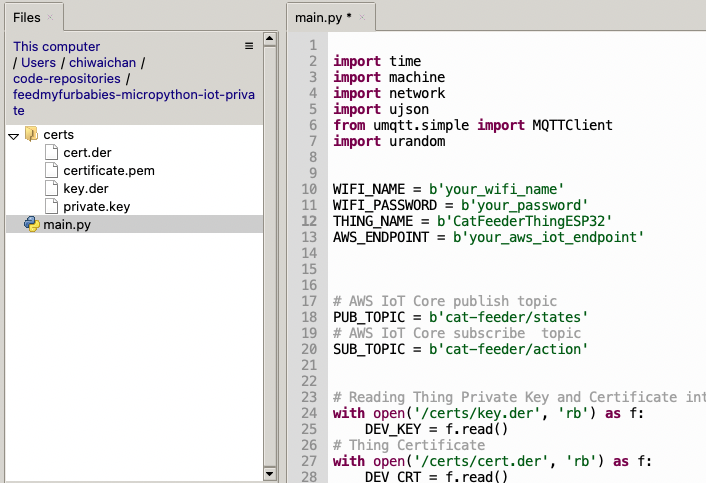
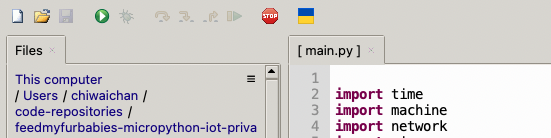
In Thonny, in the Files explorer, navigate to the GitHub repository's Root directory and open the main.py file. Fill in the values for the variables shown in the screenshot below to match your environment, if you are using my AWS CDK IoT referenece architecture then you are only required to fill in the WIFI details and the AWS IoT Endpoint specific to your AWS Account and Region.
Select both the certs folder and main.py in the Files explorer, then right click and select "Upload to /" to upload the code to your micro-controller; the files will appear in the "MicroPython Device" file explorer.
This is the moment we've been waiting for, lets run the main.py Python script by clicking on the Play Icon in green.
If all goes well you should see some output in the Shell section of Thonny.
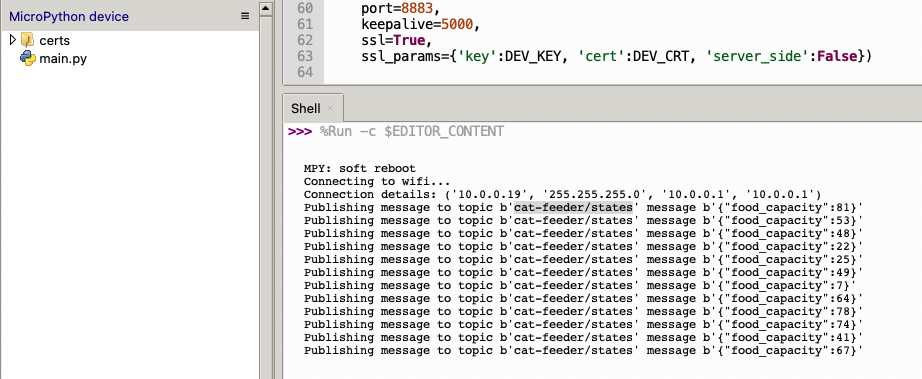
The code in the main.py file has a piece of code that is generating a random number for the food_capacity percentage property in the MQTT message; you can customise the message to fit your use case.
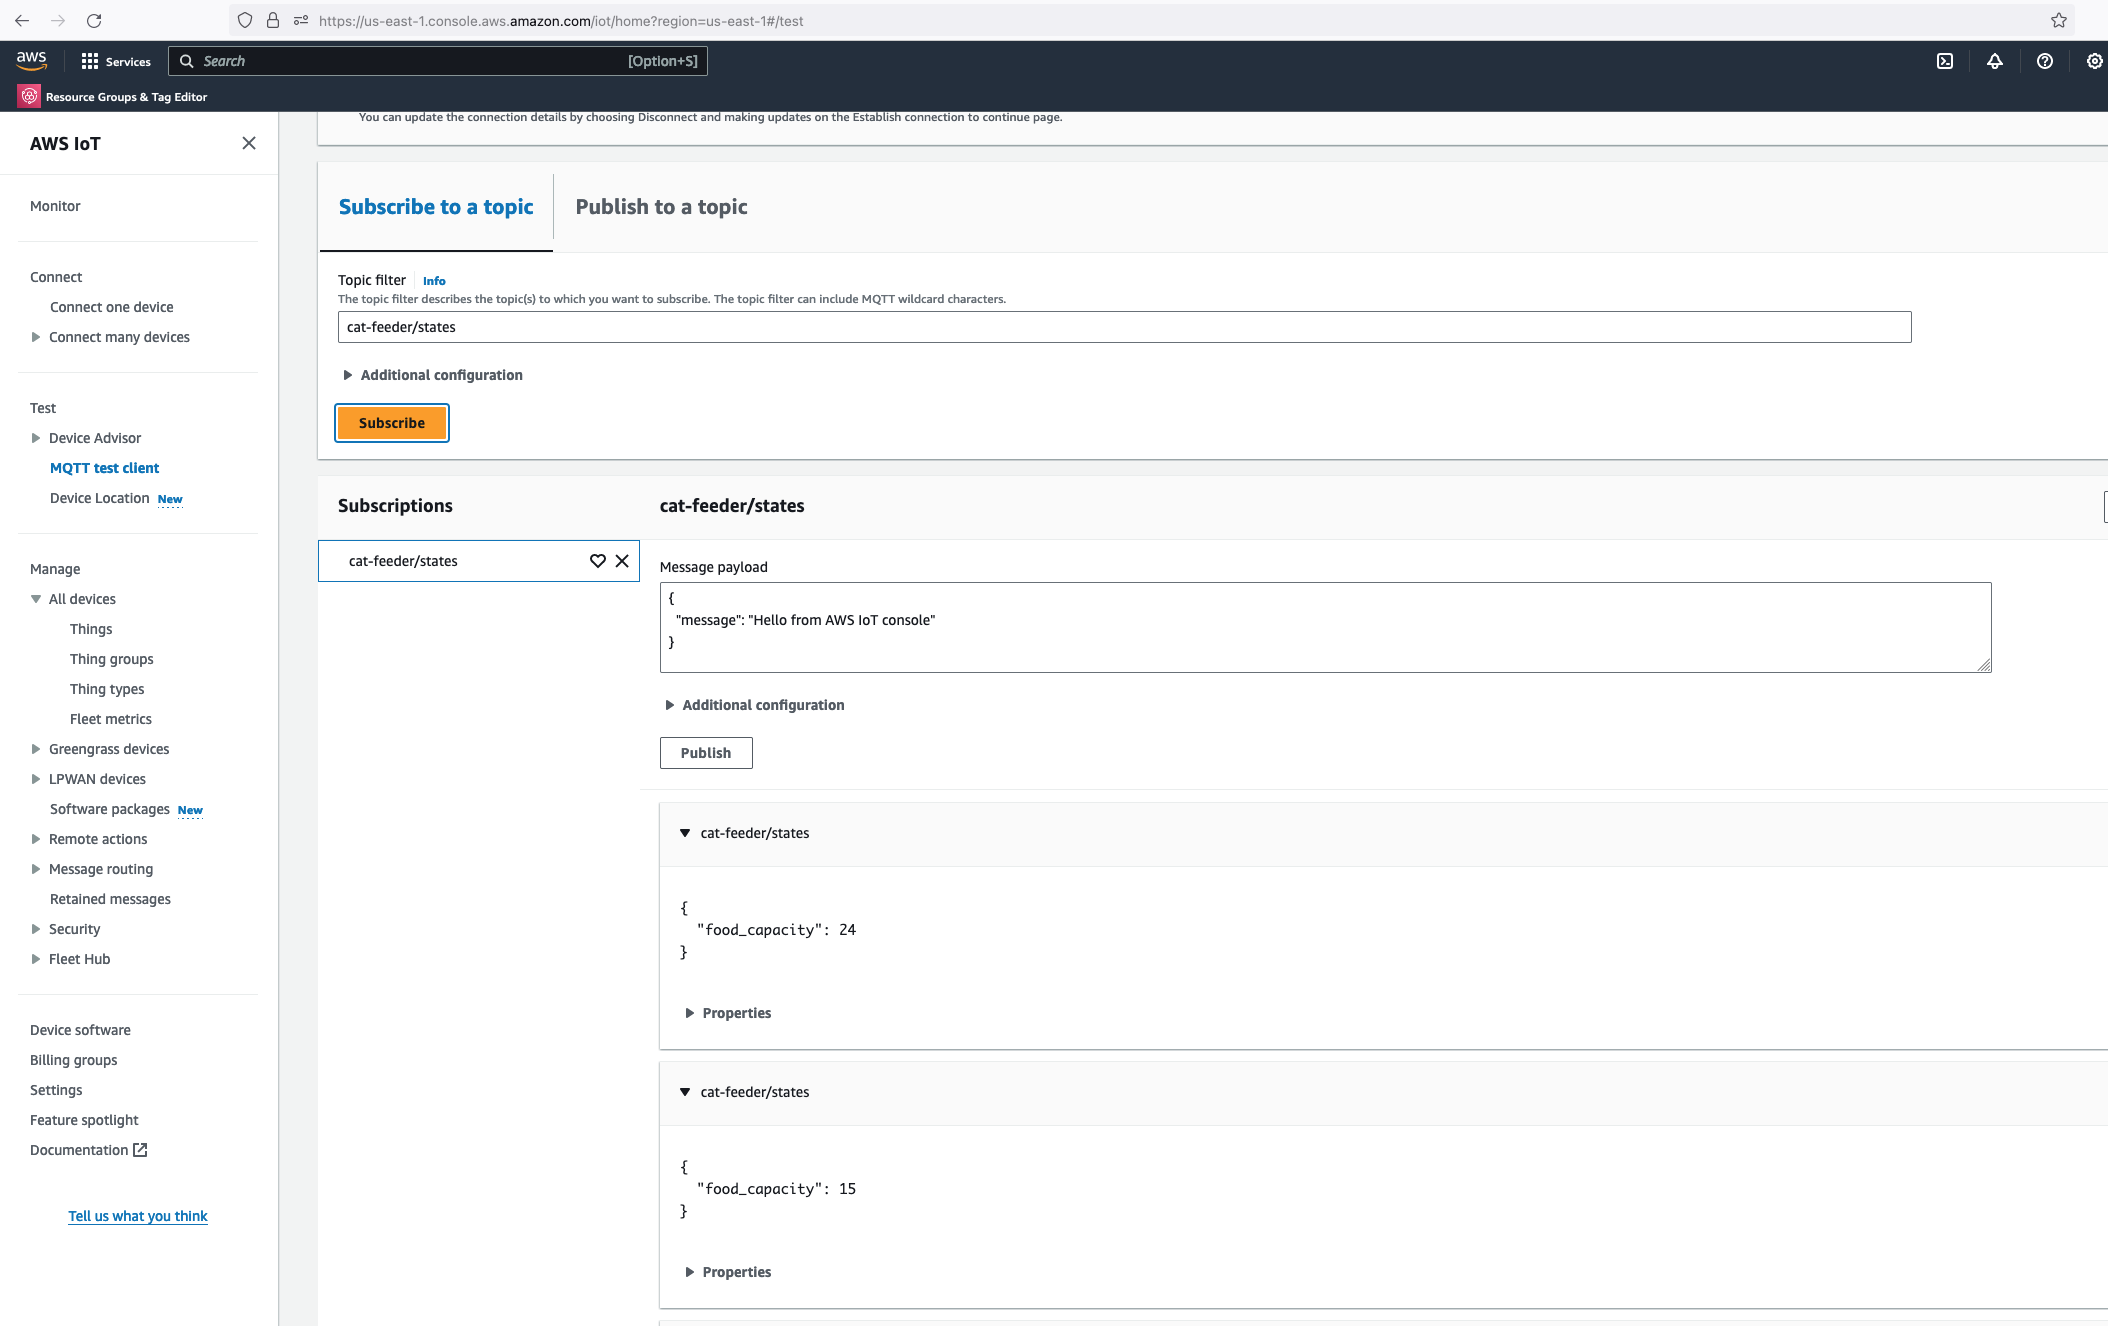
But lets verify it is actually received by AWS IoT Core.
Alright, lets go the other way and see if we can receive MQTT messages from AWS IoT Core using the other Topic called "cat-feeder/action" we subscribed to in the MicroPython code.
Lets go back the AWS Console and use the MQTT test client to publish a message.
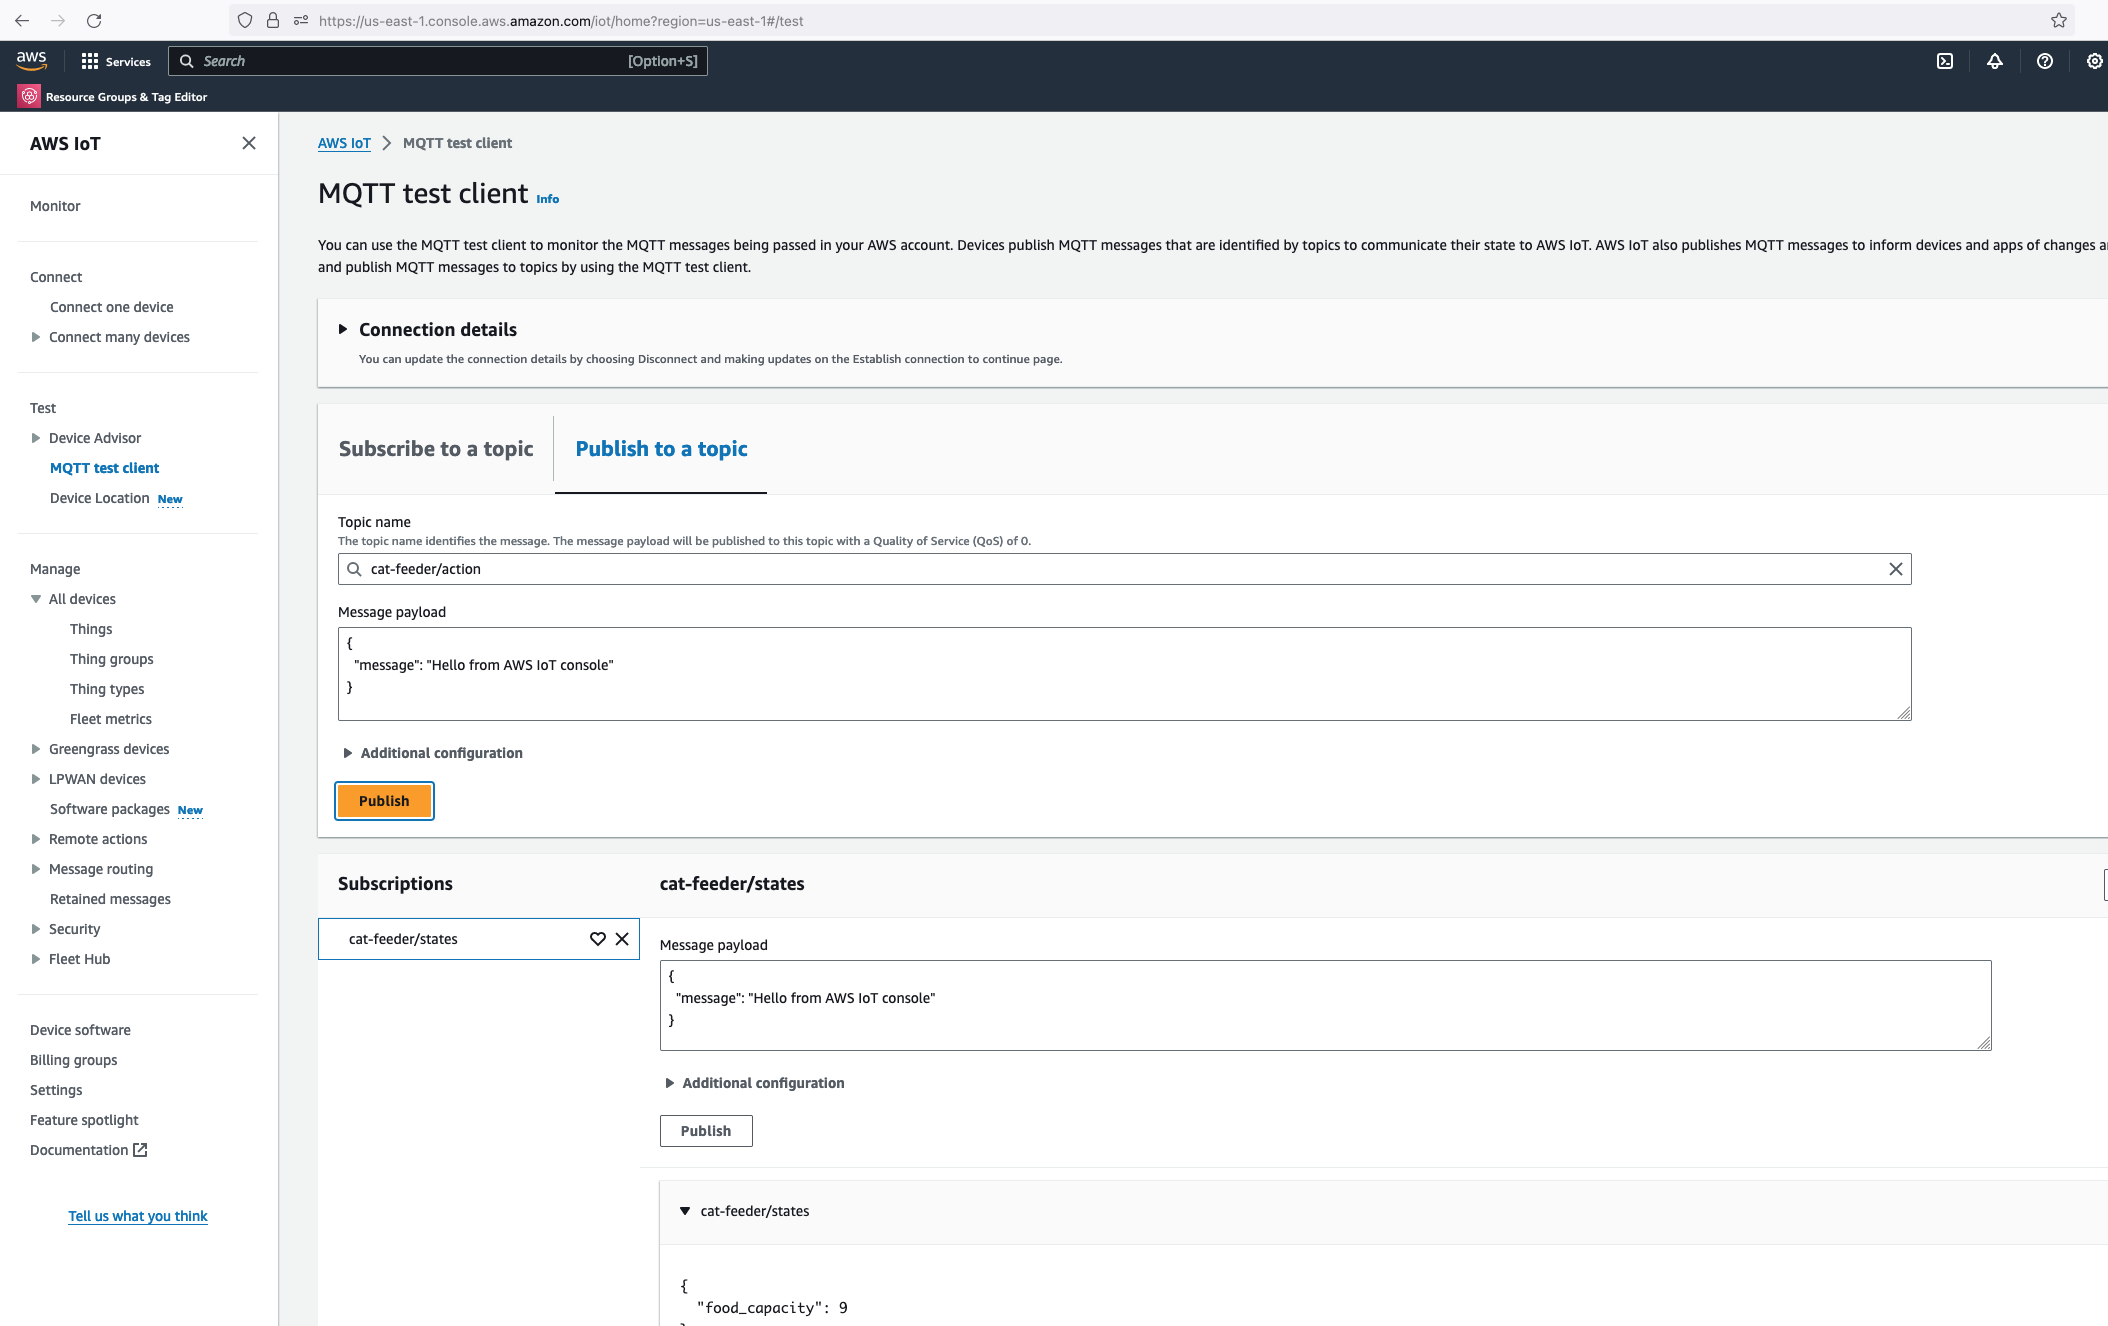
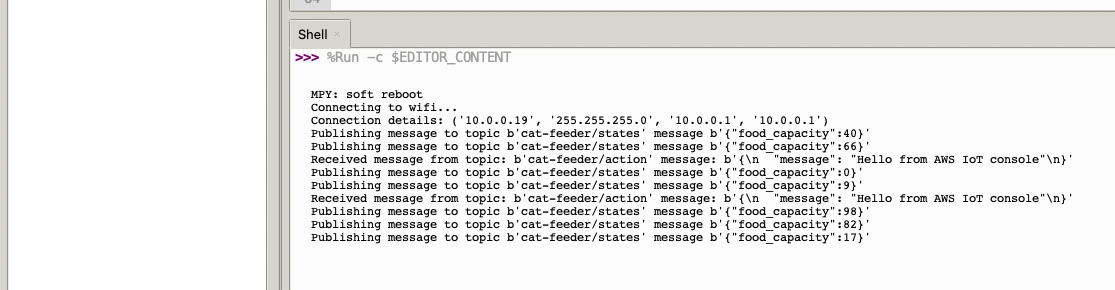
In the Thonny Shell we can see the message "Hello from AWS IoT console" sent from the AWS IoT Core side and it being received by the micro-controller.
In a previous blog I talked about switching from CloudFormation template to AWS CDK as my preference for infrastructure as code, for provisioning my AWS Core IoT resources; I mentioned at the time whilst using resources using AWS CDK, as it would improve my productivity to focus on iterating and building. Although I switched to CDK for the reasons I described in my previous blog, there are some CloudFormation limitations that cannot be addressed just by switching to CDK alone.
In this blog I will talk about CloudFormation Custom Resources:
CloudFormation Custom Resources allows you to write custom logic using AWS Lambda functions to provision resources, whether these resources live in AWS (you might ask why not just use CloudFormation or CDK: keep reading), on-premise or in other public clouds. These Custom Resource Lambda functions configured within a CloudFormation template, and are hooked into a CloudFormation Stack's lifecycle during the create, update and delete phases - to allow these lifecycle stages to happen, the logic must be implemented into the Lambda function's code.
In my AWS IoT Core reference architecture, it relies on use of two sets of certificates and private keys; they are used to authenticate each Thing devices connecting to AWS IoT Core - this ensures that only trusted devices can establish a connection.
In the CloudFormation template version of my reference architecture, I had in the deployement instructions to manually create 2 Cetificates in the AWS Console for the IoT Core service, this is because CloudFormation doesn't directly support creation of certificates for AWS IoT Core; as shown in the screenshot below.
There is nothing wrong with creating the certificates manually within the AWS Console when you are trying out my example for the purpose of learning, but it would best to be able to deploy an entire set of resources using infrastructure as code, so we can achieve consistent repeatable deployments with as minimal effort as possible. If you are someone completely new to AWS, coding and IoT, my deployment instructions would be very overwheling and the chances of you successfully deploying a fully functional example will be very unlikely.
If you got this far and actually read what was written up to this point, you probably would have guess the solution is Custom Resources: so lets talk about how the problem described above was solved.
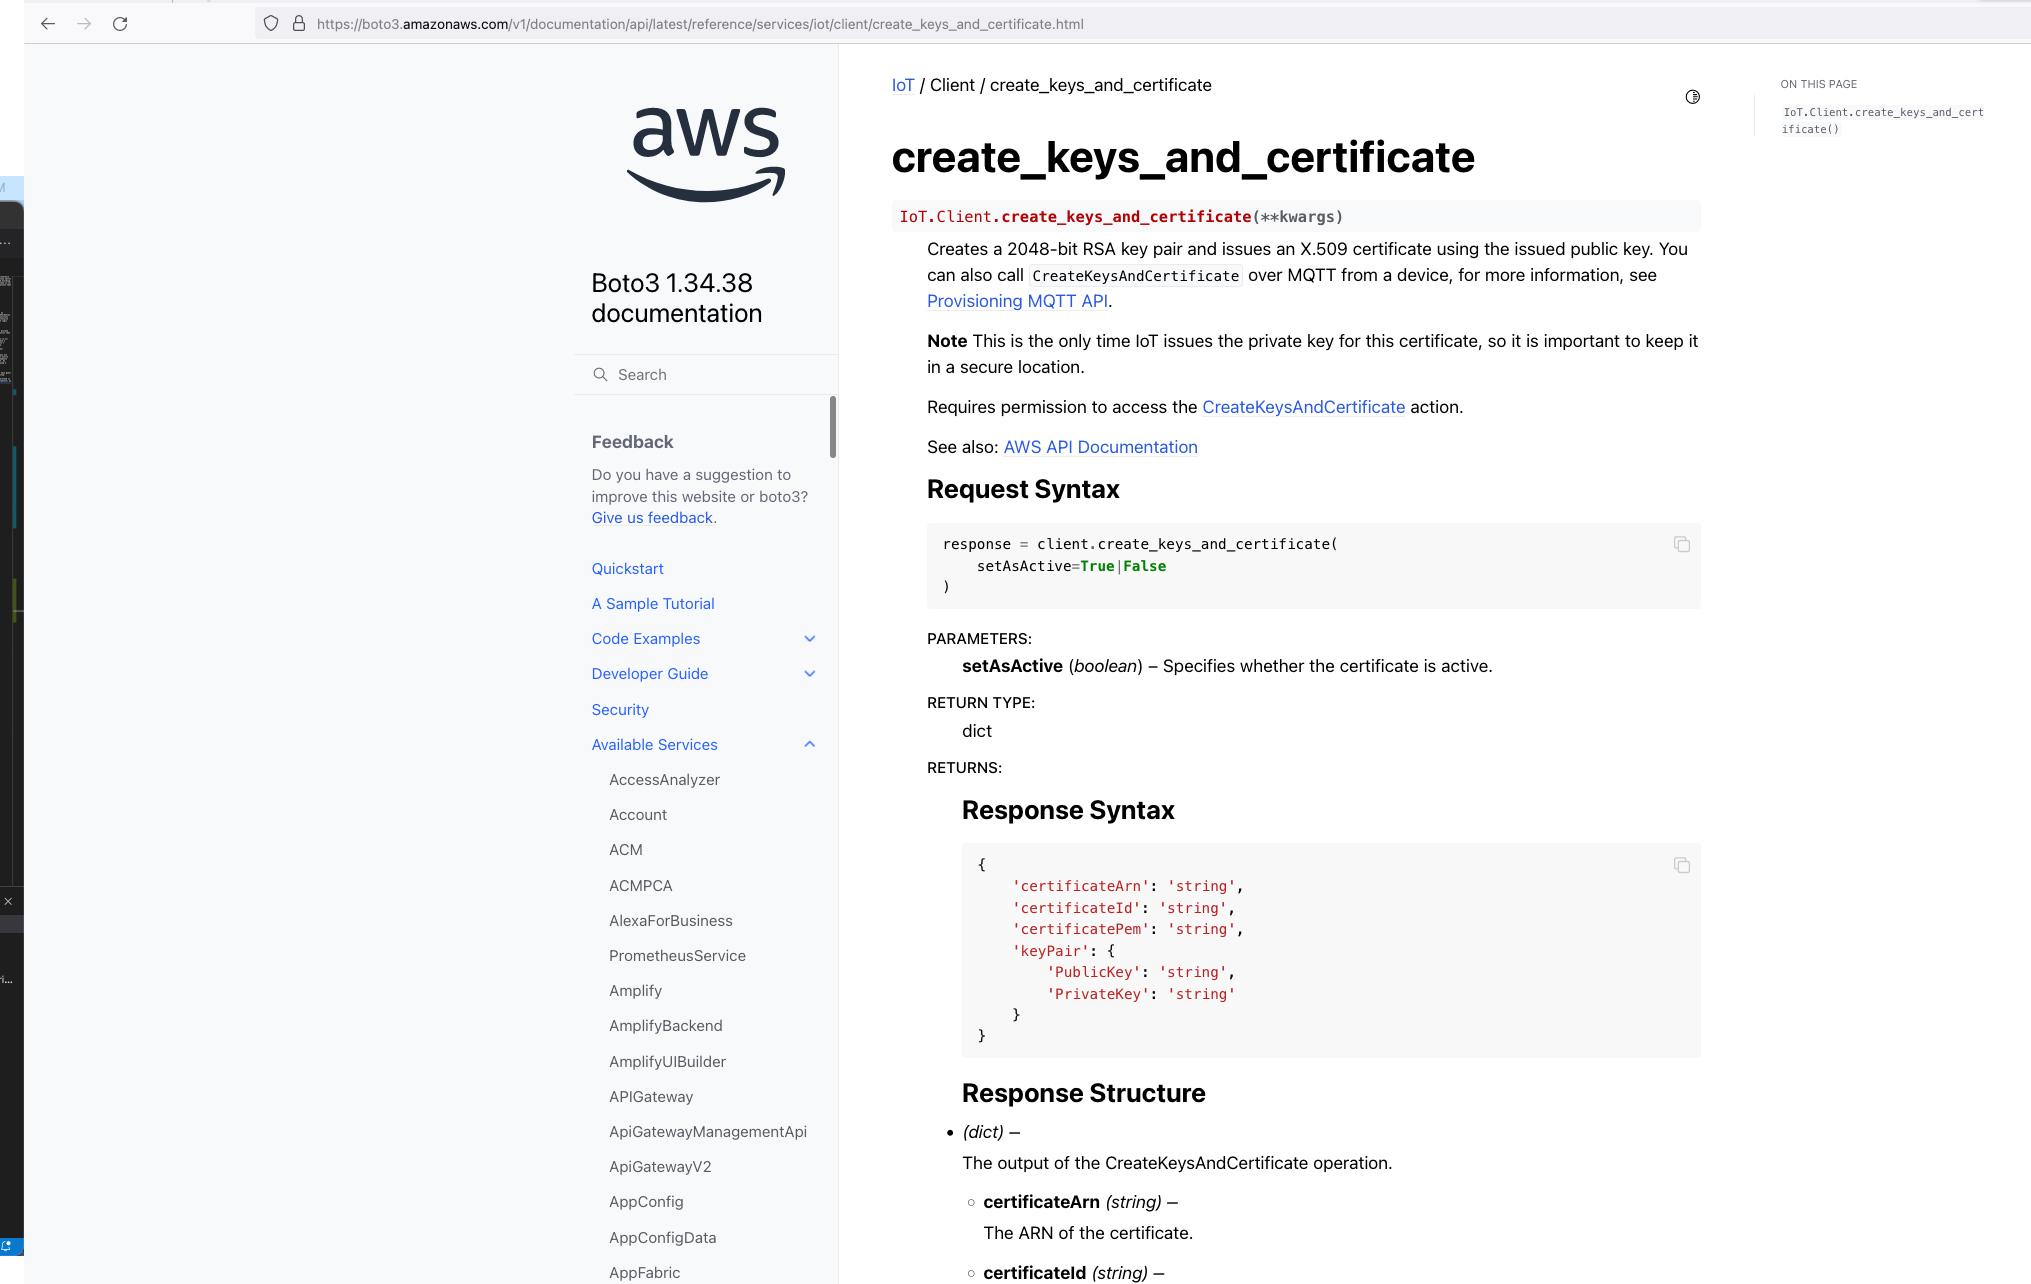
So we know Custom Resources is part of the solution, but one important thing we need to understand is that, even though there isn't the ability to create the certificates directly using CloudFormation, but there is support for creating the certificates using the AWS SDK Boto3 Python library: create_keys_and_certificate.
So essentially, we are able create the AWS IoT Core certificates using CloudFormation (in an indirectly way) but it requires the help of Custom Reources (a Lambda function) and the AWS Boto3 Python SDK.
The Python code below is what I have in the Custom Resource Lambada function, it demonstrates the use of the Boto3 SDK to create the AWS IoT Core Certificates; and as a bonus, I am leveraging the Lambda function to save the Certificates into the AWS Systems Manager Parameter Store, this makes it much more simplier by centralising the Certificates in a single location without the engineer deploying this reference architecture having to manually copying/pasting/managing the Certificates - as I have forced readers in my original version of this reference architecture deployment. The code below also manages the lifecycle of the Certificates as the CloudFormation Stacks are deleted, by deleting the Certificates it created during the create phase of the lifecycle.
The overall flow to create the certificates is: Create a CloudFormation Stack --> Invoke the Custom Resource --> invoke the Boto3 IoT "create_keys_and_certificate" API --> save the certificates in Systems Manager Parameter Store
import os
import sys
import json
import logging as logger
import requests
import boto3
from botocore.config import Config
from botocore.exceptions import ClientError

import time

logger.getLogger().setLevel(logger.INFO)


def get_aws_client(name):
    return boto3.client(
        name,
        config=Config(retries={"max_attempts": 10, "mode": "standard"}),
    )


def create_resources(thing_name: str, stack_name: str, encryption_algo: str):

    c_iot = get_aws_client("iot")
    c_ssm = get_aws_client("ssm")

    result = {}

    # Download the Amazon Root CA file and save it to Systems Manager Parameter Store
    url = "https://www.amazontrust.com/repository/AmazonRootCA1.pem"
    response = requests.get(url)

    if response.status_code == 200:
        amazon_root_ca = response.text
    else:
        f"Failed to download Amazon Root CA file. Status code: {response.status_code}"


    try:
        # Create the keys and certificate for a thing and save them each as Systems Manager Parameter Store value later
        response = c_iot.create_keys_and_certificate(setAsActive=True)
        certificate_pem = response["certificatePem"]
        private_key = response["keyPair"]["PrivateKey"]
        result["CertificateArn"] = response["certificateArn"]
    except ClientError as e:
        logger.error(f"Error creating certificate, {e}")
        sys.exit(1)

    # store certificate and private key in SSM param store
    try:
        parameter_private_key = f"/{stack_name}/{thing_name}/private_key"
        parameter_certificate_pem = f"/{stack_name}/{thing_name}/certificate_pem"
        parameter_amazon_root_ca = f"/{stack_name}/{thing_name}/amazon_root_ca"

        # Saving the private key in Systems Manager Parameter Store
        response = c_ssm.put_parameter(
            Name=parameter_private_key,
            Description=f"Certificate private key for IoT thing {thing_name}",
            Value=private_key,
            Type="SecureString",
            Tier="Advanced",
            Overwrite=True
        )
        result["PrivateKeySecretParameter"] = parameter_private_key

        # Saving the certificate pem in Systems Manager Parameter Store
        response = c_ssm.put_parameter(
            Name=parameter_certificate_pem,
            Description=f"Certificate PEM for IoT thing {thing_name}",
            Value=certificate_pem,
            Type="String",
            Tier="Advanced",
            Overwrite=True
        )
        result["CertificatePemParameter"] = parameter_certificate_pem

        # Saving the Amazon Root CA in Systems Manager Parameter Store,
        # Although this file is publically available to download, it is intended to provide a complete set of files to try out this working example with as much ease as possible
        response = c_ssm.put_parameter(
            Name=parameter_amazon_root_ca,
            Description=f"Amazon Root CA for IoT thing {thing_name}",
            Value=amazon_root_ca,
            Type="String",
            Tier="Advanced",
            Overwrite=True
        )
        result["AmazonRootCAParameter"] = parameter_amazon_root_ca
    except ClientError as e:
        logger.error(f"Error creating secure string parameters, {e}")
        sys.exit(1)

    try:
        response = c_iot.describe_endpoint(endpointType="iot:Data-ATS")
        result["DataAtsEndpointAddress"] = response["endpointAddress"]
    except ClientError as e:
        logger.error(f"Could not obtain iot:Data-ATS endpoint, {e}")
        result["DataAtsEndpointAddress"] = "stack_error: see log files"

    return result

# Delete the resources created for a thing when the CloudFormation Stack is deleted
def delete_resources(thing_name: str, certificate_arn: str, stack_name: str):
    c_iot = get_aws_client("iot")
    c_ssm = get_aws_client("ssm")

    try:
        # Delete all the Systems Manager Parameter Store values created to store a thing's certificate files
        parameter_private_key = f"/{stack_name}/{thing_name}/private_key"
        parameter_certificate_pem = f"/{stack_name}/{thing_name}/certificate_pem"
        parameter_amazon_root_ca = f"/{stack_name}/{thing_name}/amazon_root_ca"
        c_ssm.delete_parameters(Names=[parameter_private_key, parameter_certificate_pem, parameter_amazon_root_ca])
    except ClientError as e:
        logger.error(f"Unable to delete parameter store values, {e}")

    try:
        # Clean up the certificate by firstly revoking it then followed by deleting it
        c_iot.update_certificate(certificateId=certificate_arn.split("/")[-1], newStatus="REVOKED")
        c_iot.delete_certificate(certificateId=certificate_arn.split("/")[-1])
    except ClientError as e:
        logger.error(f"Unable to delete certificate {certificate_arn}, {e}")


def handler(event, context):
    props = event["ResourceProperties"]
    physical_resource_id = ""


    try:
        # Check if this is a Create and we're failing Creates
        if event["RequestType"] == "Create" and event["ResourceProperties"].get(
            "FailCreate", False
        ):
            raise RuntimeError("Create failure requested, logging")
        elif event["RequestType"] == "Create":
            logger.info("Request CREATE")

            resp_lambda = create_resources(
                thing_name=props["CatFeederThingLambdaCertName"],
                stack_name=props["StackName"],
                encryption_algo=props["EncryptionAlgorithm"]
            )

            resp_controller = create_resources(
                thing_name=props["CatFeederThingControllerCertName"],
                stack_name=props["StackName"],
                encryption_algo=props["EncryptionAlgorithm"]
            )

            # The values in the response_data could be used in the CDK code, for example used as Outputs for the CloudFormation Stack deployed
            response_data = {
                "CertificateArnLambda": resp_lambda["CertificateArn"],
                "PrivateKeySecretParameterLambda": resp_lambda["PrivateKeySecretParameter"],
                "CertificatePemParameterLambda": resp_lambda["CertificatePemParameter"],
                "AmazonRootCAParameterLambda": resp_lambda["AmazonRootCAParameter"],
                "CertificateArnController": resp_controller["CertificateArn"],
                "PrivateKeySecretParameterController": resp_controller["PrivateKeySecretParameter"],
                "CertificatePemParameterController": resp_controller["CertificatePemParameter"],
                "AmazonRootCAParameterController": resp_controller["AmazonRootCAParameter"],
                "DataAtsEndpointAddress": resp_lambda[
                    "DataAtsEndpointAddress"
                ],
            }

            # Using the ARNs of the pairs of certificates created as the PhysicalResourceId used by Custom Resource
            physical_resource_id = response_data["CertificateArnLambda"] + "," + response_data["CertificateArnController"]
        elif event["RequestType"] == "Update":
            logger.info("Request UPDATE")
            response_data = {}
            physical_resource_id = event["PhysicalResourceId"]
        elif event["RequestType"] == "Delete":
            logger.info("Request DELETE")

            certificate_arns = event["PhysicalResourceId"]
            certificate_arns_array = certificate_arns.split(",")

            resp_lambda = delete_resources(
                thing_name=props["CatFeederThingLambdaCertName"],
                certificate_arn=certificate_arns_array[0],
                stack_name=props["StackName"],
            )

            resp_controller = delete_resources(
                thing_name=props["CatFeederThingControllerCertName"],
                certificate_arn=certificate_arns_array[1],
                stack_name=props["StackName"],
            )
            response_data = {}
            physical_resource_id = certificate_arns
        else:
            logger.info("Should not get here in normal cases - could be REPLACE")

        send_cfn_response(event, context, "SUCCESS", response_data, physical_resource_id)
    except Exception as e:
        logger.exception(e)
        sys.exit(1)


def send_cfn_response(event, context, response_status, response_data, physical_resource_id):
    response_body = json.dumps({
        "Status": response_status,
        "Reason": "See the details in CloudWatch Log Stream: " + context.log_stream_name,
        "PhysicalResourceId": physical_resource_id,
        "StackId": event['StackId'],
        "RequestId": event['RequestId'],
        "LogicalResourceId": event['LogicalResourceId'],
        "Data": response_data
    })

    headers = {
        'content-type': '',
        'content-length': str(len(response_body))
    }

    requests.put(event['ResponseURL'], data=response_body, headers=headers)
What I am about to describe in this section can also be applied to a regular CloudFormation template, as a matter of fact, CDK will generate a CloudFormation template behind the scenes during the Synth phase of the CDK code in the latest version of my IoT Core reference architecture implemented using AWS CDK: https://chiwaichan.co.nz/blog/2024/02/02/feedmyfurbabies-i-am-switching-to-aws-cdk/
If you want to get straight into deploying the CDK version of reference architecture, go here: https://github.com/chiwaichan/feedmyfurbabies-cdk-iot
In my CDK code, I provision the Custom Resource lambda function and the associated IAM Roles and Polices using the Python code below. The line of code "code=lambda_.Code.from_asset("lambdas/custom-resources/iot")" loads the Custom Resource Lambda function code shown earlier.
# IAM Role for Lambda Function
        custom_resource_lambda_role = iam.Role(
            self, "CustomResourceExecutionRole",
            assumed_by=iam.ServicePrincipal("lambda.amazonaws.com")
        )

        # IAM Policies
        iot_policy = iam.PolicyStatement(
            actions=[
                "iot:CreateCertificateFromCsr",
                "iot:CreateKeysAndCertificate",
                "iot:DescribeEndpoint",
                "iot:AttachPolicy",
                "iot:DetachPolicy",
                "iot:UpdateCertificate",
                "iot:DeleteCertificate"
            ],
            resources=["*"]  # Modify this to restrict to specific secrets
        )

        # IAM Policies
        ssm_policy = iam.PolicyStatement(
            actions=[
                "ssm:PutParameter",
                "ssm:DeleteParameters"
            ],
            resources=[f"arn:aws:ssm:{self.region}:{self.account}:parameter/*"]  # Modify this to restrict to specific secrets
        )

        logging_policy = iam.PolicyStatement(
            actions=[
                "logs:CreateLogGroup",
                "logs:CreateLogStream",
                "logs:PutLogEvents"
            ],
            resources=["arn:aws:logs:*:*:*"]
        )

        custom_resource_lambda_role.add_to_policy(iot_policy)
        custom_resource_lambda_role.add_to_policy(ssm_policy)
        custom_resource_lambda_role.add_to_policy(logging_policy)

        # Define the Lambda function
        custom_lambda = lambda_.Function(
            self, 'CustomResourceLambdaIoT',
            runtime=lambda_.Runtime.PYTHON_3_8,
            handler="app.handler",
            code=lambda_.Code.from_asset("lambdas/custom-resources/iot"),
            timeout=Duration.seconds(60),
            role=custom_resource_lambda_role
        )


        # Properties to pass to the custom resource
        custom_resource_props = {
            "EncryptionAlgorithm": "ECC",
            "CatFeederThingLambdaCertName": f"{cat_feeder_thing_lambda_name.value_as_string}",
            "CatFeederThingControllerCertName": f"{cat_feeder_thing_controller_name.value_as_string}",
            "StackName": f"{construct_id}",
        }

        # Create the Custom Resource
        custom_resource = CustomResource(
            self, 'CustomResourceIoT',
            service_token=custom_lambda.function_arn,
            properties=custom_resource_props
        )
When you execute a "cdk deploy" using the CLI on the CDK reference architecture, CDK will synthesize from the Python CDK code, a CloudFormation template, and then create a CloudFormation Stack using the synthesized CloudFormation template for you.
For more details on the CDK AWS IoT reference architecture and deployment instructions, please visit my blog: https://chiwaichan.co.nz/blog/2024/02/02/feedmyfurbabies-i-am-switching-to-aws-cdk/
I have been a bit slack on this Cat Feeder IoT project for the last 12 months or so; there have been many challenges I've faced during that time that prevented me from materialising the ideas I had - many of them sounded a little crazy if you've had a conversation with me in passing, but they are not crazy to me in my crazy mind as I know what I ramble about is technically doable.
Examples of the technical related challenges I had were:
CloudFormation: the initial version of this project was implemented using CloudFormation for the IaC, here is the repository containing both the code and deployment instructions. If you read the deployment instructions, you will notice there are a lot of manual steps required - e.g. creating 2 sets of certificates in AWS Iot Core in the AWS Console; and copying and pasting values to and from the CloudFormation Parameters and Outputs, even though at the time I made my best efforts to minimise the manual effort required while coding them. It was not a good example to get it up and running especially if you are new to AWS, Arduino or IoT; as I myself struggled at times to deploy my own example.
Terraform: I ported the CloudFormation IaC code to Terraform some time last year, you can find it here. Nothing is wrong with Terraform itself; I just keep forgetting to save or misplaced my terraform state files every time I resume this project. In reality I might leverage both Terraform and CDK for the projects/micro-services I create in the future, but it all really depends on what I am trying to achieve at the end of the day.
So, the commands below are the deployment instructions taken from the AWS CDK version of this project, you can find it here: https://github.com/chiwaichan/feedmyfurbabies-cdk-iot
git clone git@github.com:chiwaichan/feedmyfurbabies-cdk-iot.git
cdk feedmyfurbabies-cdk-iot
cdk deploy

git remote rm origin
git remote add origin https://git-codecommit.us-east-1.amazonaws.com/v1/repos/feedmyfurbabies-cdk-iot-FeedMyFurBabiesCodeCommitRepo
git push --set-upstream origin main
The commands above are all you need to execute in order to deploy the Cat Feeder project in CDK - assuming you have the AWS CDK and your AWS credentials configured on the machine you are calling these commands on; the first group of commands checks out the CDK code which deploys an AWS CodeCommit repository and a CodePipeline pipeline - creates the 1st CloudFormation Stack using a CloudFormation template; and the second group of commands pushes the CDK code into the newly created CodeCommit repository created in the first group of commands, which in turns trigger an execution in CodePipeline and the pipeline deploys the resources for this Cat Feeder IoT project - creates the 2nd CloudFormation Stack using a different CloudFormation template.
The two groups of commands creates the 2 CloudFormation Stacks shown in the screenshot below, the stack "feedmyfurbabies-cdk-iot" provisions the CodeCommit repository and CodePipeline - using the 1st CloudFormation template, and the stack "Deploy-feedmyfurbabies-cdk-iot-deployed-service" provisions the resources for this Cat Feeder IoT project - using the 2nd CloudFormation template.
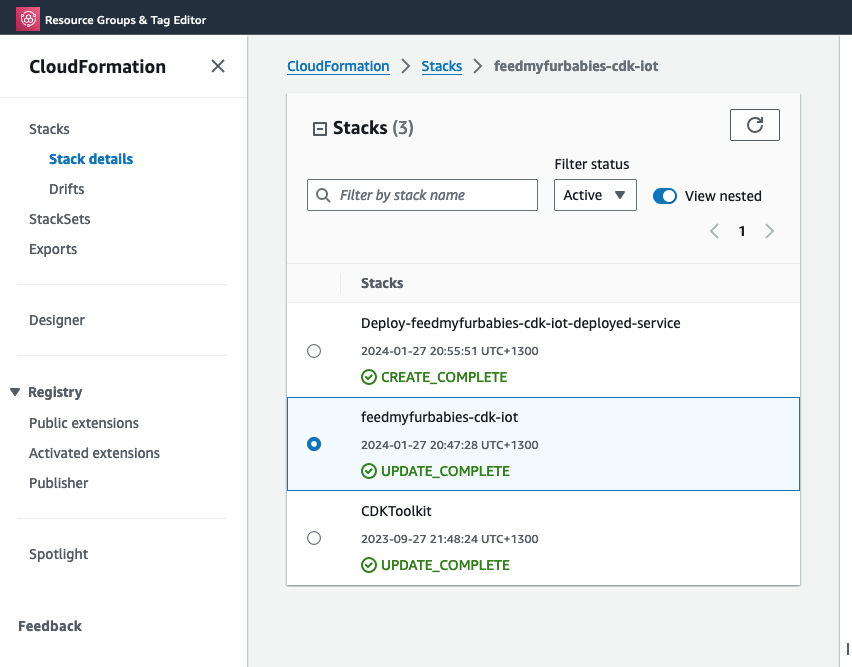
FYI, I did not come up with the pattern I just described above that deployed the two CloudFormation Stacks: one for the pipeline and the other for the AWS resources for this Cat Feeder IoT project; I only came across it during one of those AWS online workshops I was using to learn CDK and noticed this pattern and found it useful, and pretty much decided to adopt it for my projects going forward.
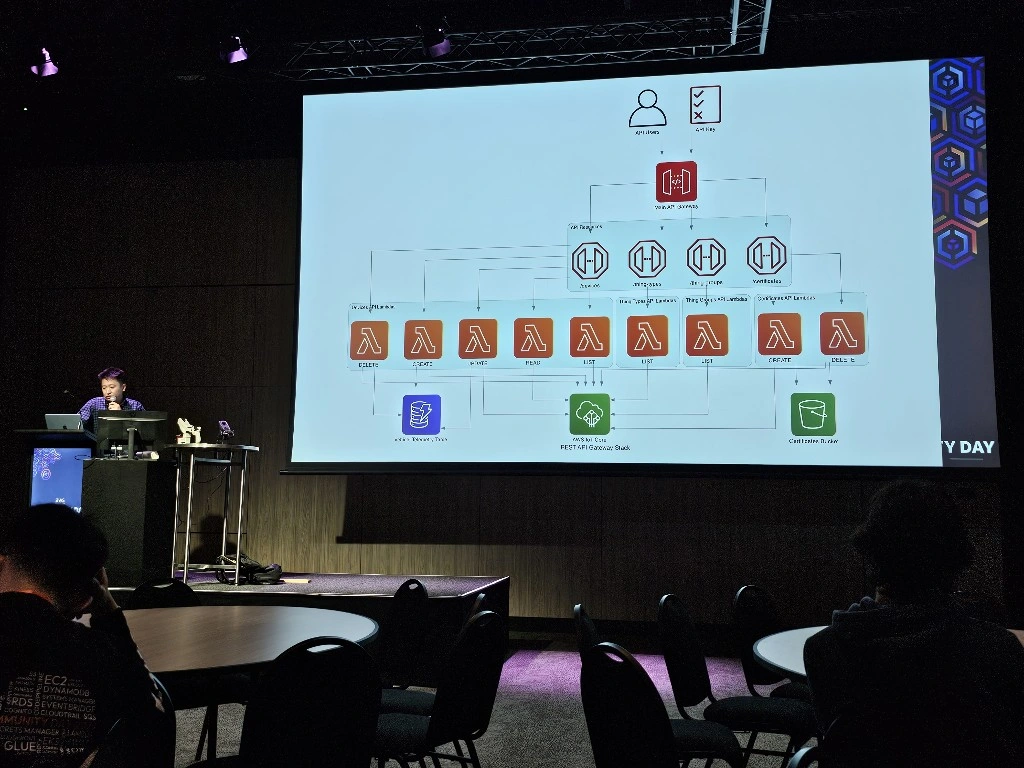
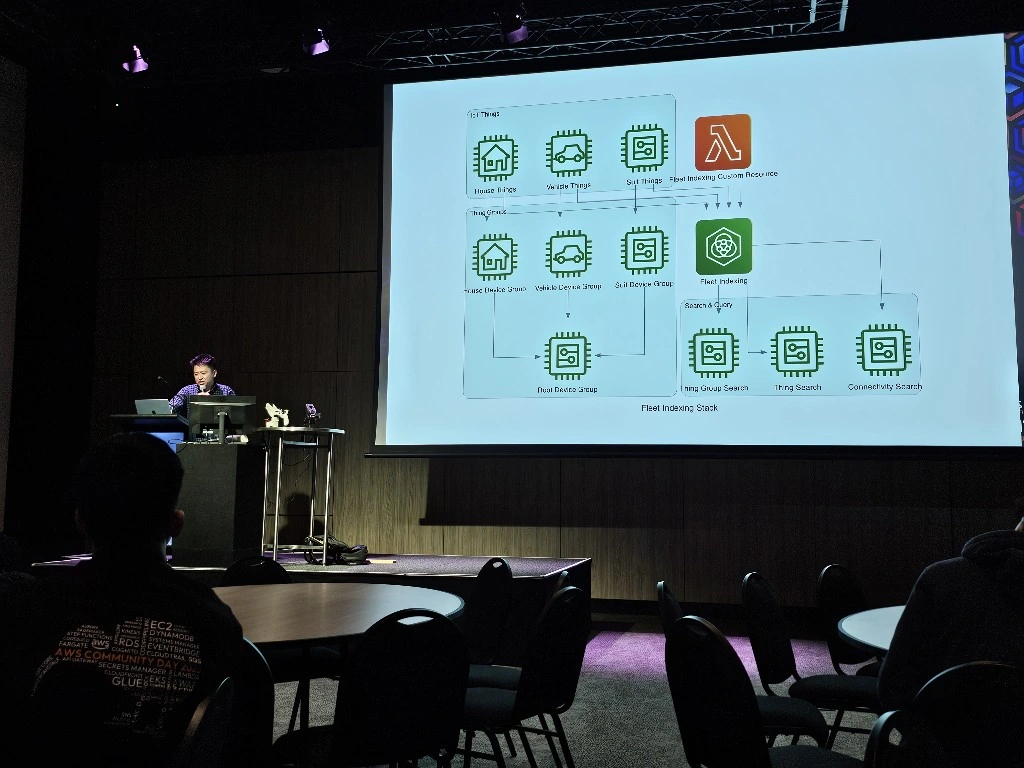
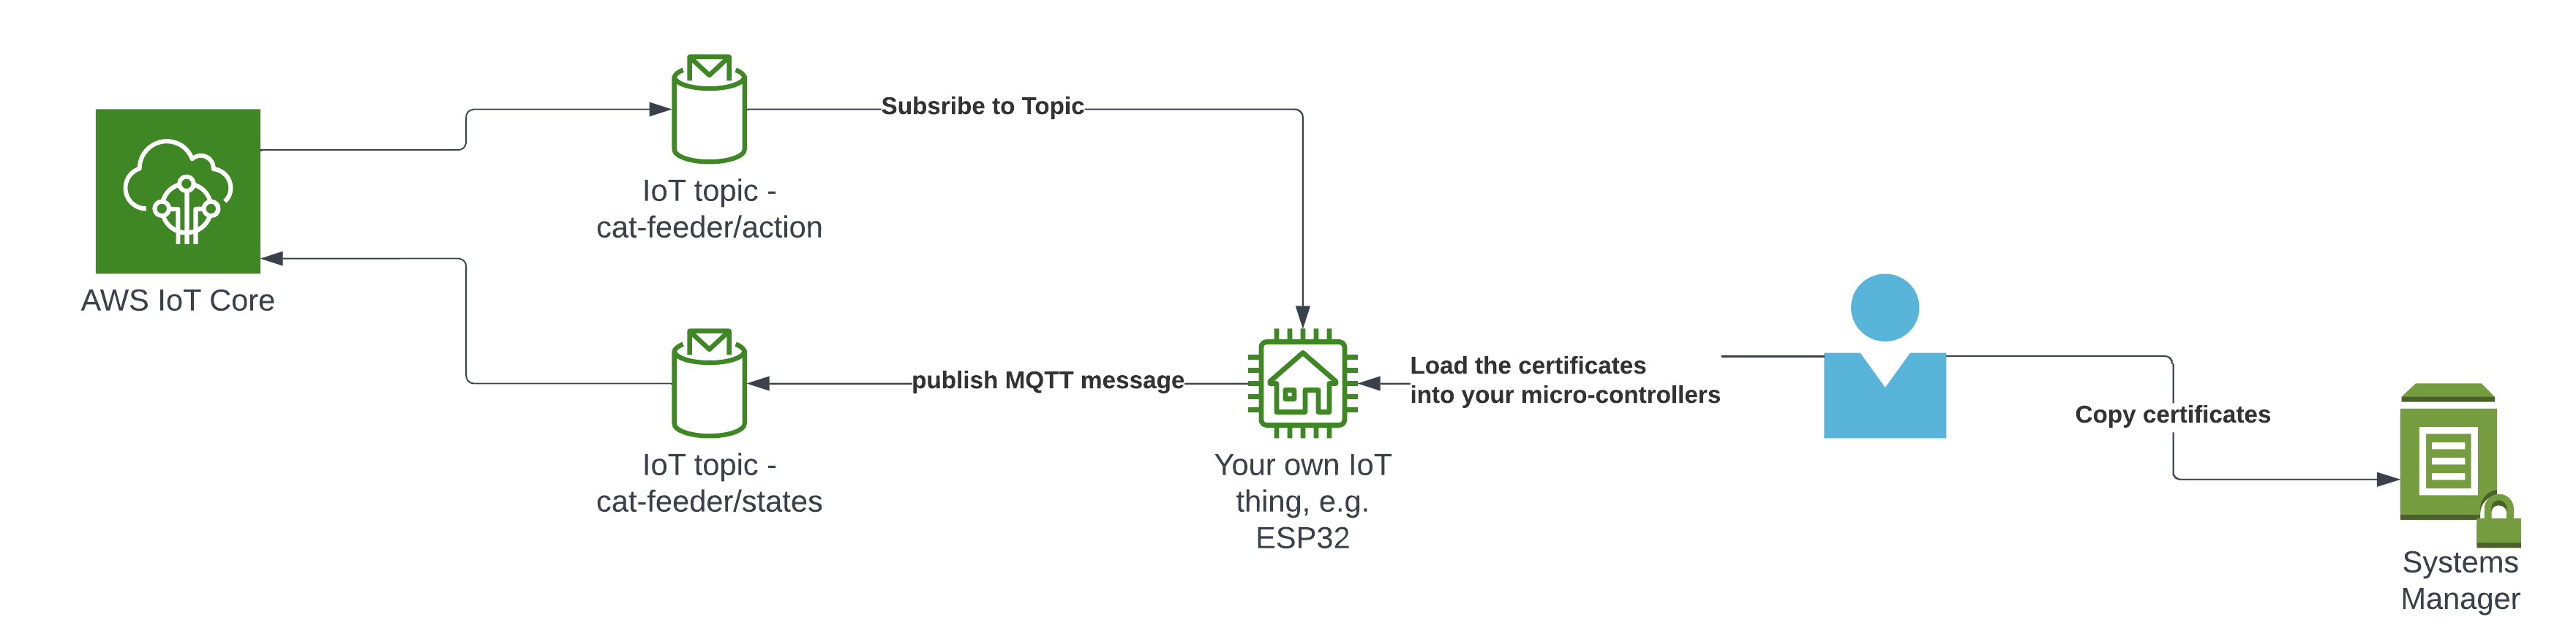
The resources that are relevant to architecture of this AWS IoT solution are shown in the diagram below.

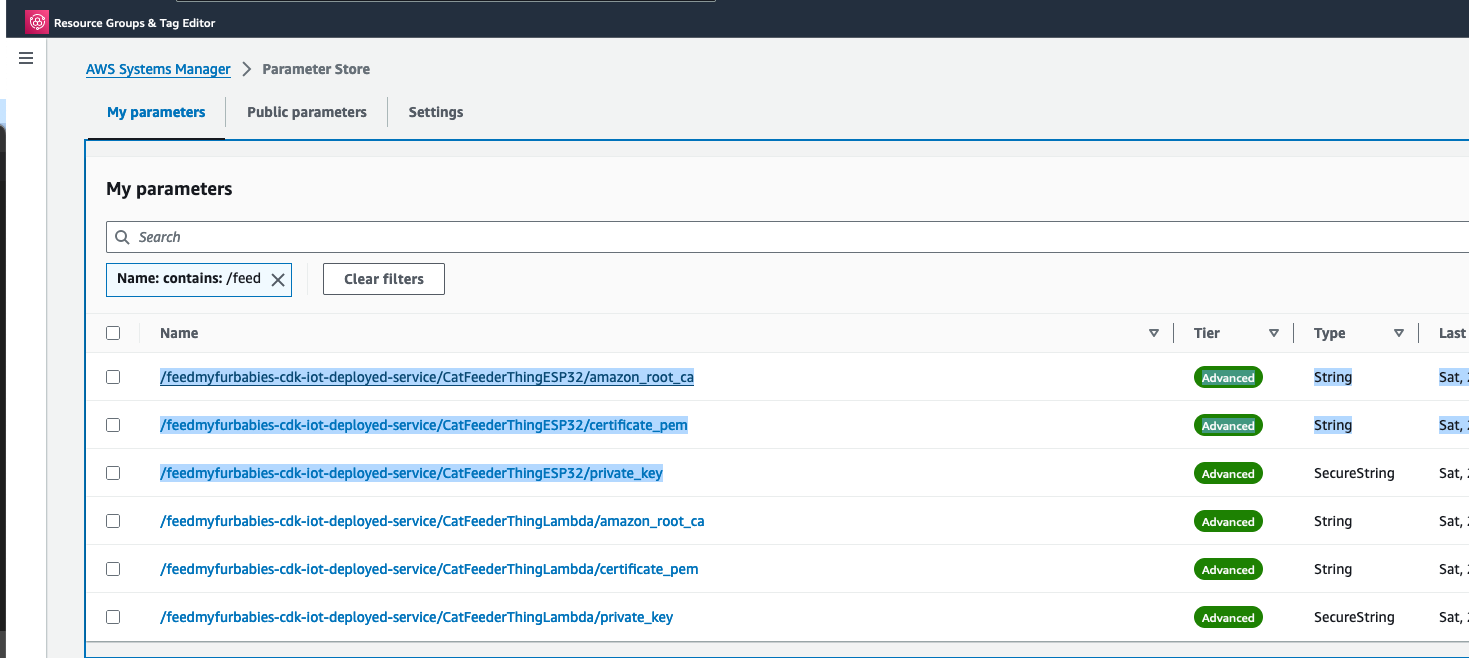
There are 2 sets of certificates and 2 sets of AWS IoT Things and policies deployed by the "Deploy-feedmyfurbabies-cdk-iot-deployed-service":
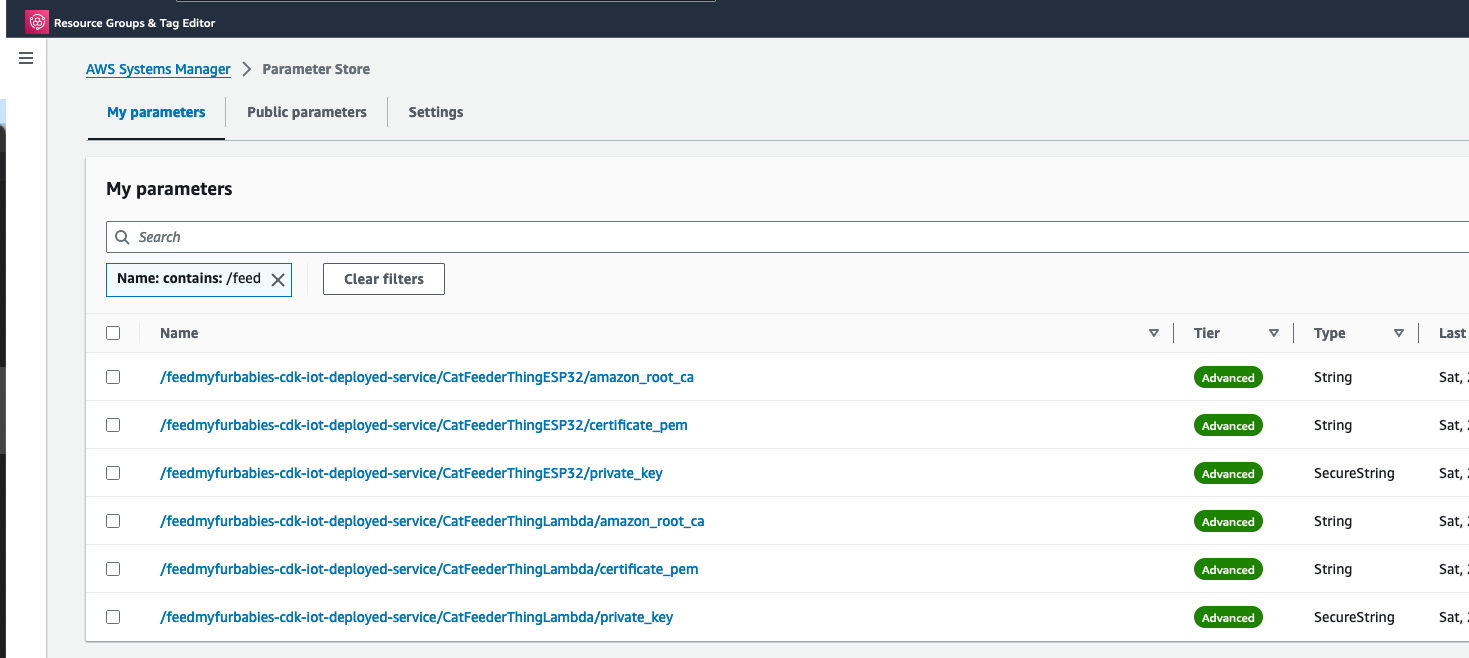
The 1st set of certificates and IoT Thing is hooked up to the AWS Lambda function (Lambda Thing) shown in the diagram, this Lambda function acts as an AWS IoT Thing (uses the certificates saved in Systems Manager Parameter prefixed with "/feedmyfurbabies-cdk-iot-deployed-service/CatFeederThingLambda") and is fully configured as one along with all the neccessary certificates and permissions to send an MQTT message to the "cat-feeder/action" topic in AWS IoT Core; this is a very convenient way to see in action how one could send MQTT messages to AWS IoT Core using Python, as well as a good way to confirm the deployment was successful by testing it out!
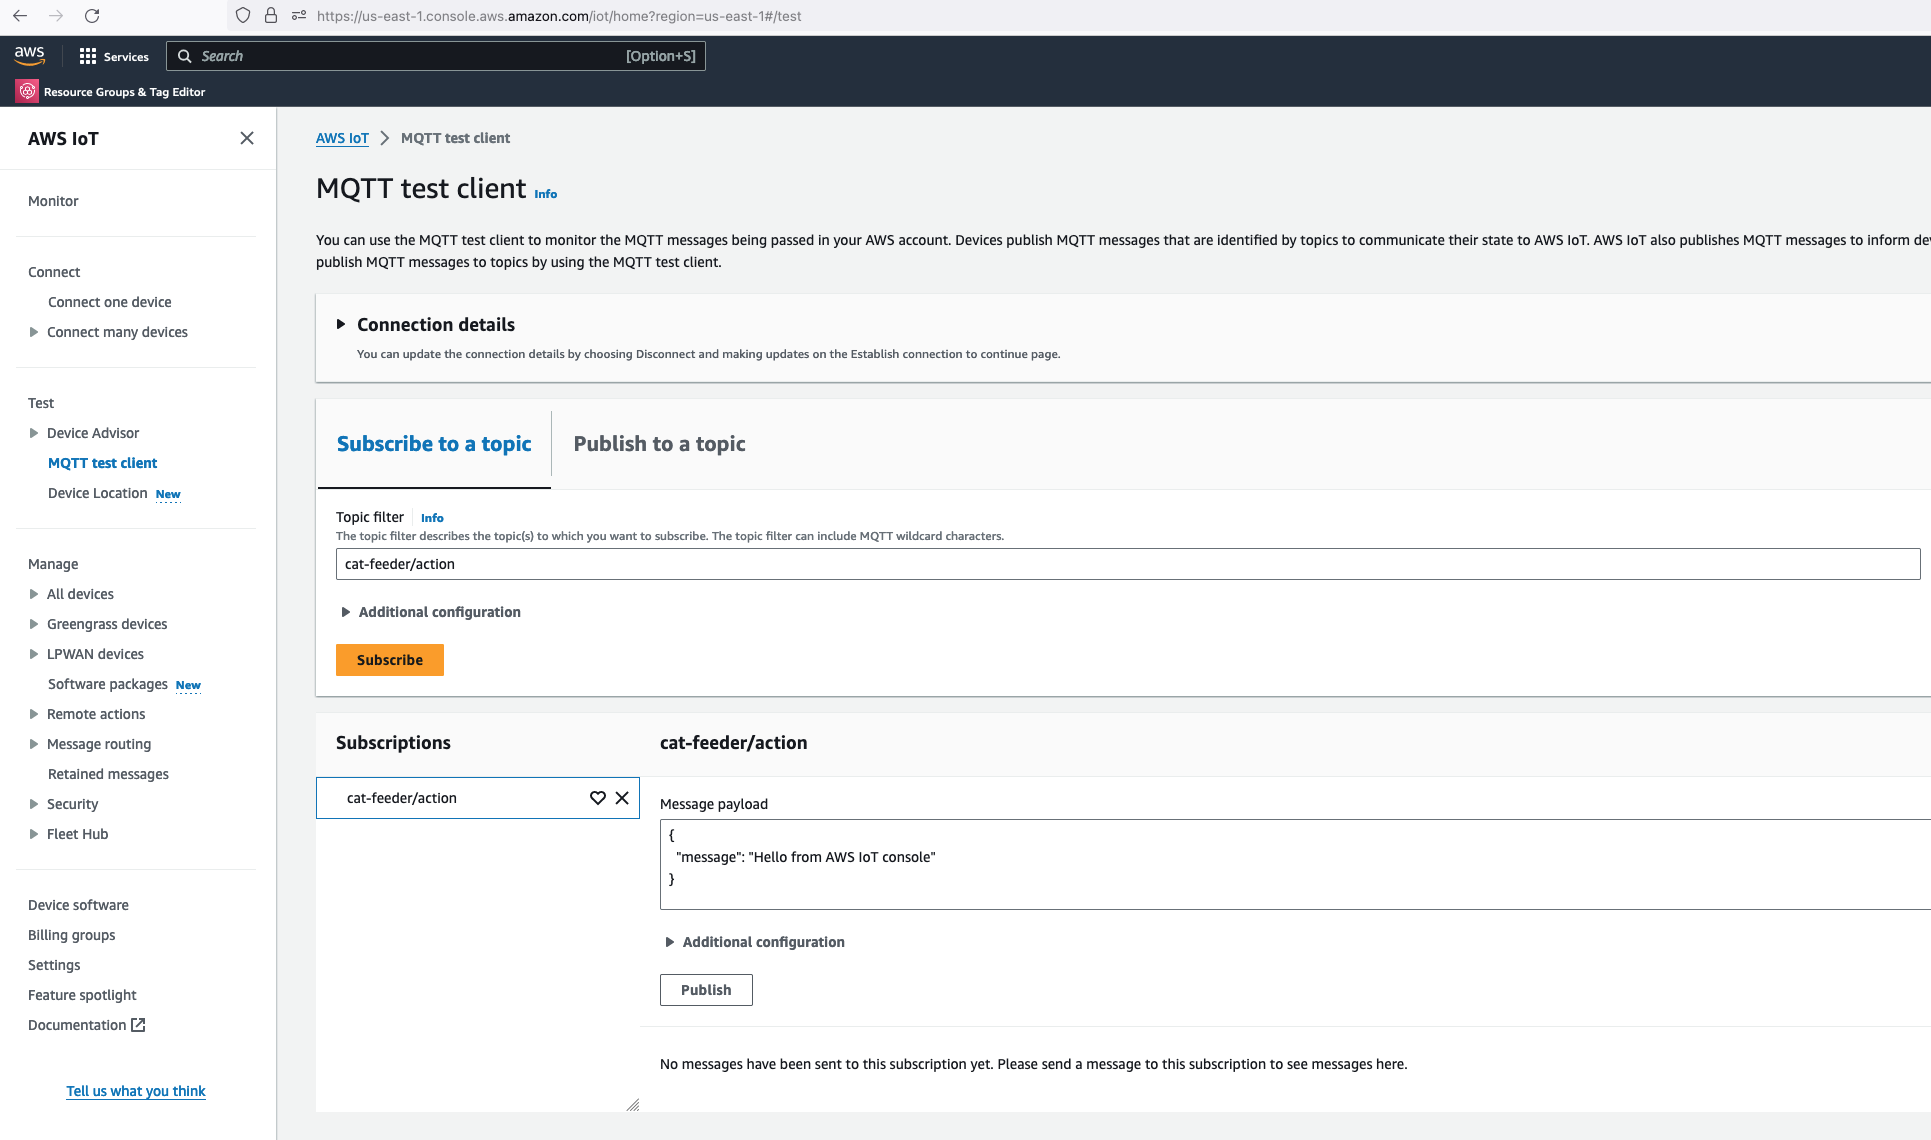
Before we invoke the Lambda Thing/function, we need to subscribe to the "cat-feeder/action" topic so that we could see the incoming messages sent by the Lambda function.
Then we invoke the Lambda function in the AWS Console:
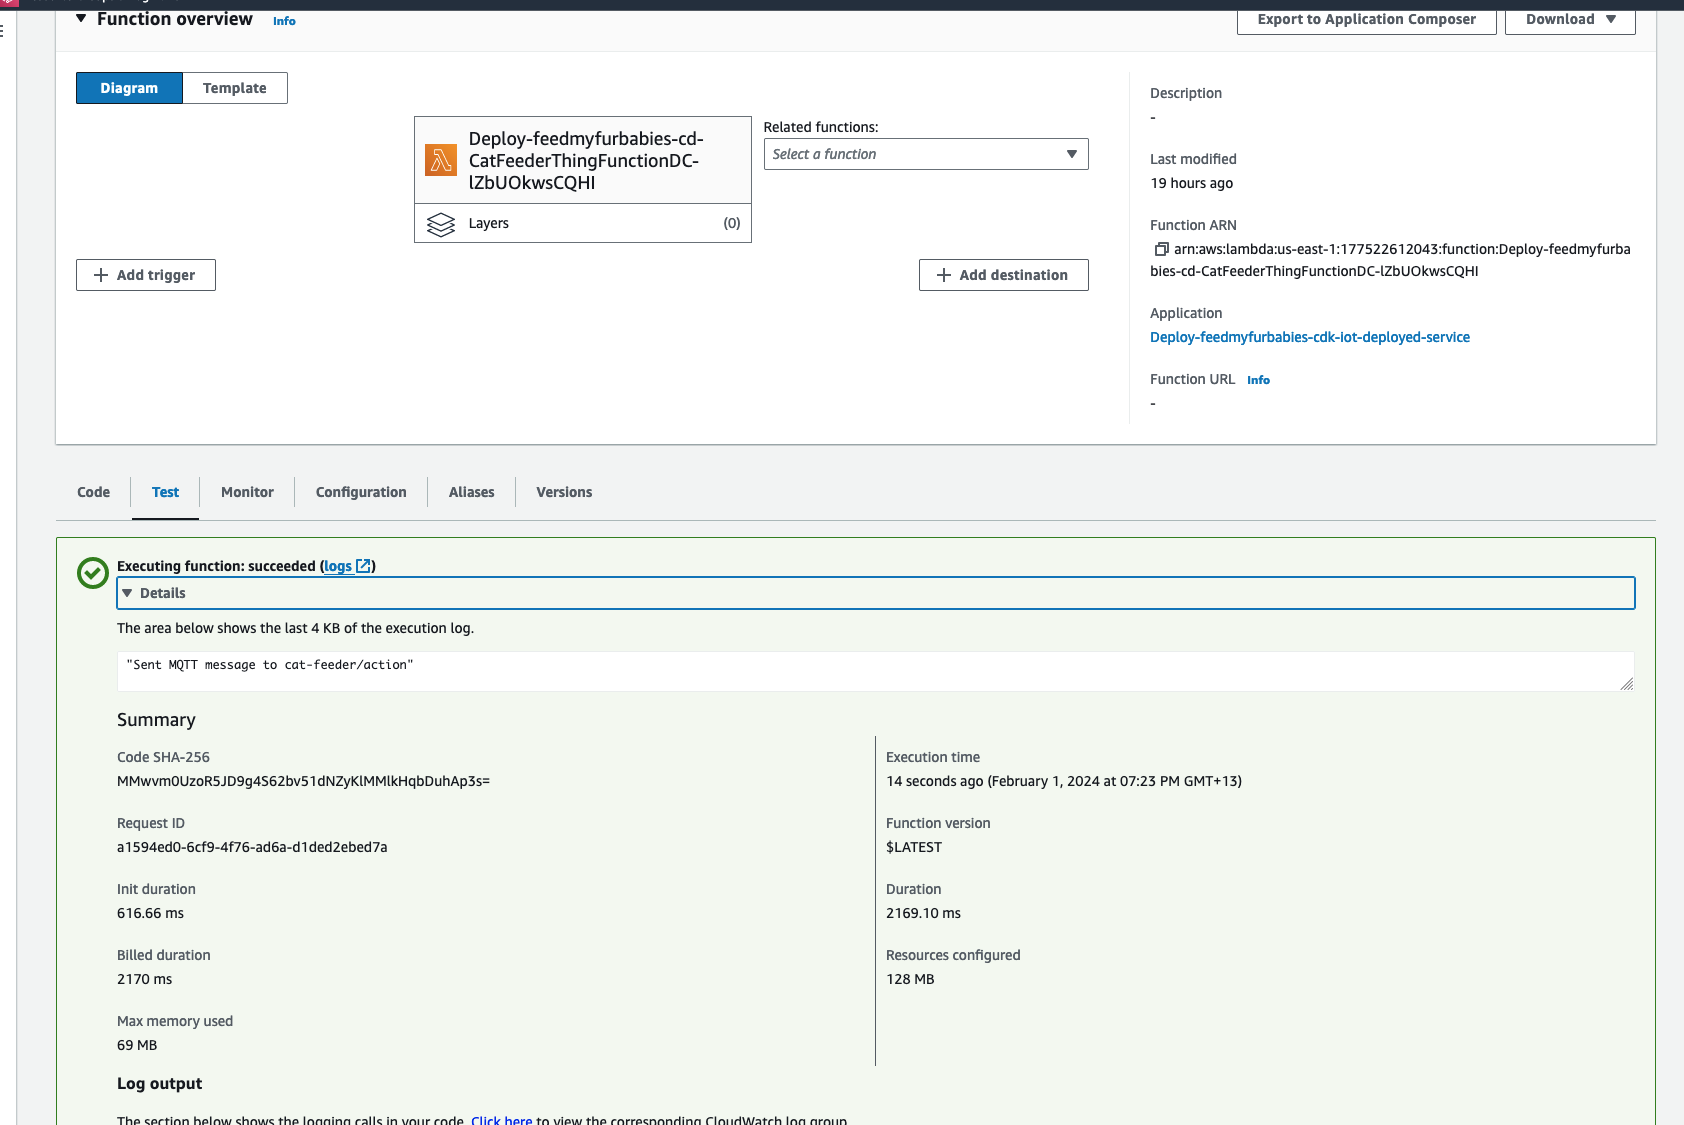
Make sure you get a green box confirming the MQTT message was sent.
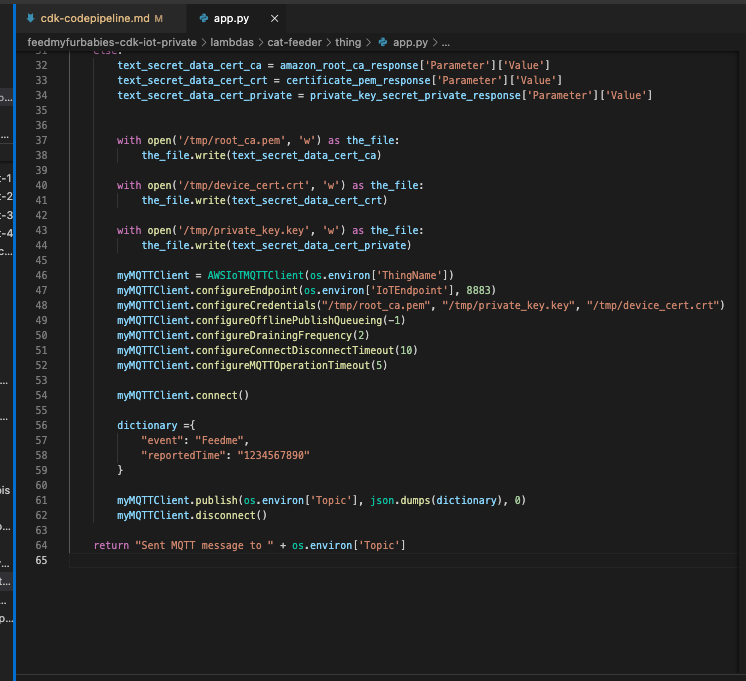
The code in the Lambda is written in Python and it sends a JSON payload (the dictionary variable shown in the code below) to the IoT Topic "cat-feeder/action"
Now lets go back to AWS IoT Core to confirm we have received the message:
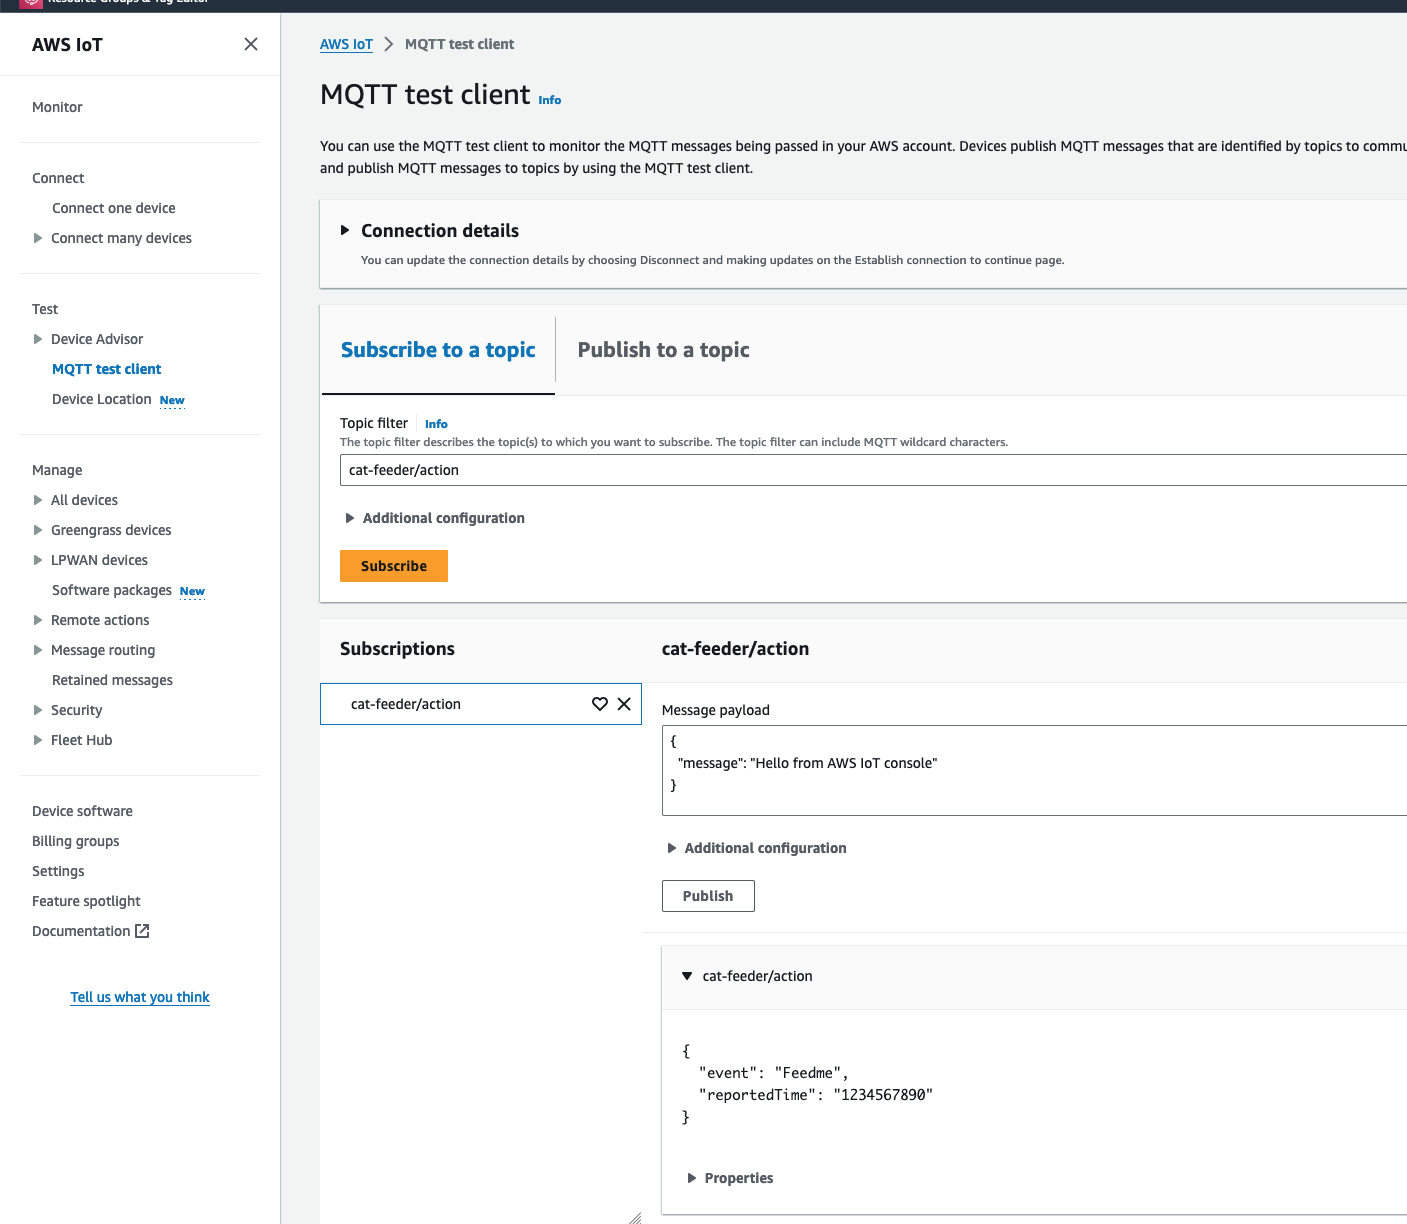
We can see the message received in IoT Core is the dictionary object sent by the Lambda code
Using CDK does not eliminate all the issues you might encounter when using CloudFormation - I have a future blog on creating and using CloudFormation Custom Resources lined up; because at the end of the day CDK just generates a CloudFormation template and handles the deloyment of the CloudFormation Stack for you without you having to manage the CloudFormation Stacks or templates; the intent of this blog is to demonstrate how little effort is required to deploy an AWS IoT solution using CDK, compared with the same architecture I shared in my Github repo 2 years ago but with instructions using a CloudFormation template deployment that was long and tedious in manual steps.
The ultimate aim of change in IaC is to just focusing on building and iterating!
I do often talk too much in my blogs, but in this instance the instructions to deploy this solution for yourself to try out is very minimal, with the majority of the content focused on the resources deployed; and what each resource is for and how they interact with each other.
You may have noticed that there are 2 sets of certificates deployed in IoT Core and 2 IoT Things in this reference architecture, this is because you can take the 2nd set of certificates (prefixed with "/feedmyfurbabies-cdk-iot-deployed-service/CatFeederThingESP32") and Thing provisioned purely for you to send MQTT message to AWS IoT Core from your own IoT hardware devices / micro-controllers.
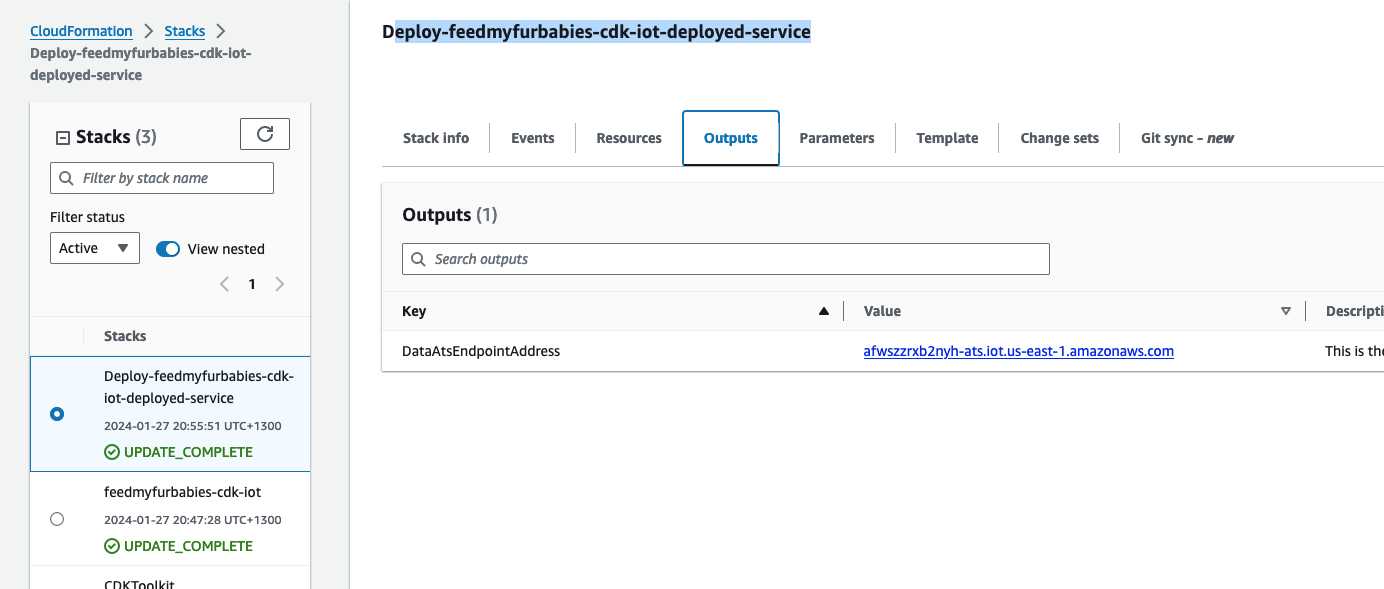
If you want to try it out, you will need to use the IoT Core Endpoint specific to your AWS Account and Region; you can either find it in the AWS IoT Core Console, or copy it from the CloudFormation Stack's Output:
The Lambda Thing we tested above can be used to send MQTT messages to your own IoT device/micro-controller, as the 2nd set of certificates is configured with the neccessary IoT Core Policies to receive the MQTT messages sent to the Topic "cat-feeder/action", and the certificates is also configured with the policies to send MQTT messages to a second IoT Topic called "cat-feeder/states"
I have a future blog that will demonstrate how to do this using MicroPython and a Seeed Studio XIAO ESP32C3 - so watch this space.
It is real.