7 posts tagged with "Serverless"

Serverless

View All Tags

FeedMyFurBabies – I am switching to AWS CDK

· 7 min read
Chiwai Chan
Tinkerer

I have been a bit slack on this Cat Feeder IoT project for the last 12 months or so; there have been many challenges I've faced during that time that prevented me from materialising the ideas I had - many of them sounded a little crazy if you've had a conversation with me in passing, but they are not crazy to me in my crazy mind as I know what I ramble about is technically doable.

Examples of the technical related challenges I had were:

  • CloudFormation: the initial version of this project was implemented using CloudFormation for the IaC, here is the repository containing both the code and deployment instructions. If you read the deployment instructions, you will notice there are a lot of manual steps required - e.g. creating 2 sets of certificates in AWS Iot Core in the AWS Console; and copying and pasting values to and from the CloudFormation Parameters and Outputs, even though at the time I made my best efforts to minimise the manual effort required while coding them. It was not a good example to get it up and running especially if you are new to AWS, Arduino or IoT; as I myself struggled at times to deploy my own example.

  • Terraform: I ported the CloudFormation IaC code to Terraform some time last year, you can find it here. Nothing is wrong with Terraform itself; I just keep forgetting to save or misplaced my terraform state files every time I resume this project. In reality I might leverage both Terraform and CDK for the projects/micro-services I create in the future, but it all really depends on what I am trying to achieve at the end of the day.

Deploying the AWS CDK version of this Cat Feeder IoT project

So, the commands below are the deployment instructions taken from the AWS CDK version of this project, you can find it here: https://github.com/chiwaichan/feedmyfurbabies-cdk-iot

git clone git@github.com:chiwaichan/feedmyfurbabies-cdk-iot.git
cdk feedmyfurbabies-cdk-iot
cdk deploy

git remote rm origin
git remote add origin https://git-codecommit.us-east-1.amazonaws.com/v1/repos/feedmyfurbabies-cdk-iot-FeedMyFurBabiesCodeCommitRepo
git push --set-upstream origin main

The commands above are all you need to execute in order to deploy the Cat Feeder project in CDK - assuming you have the AWS CDK and your AWS credentials configured on the machine you are calling these commands on; the first group of commands checks out the CDK code which deploys an AWS CodeCommit repository and a CodePipeline pipeline - creates the 1st CloudFormation Stack using a CloudFormation template; and the second group of commands pushes the CDK code into the newly created CodeCommit repository created in the first group of commands, which in turns trigger an execution in CodePipeline and the pipeline deploys the resources for this Cat Feeder IoT project - creates the 2nd CloudFormation Stack using a different CloudFormation template.

The two groups of commands creates the 2 CloudFormation Stacks shown in the screenshot below, the stack "feedmyfurbabies-cdk-iot" provisions the CodeCommit repository and CodePipeline - using the 1st CloudFormation template, and the stack "Deploy-feedmyfurbabies-cdk-iot-deployed-service" provisions the resources for this Cat Feeder IoT project - using the 2nd CloudFormation template.
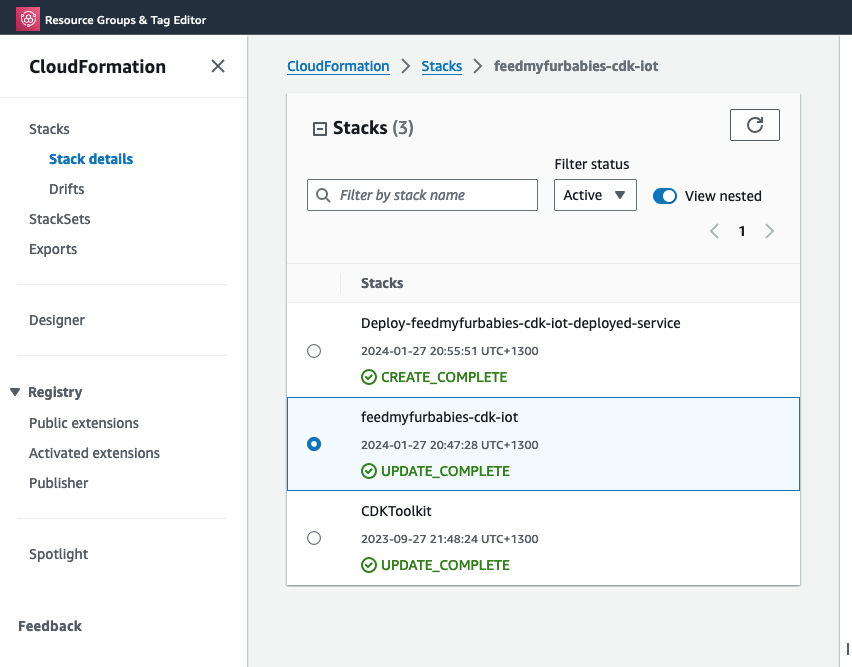
CloudFormation Stacks

FYI, I did not come up with the pattern I just described above that deployed the two CloudFormation Stacks: one for the pipeline and the other for the AWS resources for this Cat Feeder IoT project; I only came across it during one of those AWS online workshops I was using to learn CDK and noticed this pattern and found it useful, and pretty much decided to adopt it for my projects going forward.

Test out the deployed solution

The resources that are relevant to architecture of this AWS IoT solution are shown in the diagram below.
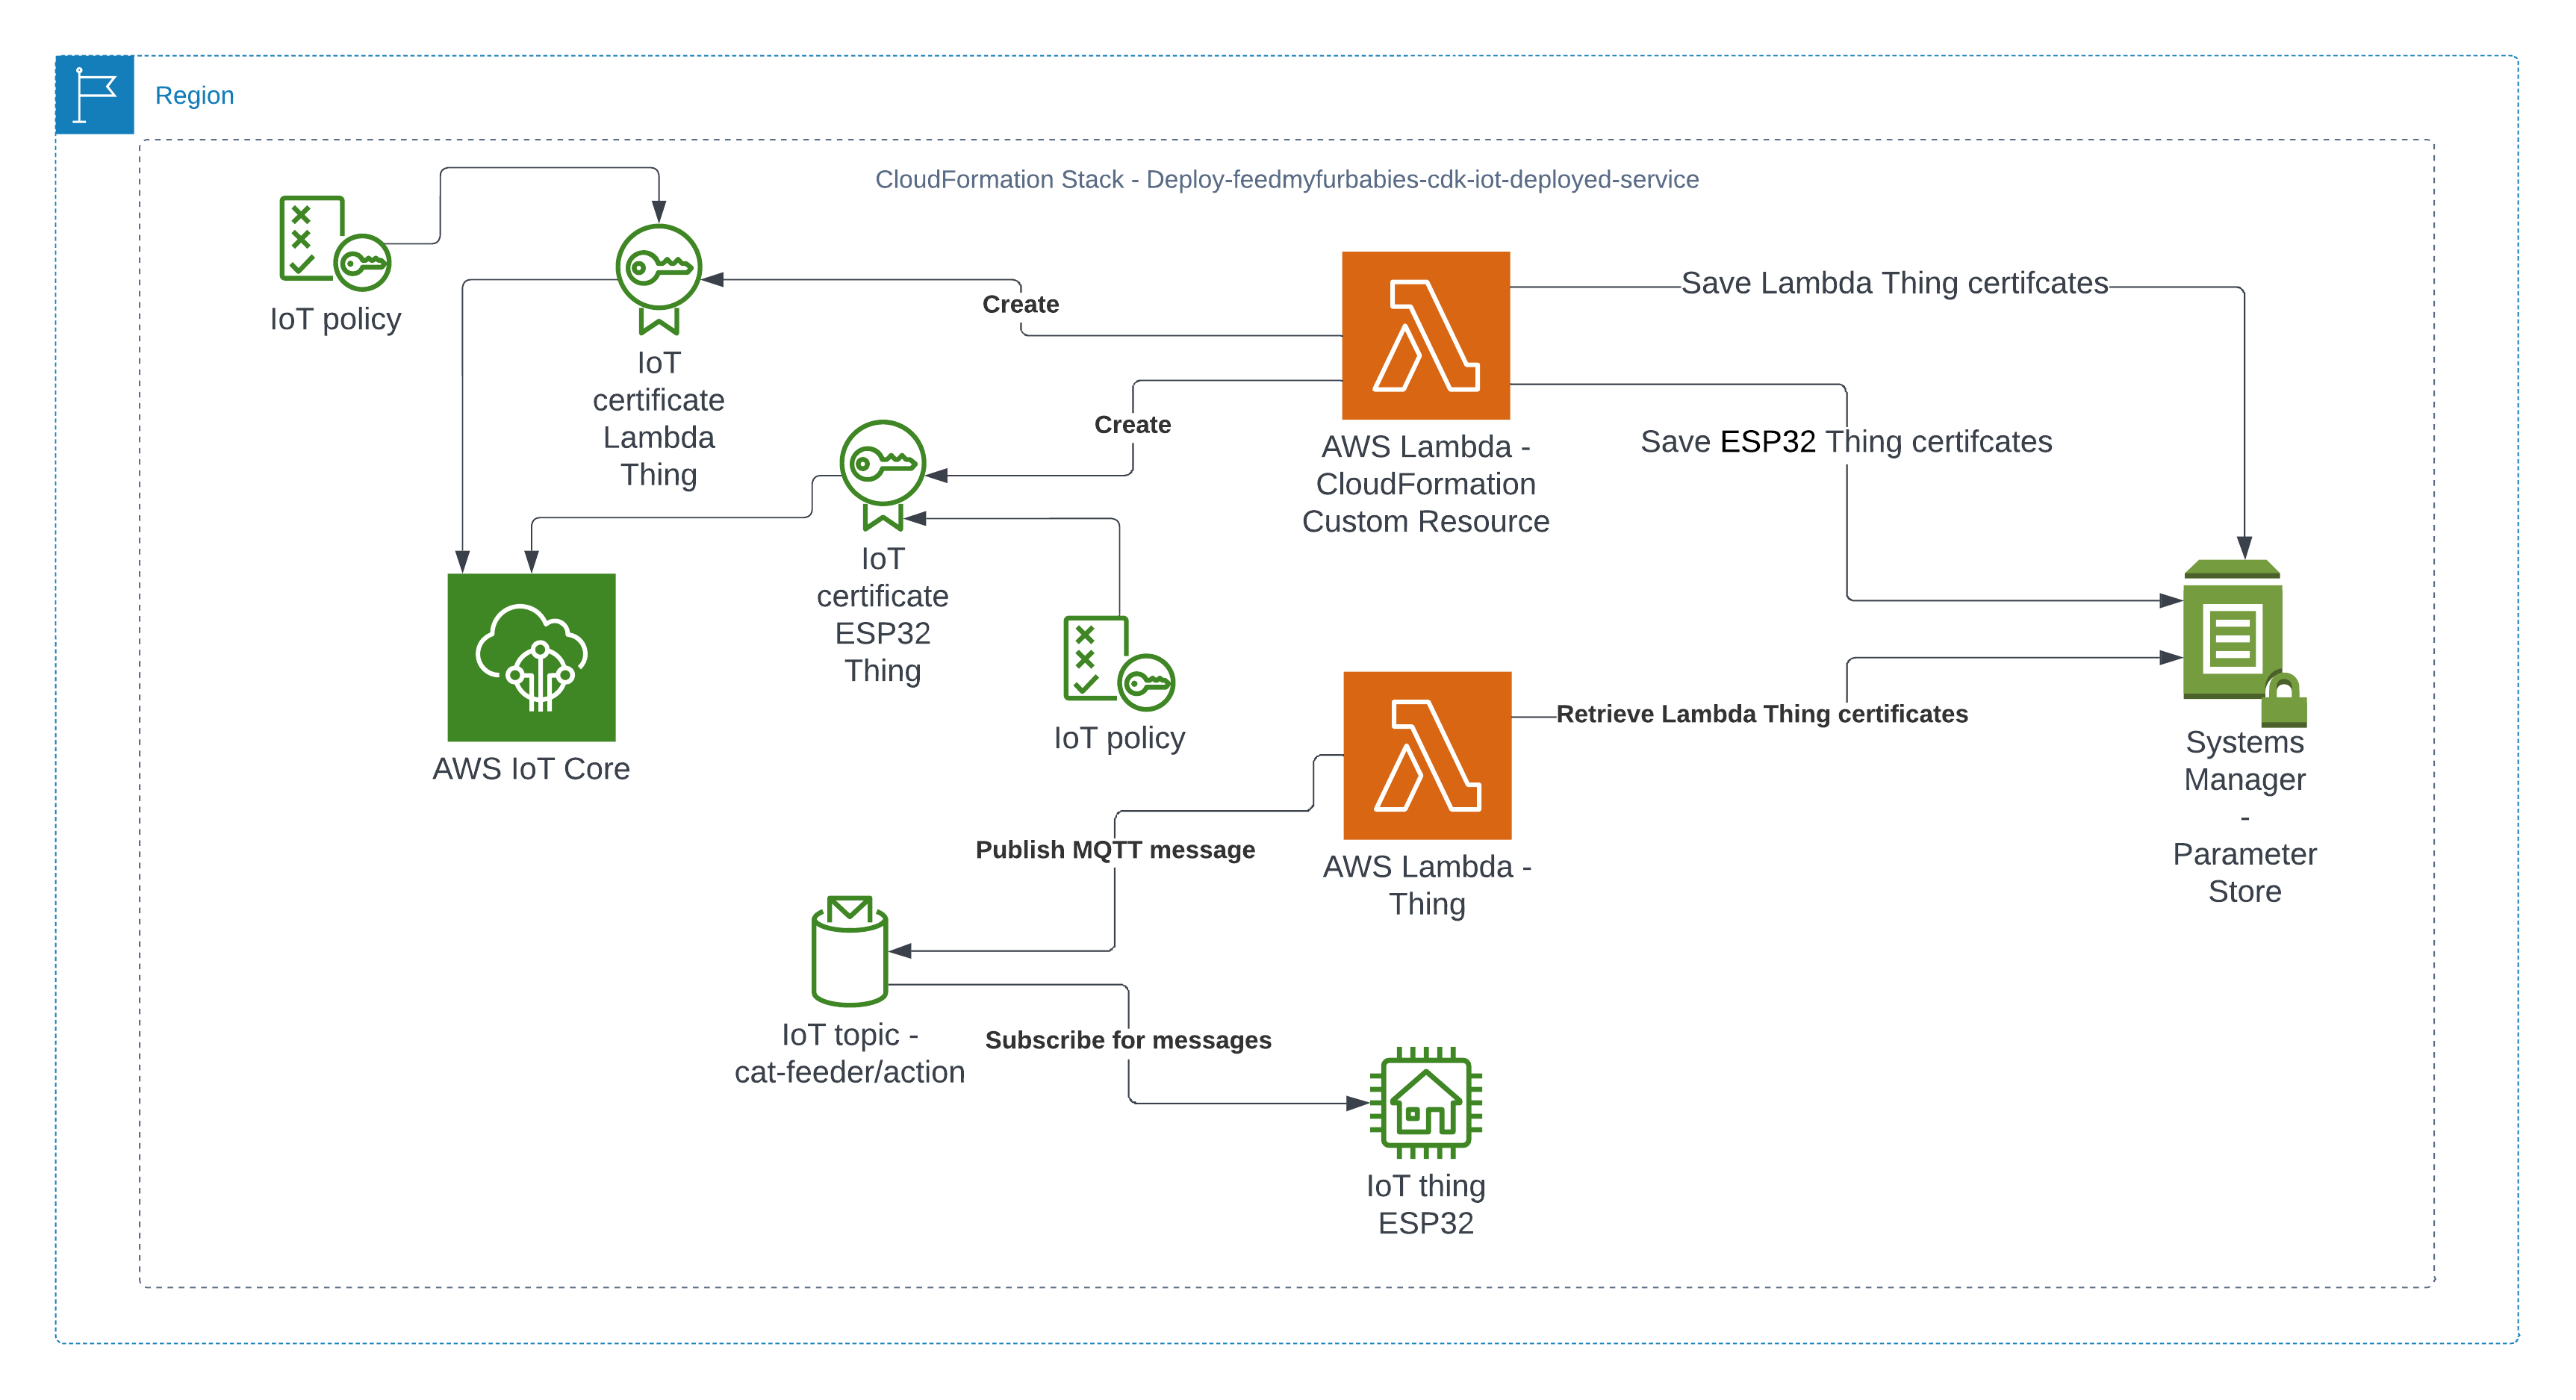
Deployed resources

There are 2 sets of certificates and 2 sets of AWS IoT Things and policies deployed by the "Deploy-feedmyfurbabies-cdk-iot-deployed-service":
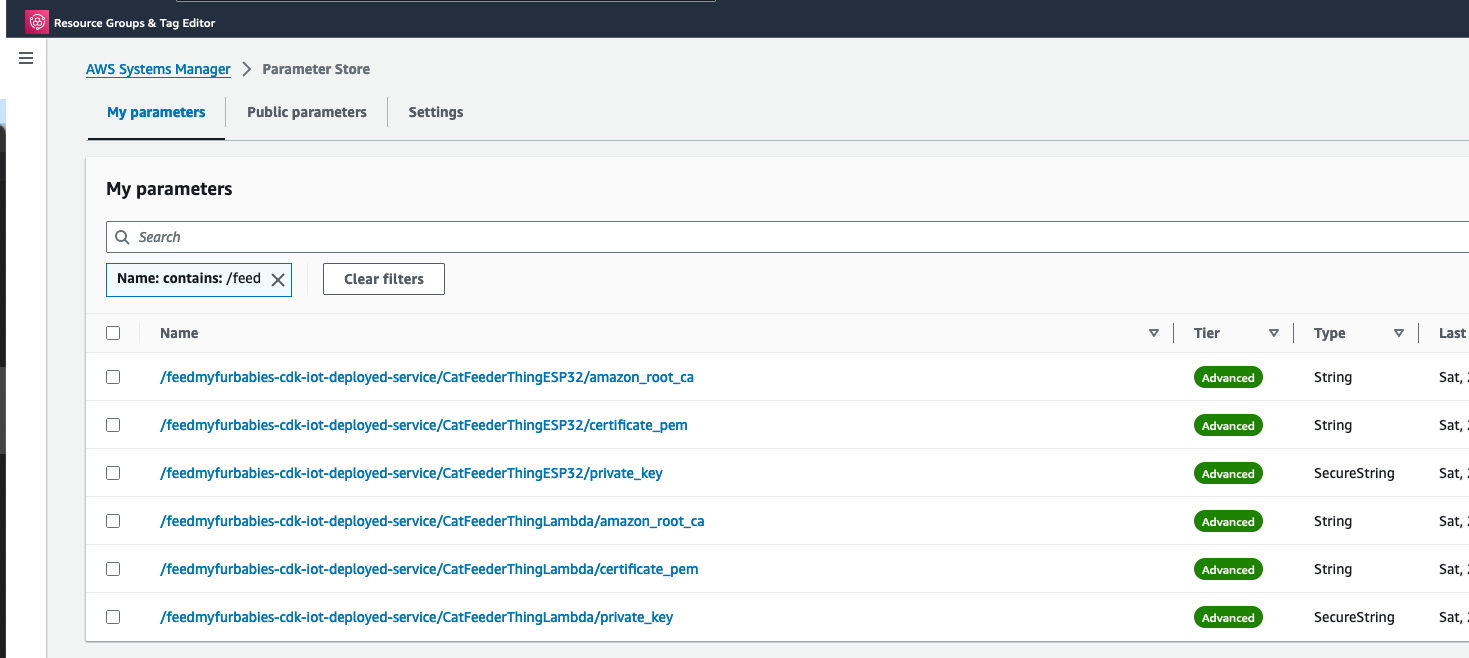
IoT Certificates

The 1st set of certificates and IoT Thing is hooked up to the AWS Lambda function (Lambda Thing) shown in the diagram, this Lambda function acts as an AWS IoT Thing (uses the certificates saved in Systems Manager Parameter prefixed with "/feedmyfurbabies-cdk-iot-deployed-service/CatFeederThingLambda") and is fully configured as one along with all the neccessary certificates and permissions to send an MQTT message to the "cat-feeder/action" topic in AWS IoT Core; this is a very convenient way to see in action how one could send MQTT messages to AWS IoT Core using Python, as well as a good way to confirm the deployment was successful by testing it out!

Before we invoke the Lambda Thing/function, we need to subscribe to the "cat-feeder/action" topic so that we could see the incoming messages sent by the Lambda function.
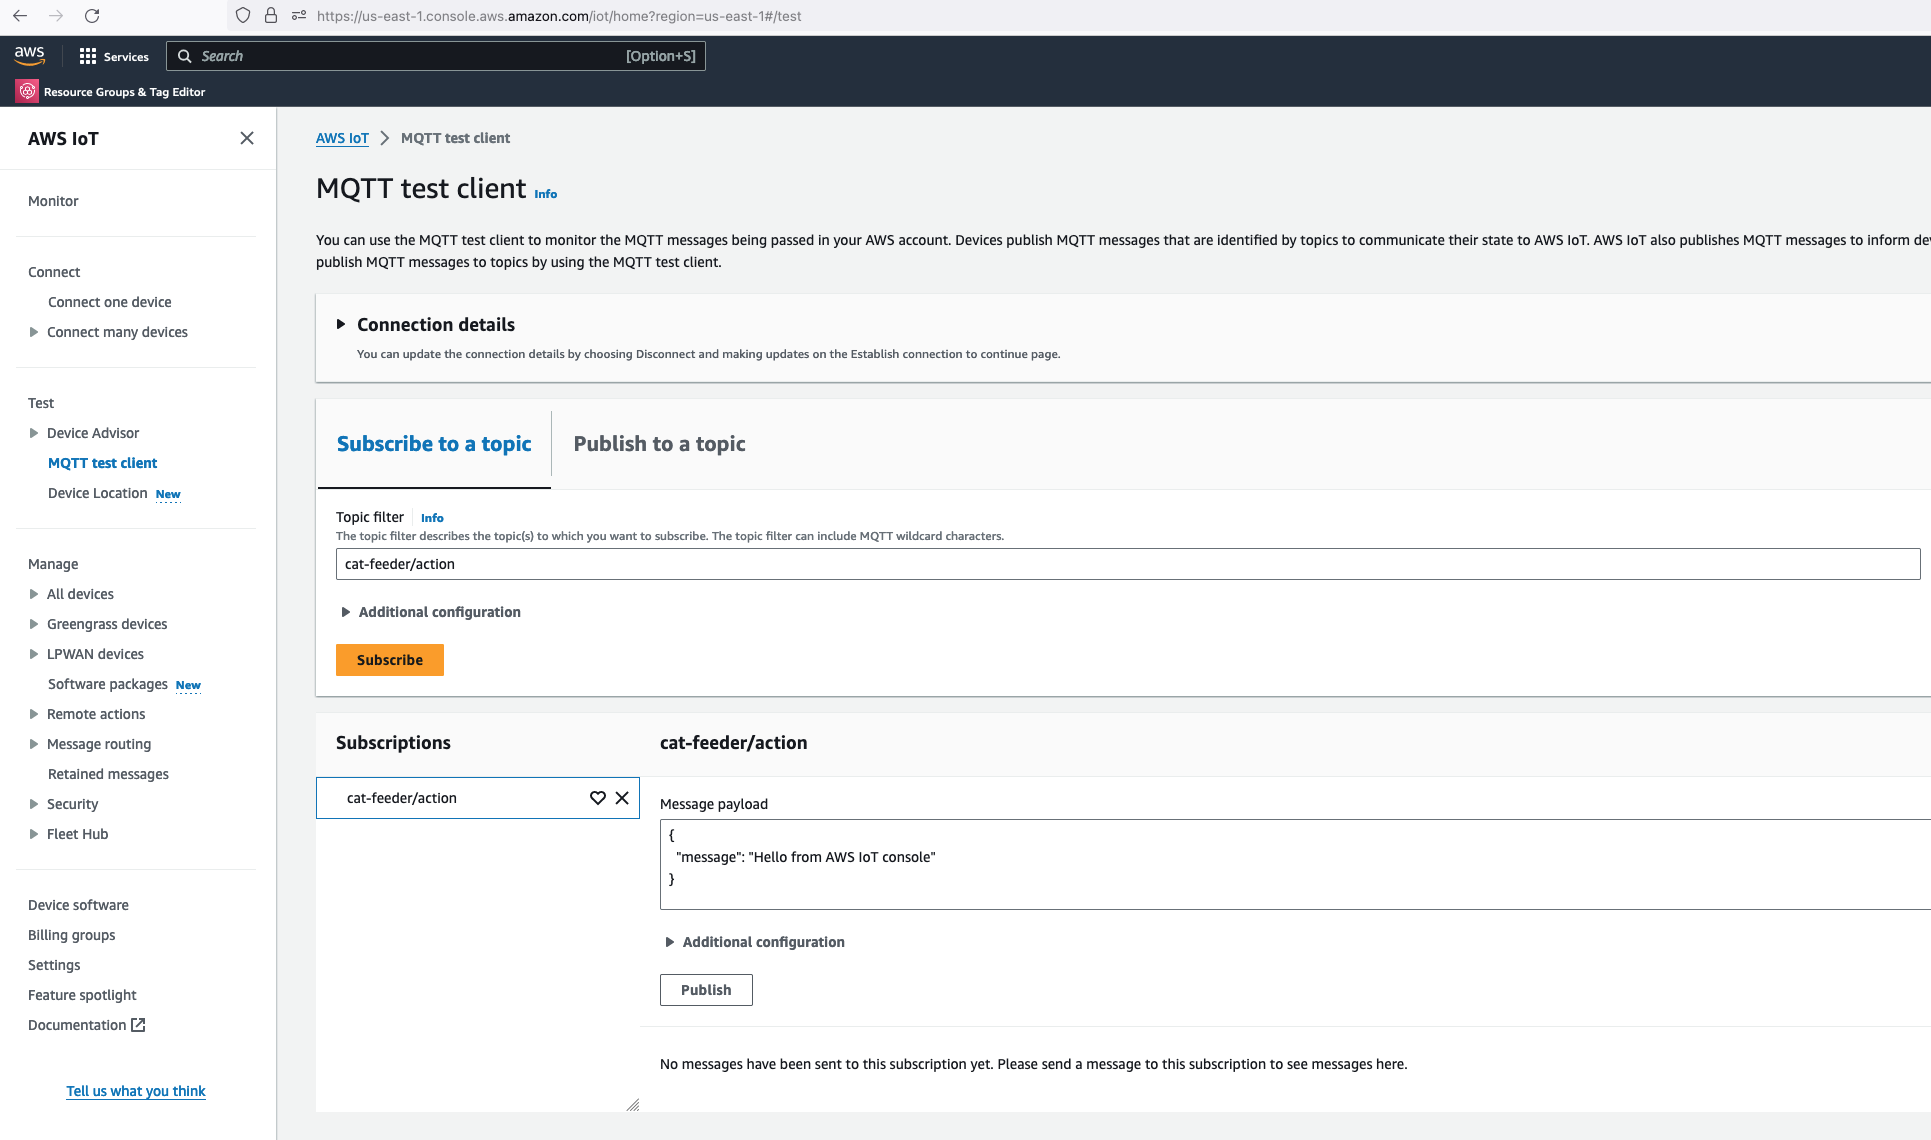
Subscribe to IoT Topic

Then we invoke the Lambda function in the AWS Console:
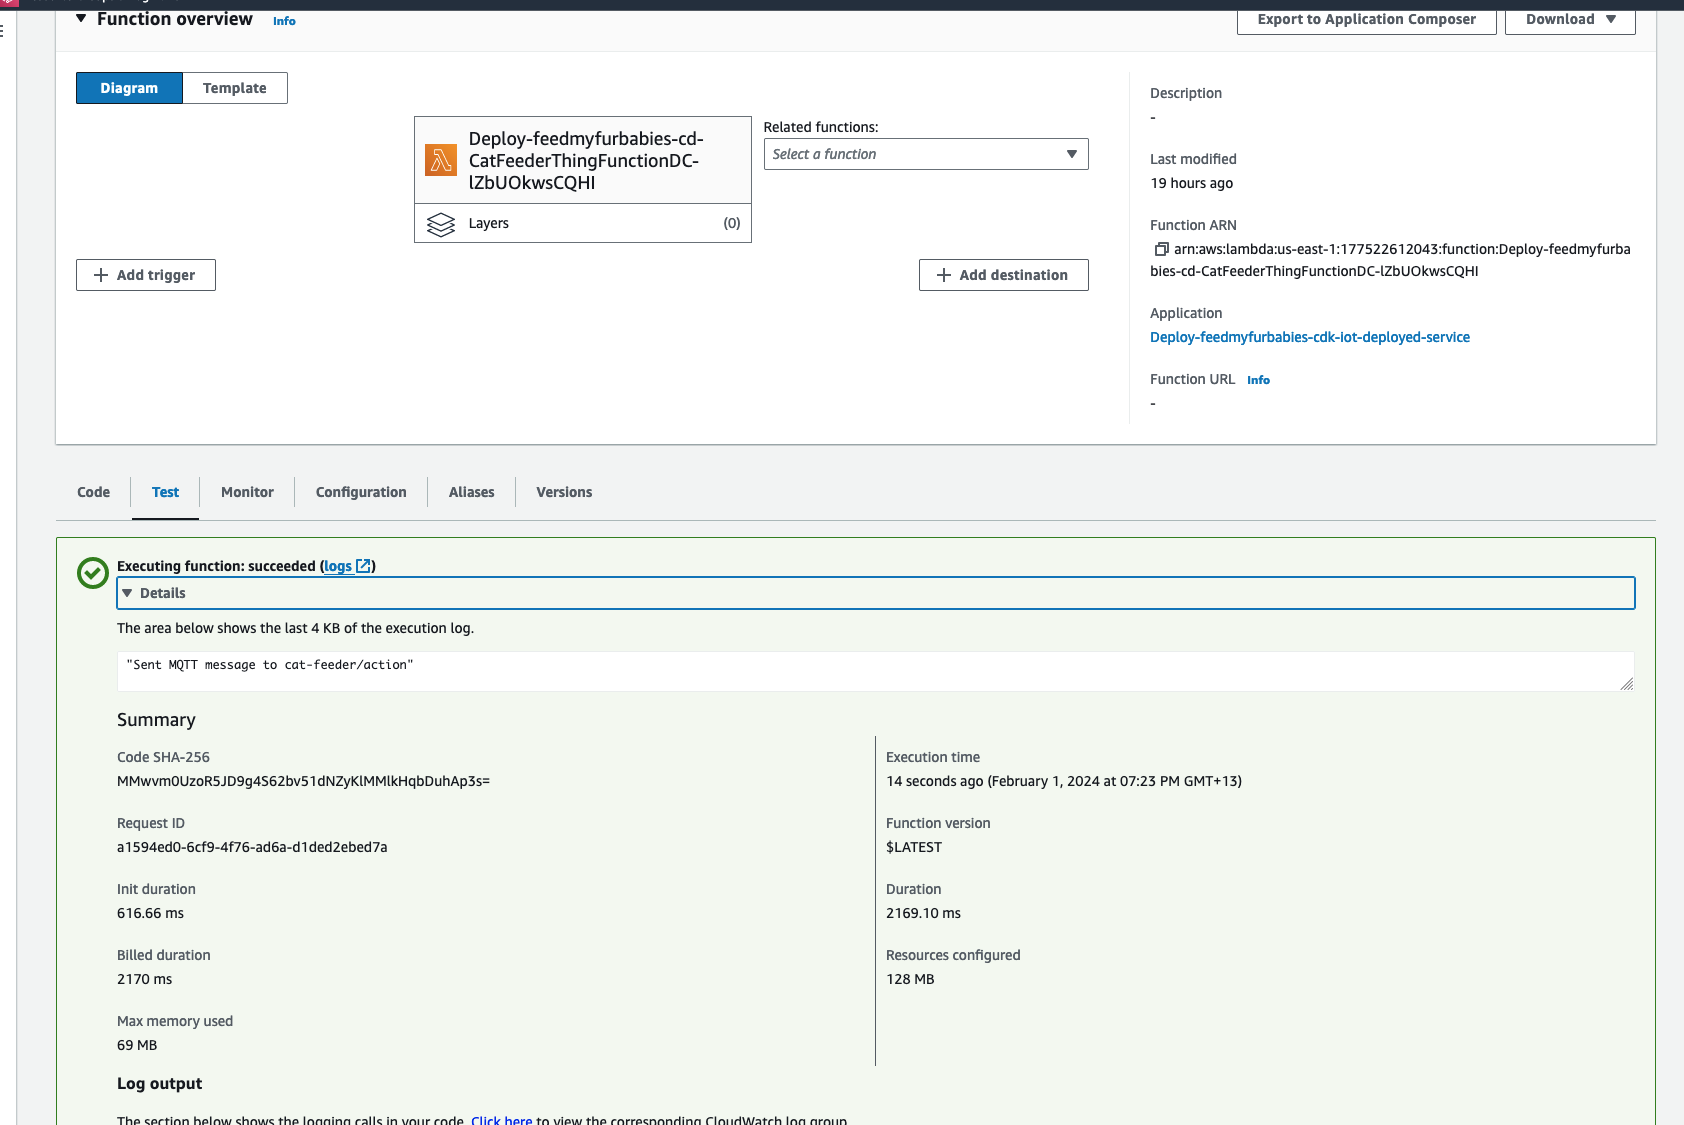
Lambda Result

Make sure you get a green box confirming the MQTT message was sent.

The code in the Lambda is written in Python and it sends a JSON payload (the dictionary variable shown in the code below) to the IoT Topic "cat-feeder/action"
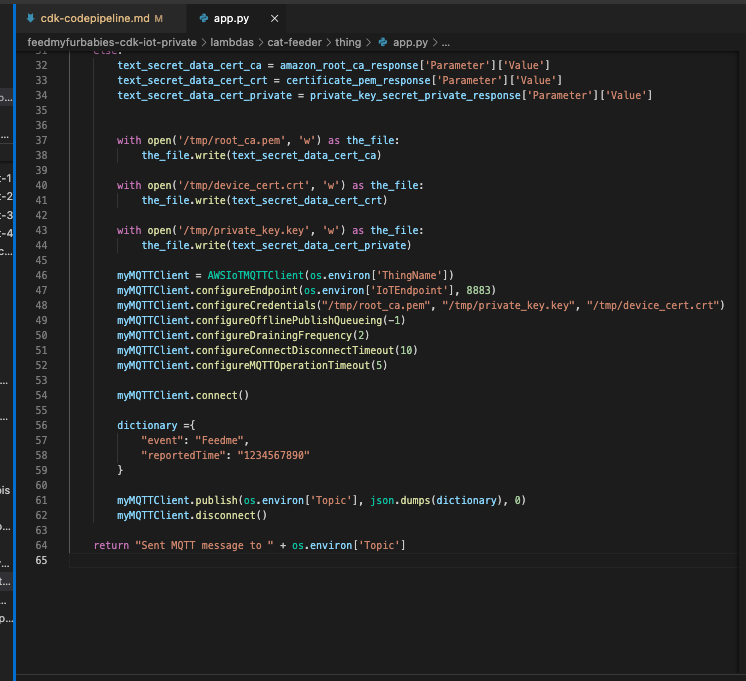
Lambda Code

Now lets go back to AWS IoT Core to confirm we have received the message:
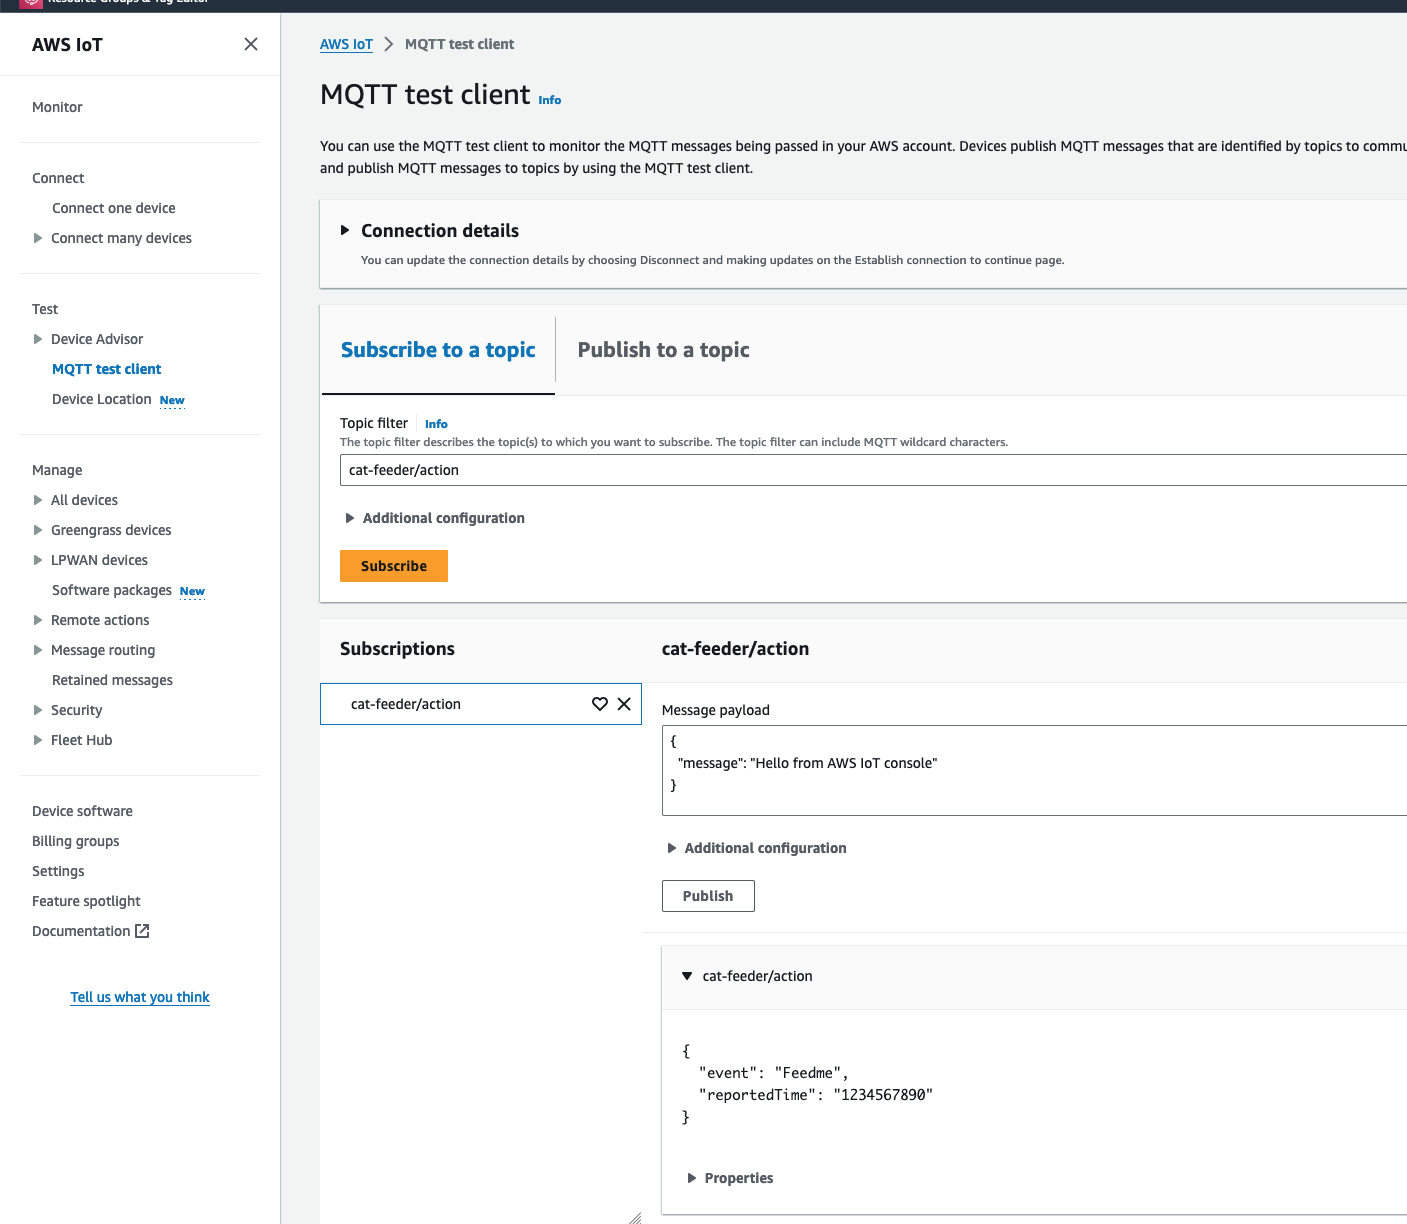
AWS IoT Core MQTT received

We can see the message received in IoT Core is the dictionary object sent by the Lambda code

Conclusion

Using CDK does not eliminate all the issues you might encounter when using CloudFormation - I have a future blog on creating and using CloudFormation Custom Resources lined up; because at the end of the day CDK just generates a CloudFormation template and handles the deloyment of the CloudFormation Stack for you without you having to manage the CloudFormation Stacks or templates; the intent of this blog is to demonstrate how little effort is required to deploy an AWS IoT solution using CDK, compared with the same architecture I shared in my Github repo 2 years ago but with instructions using a CloudFormation template deployment that was long and tedious in manual steps.

The ultimate aim of change in IaC is to just focusing on building and iterating!

I do often talk too much in my blogs, but in this instance the instructions to deploy this solution for yourself to try out is very minimal, with the majority of the content focused on the resources deployed; and what each resource is for and how they interact with each other.

Extra

You may have noticed that there are 2 sets of certificates deployed in IoT Core and 2 IoT Things in this reference architecture, this is because you can take the 2nd set of certificates (prefixed with "/feedmyfurbabies-cdk-iot-deployed-service/CatFeederThingESP32") and Thing provisioned purely for you to send MQTT message to AWS IoT Core from your own IoT hardware devices / micro-controllers.
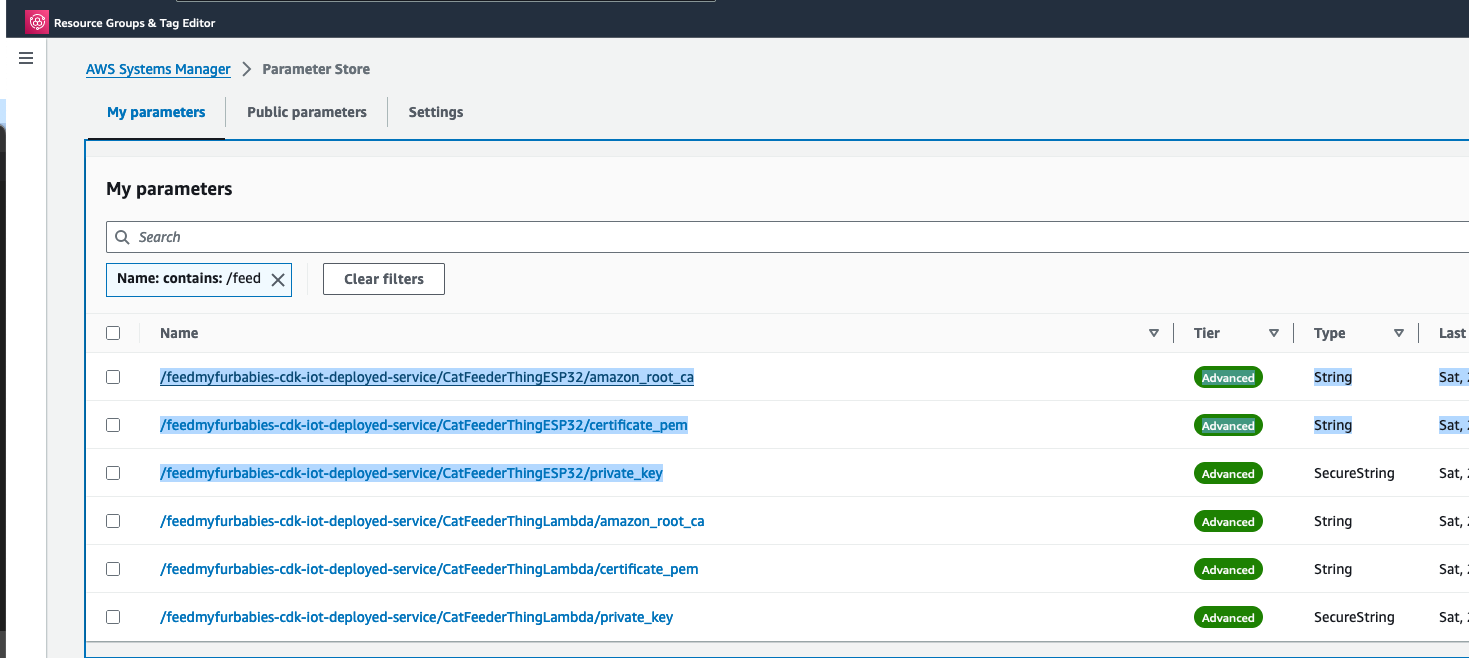
Your own Thing

If you want to try it out, you will need to use the IoT Core Endpoint specific to your AWS Account and Region; you can either find it in the AWS IoT Core Console, or copy it from the CloudFormation Stack's Output:
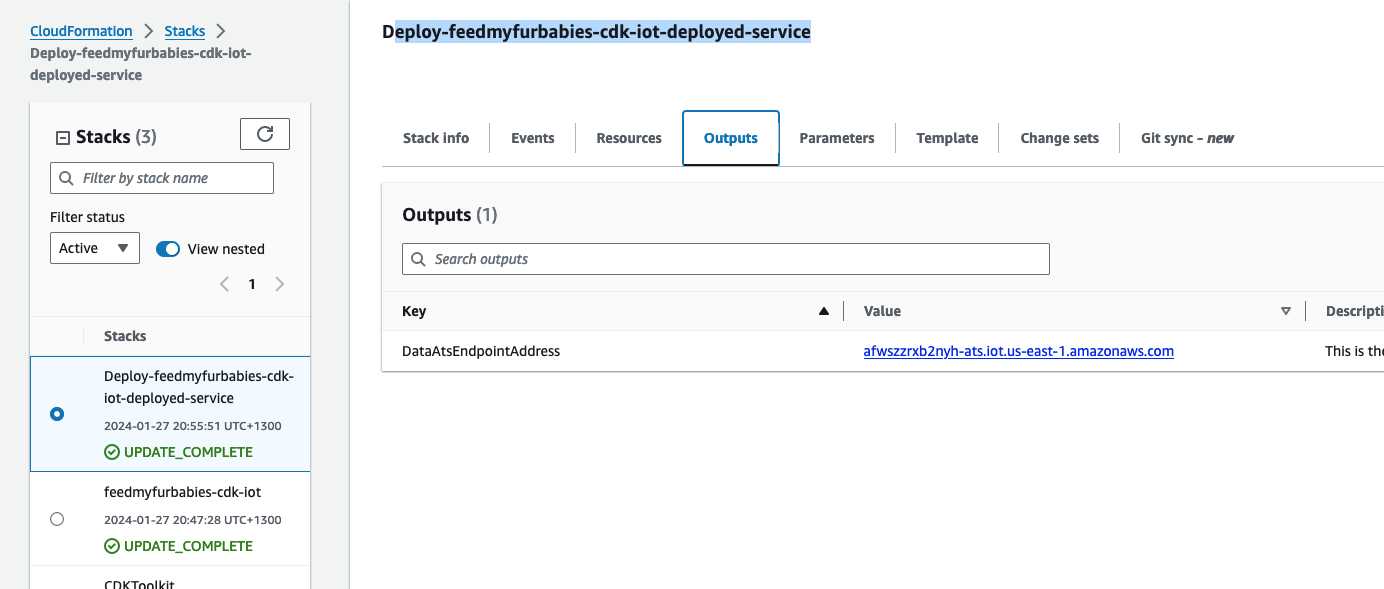
IoT Core Endpoint

The Lambda Thing we tested above can be used to send MQTT messages to your own IoT device/micro-controller, as the 2nd set of certificates is configured with the neccessary IoT Core Policies to receive the MQTT messages sent to the Topic "cat-feeder/action", and the certificates is also configured with the policies to send MQTT messages to a second IoT Topic called "cat-feeder/states"

Your own Thing Architecture

I have a future blog that will demonstrate how to do this using MicroPython and a Seeed Studio XIAO ESP32C3 - so watch this space.

FeedMyFurBabies – Event-Sourcing using Amazon EventBridge

· 8 min read
Chiwai Chan
Tinkerer

In my previous AWS IoT Cat feeder project I used a Lambda function as the event handler each time the Seeed Studio AWS IoT 1-click button was pressed, the Lambda function in turn published an MQTT message to AWS Iot Core which is received by the Cat Feeder (via a Seeed Studio XIAO ESP32C3 micro-controller) to dispense food into either one of the cat bowls or both (depending on the type of press performed on the IoT button). The long term goal is to integrate the AWS IoT Cat Feeder with the Feed My Fur Babies project.

In this Part 2 of the Feed My Fur Babies blog series, I will be introducing the Event-Sourcing pattern to the https://www.feedmyfurbabies.com architecture; describe the benefits of designing an architecture around Event-Souring and an example implemented using Terraform. I recently learnt Terraform and I now prefer it over the native IaC.

Current state architecture

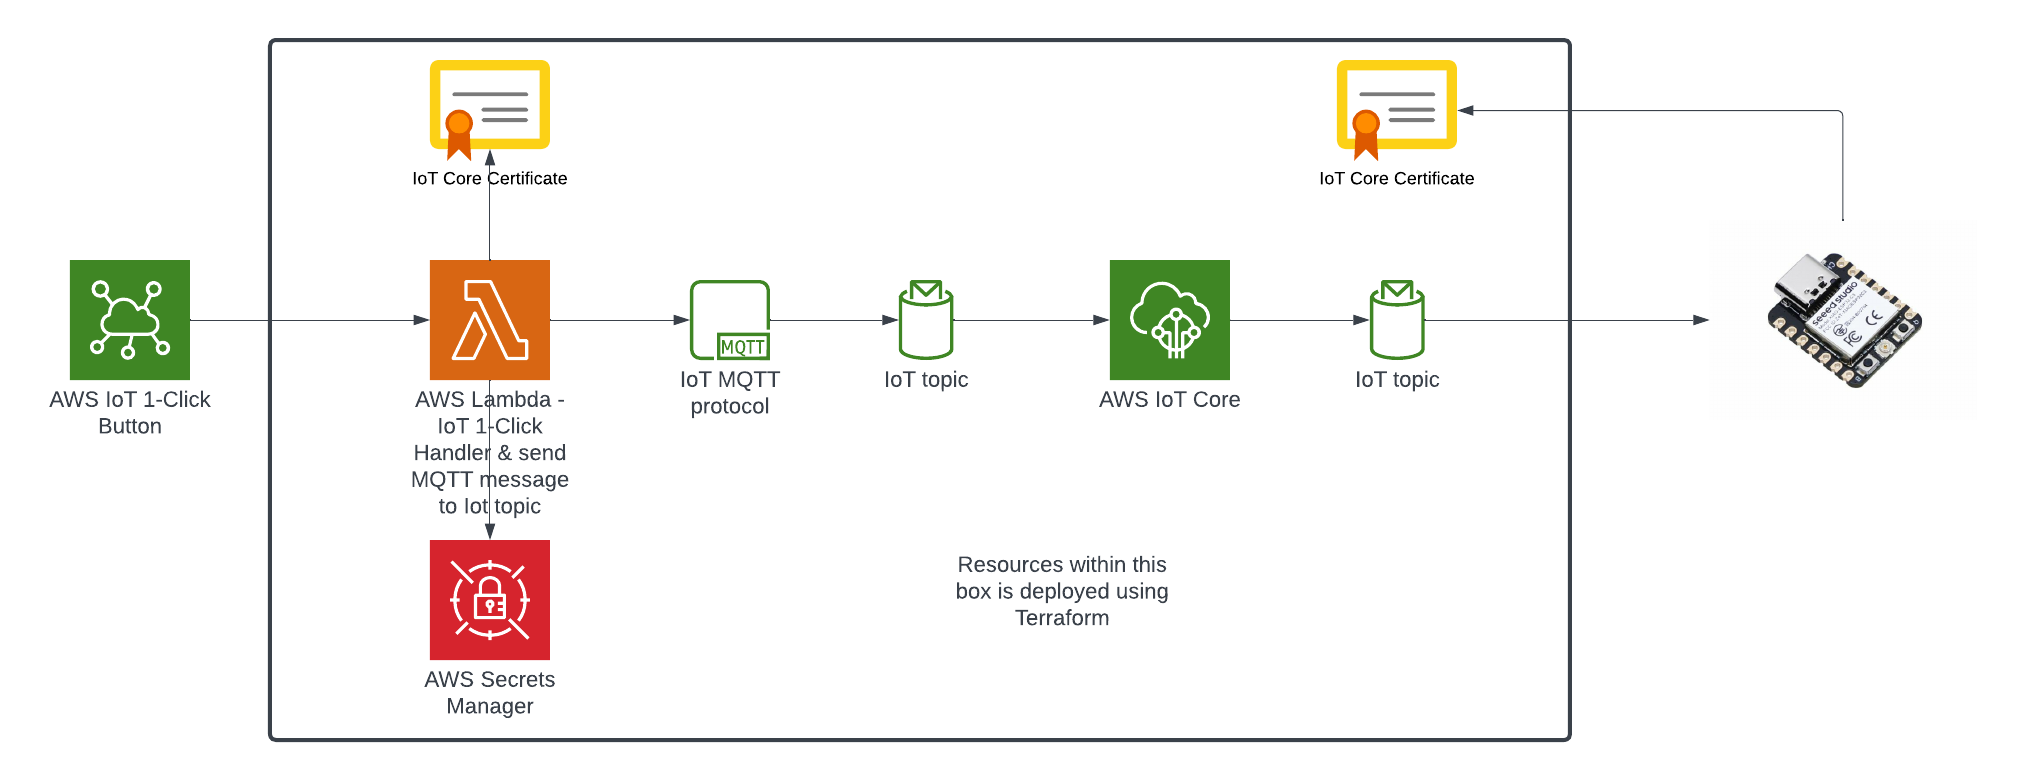
Here is the current state of the Cat Feeder architecture amd the IoT related resources previously deployed in AWS using CloudFormation:

Current State Architecture

The responsibilities of each of the resources deployed in the diagram prior to the introduction of the Event-Sourcing pattern into the architecture are:

  • AWS IoT 1-Click Button: This is an IoT button I physically press to emit an event to dispense food into one or both of the cat bowls, this button can be used anywhere where there is a WIFI connection
  • AWS IoT Core Certificates: Certificates are associated with resources and devices that interacts with the AWS IoT Core Service, either publishing an MQTT message to an AWS IoT Topic, or receiving an MQTT message from a Topic
  • AWS Lambda - IoT 1-Click Event Handler & sends an MQTT message to an Iot topic: This Lambda function is responsible for handling incoming events created by the AWS IoT 1-Click Button, as well as translating the event into an MQTT message before sending it to an AWS IoT Core Topic. This is the component in the architecture that is the main focus of this blog post, we will describe how this component will be re-architectured and decomposed to work in conjunction with the introduction of the Event-Sourcing pattern.
  • AWS IoT Core: This is the IoT service that manages the IoT Topics and Subcriptions to said Topics
  • Seeed Studio XIAO ESP32C3: a micro-controller subscribed to the IoT Topic (the one the Lambda sent MQTT messages to) that will dispense food into 1 or 2 cat bowls when it receives an MQTT message from the Topic

For further details on what role this architecture plays in the Smart IoT Cat Feeder, visit Part 2 of the Smart Cat Feeder Blog Series.

What is Event-Sourcing?

The idea of Event-Sourcing is to capture all events that occurs within a system during its lifetime, these events are stored in an immutable ledger in the sequence in which they occurred in.

One of the biggest benefits of capturing all the events of a system is that we are able to replay every single event that has ever occured within the system (partially or as a whole) at a later time (lets say 5 years later), and have the ability to selectively replay the 5 years worth of events to one or more specific downstream event bus targets: an event bus target could be a new application that was deployed into your production environment 5 years after the first event was created; what this means is that we could hydrate this new application's datastore with 5 years worth of data as if it existed at the beginning when the first event occured. Also, imagine being able to re-create entire datastores with the full history for 100s of applications (where each application has its own datastore) within your system landscape, these datastores could be hydrated with the full history of events stored in the immutable Event-Sourcing ledger, or even replay the events that occur from the very first event and up to a specific event at a given point in time (e.g. half of the entire ledge) - effectively providing you with the ability to create any datastore in any datastore engine with the data inside in a state to any given point in time.

How do we introduce Event-Sourcing into the architecture?

Step 1

We start off with the AWS Lambda function shown in the current state architecture where its responsibilites is to handle the events received from the AWS IoT 1-Click Button each time it is pressed, as well as sending an MQTT message to an AWS Iot Core Topic in response to each incoming event; essentially it has 2 distinct responsibilities


Step 2

Next, we decompose the single Lambda function into 2 separate distinct Lambda functions based on its 2 responsibilities, then we chain the 2 Lambda functions together to preserve its functionality - what we have effectively achieved by doing this is decoupling the 2 responsibilities as 2 separate units of work - resulting in 2 separate compute resources.

The benefits by a decoupled architecture are:

  • Each of the Lambda functions can be implemented in different languages - e.g. one in Python and the other can be in Java
  • Independent release cycles for each of the Lambda functions
  • Changes to either one of the 2 responsibilities can be made independently of each other
  • Each Lambda function can be scaled independently of another

Step 3

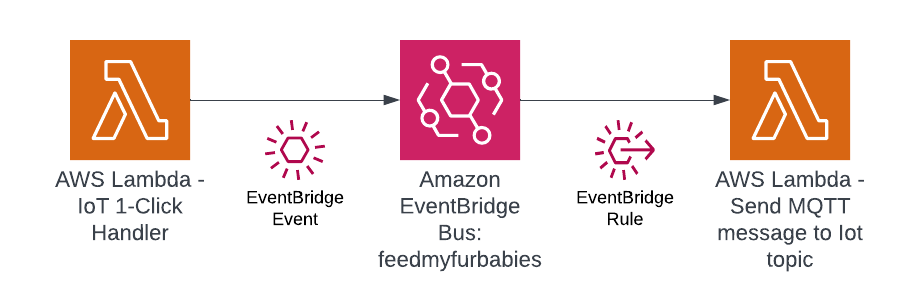
In this step we use Amazon EventBridge as the Event-Sourcing store - known as the immutable ledger we described earlier, we will also leverage EventBridge as a serverless event bus to help us receive, filter, transform, route and deliver events to downstream services (event bus targets). In this instance we will slip EventBridge in between the 2 Lambda functions and we will be storing every single IoT event sent by the IoT Button into the immutable ledge,

Benefits of adding EventBridge to the architecture:

  • The IoT 1-Click Lambda handler no longer directly calls the downstream Lambda function - so it is unaware of the downstream targets
  • The IoT events are stored in an immutable ledger in the sequence in which they occurred in
  • Prepare the system landscape with the ability to more easily develop micro-services in an Event-Driven architecture using the orchestration pattern

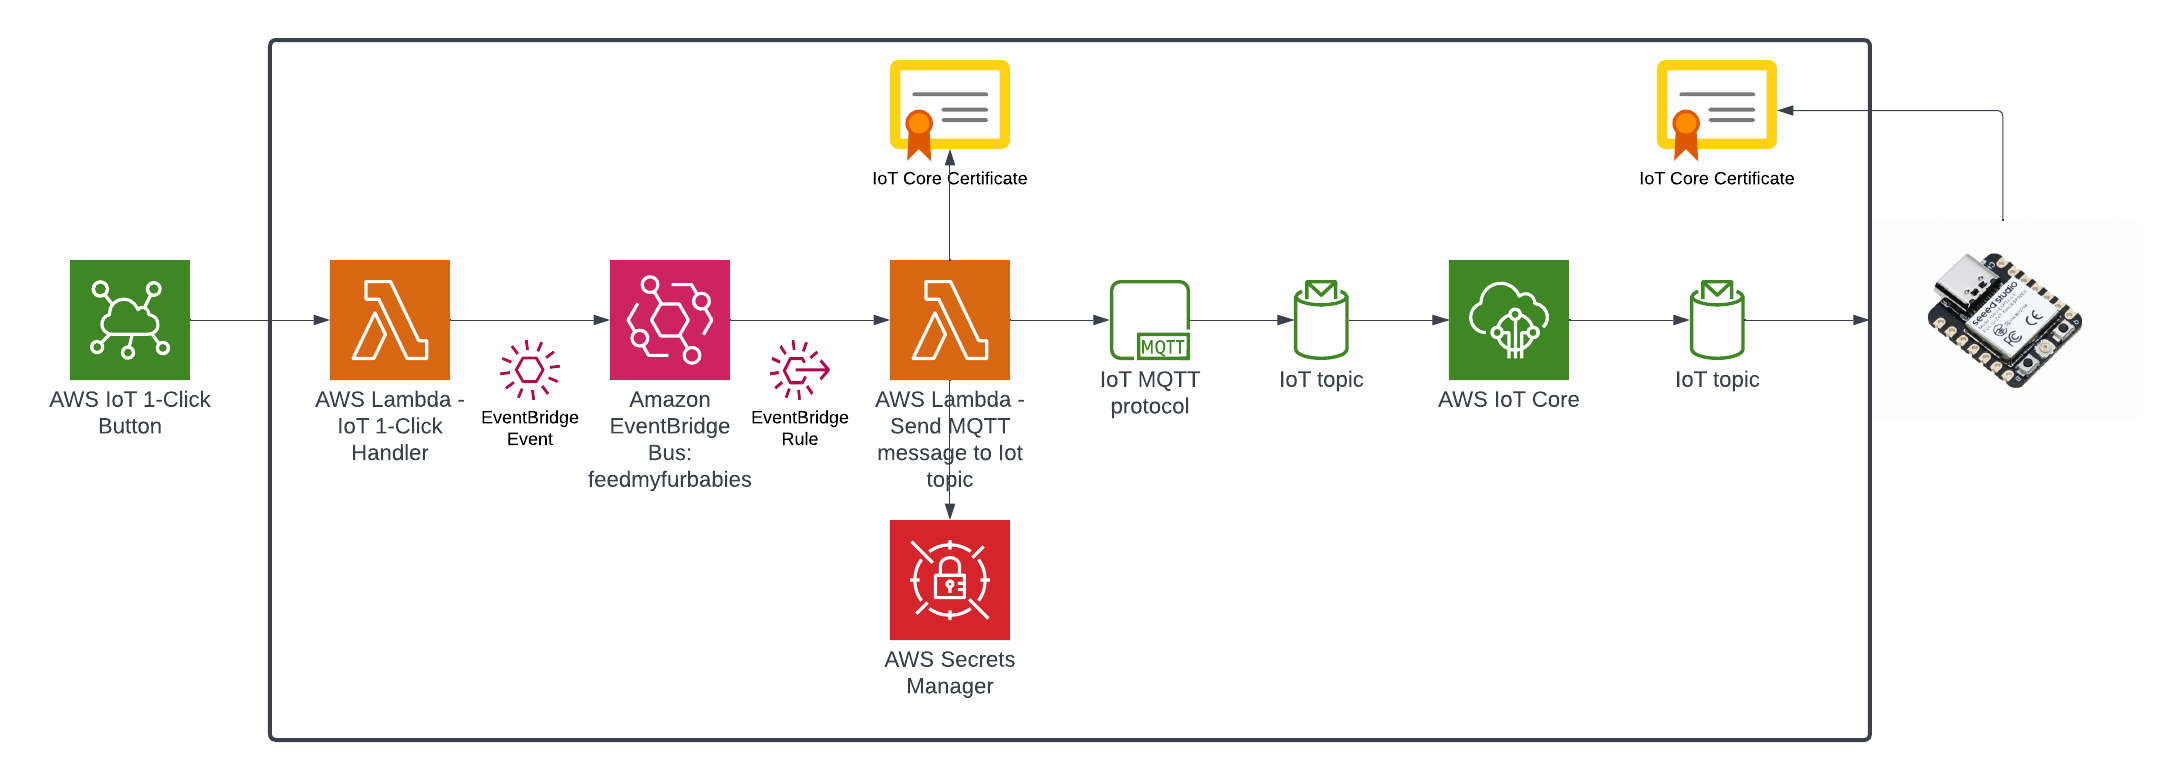
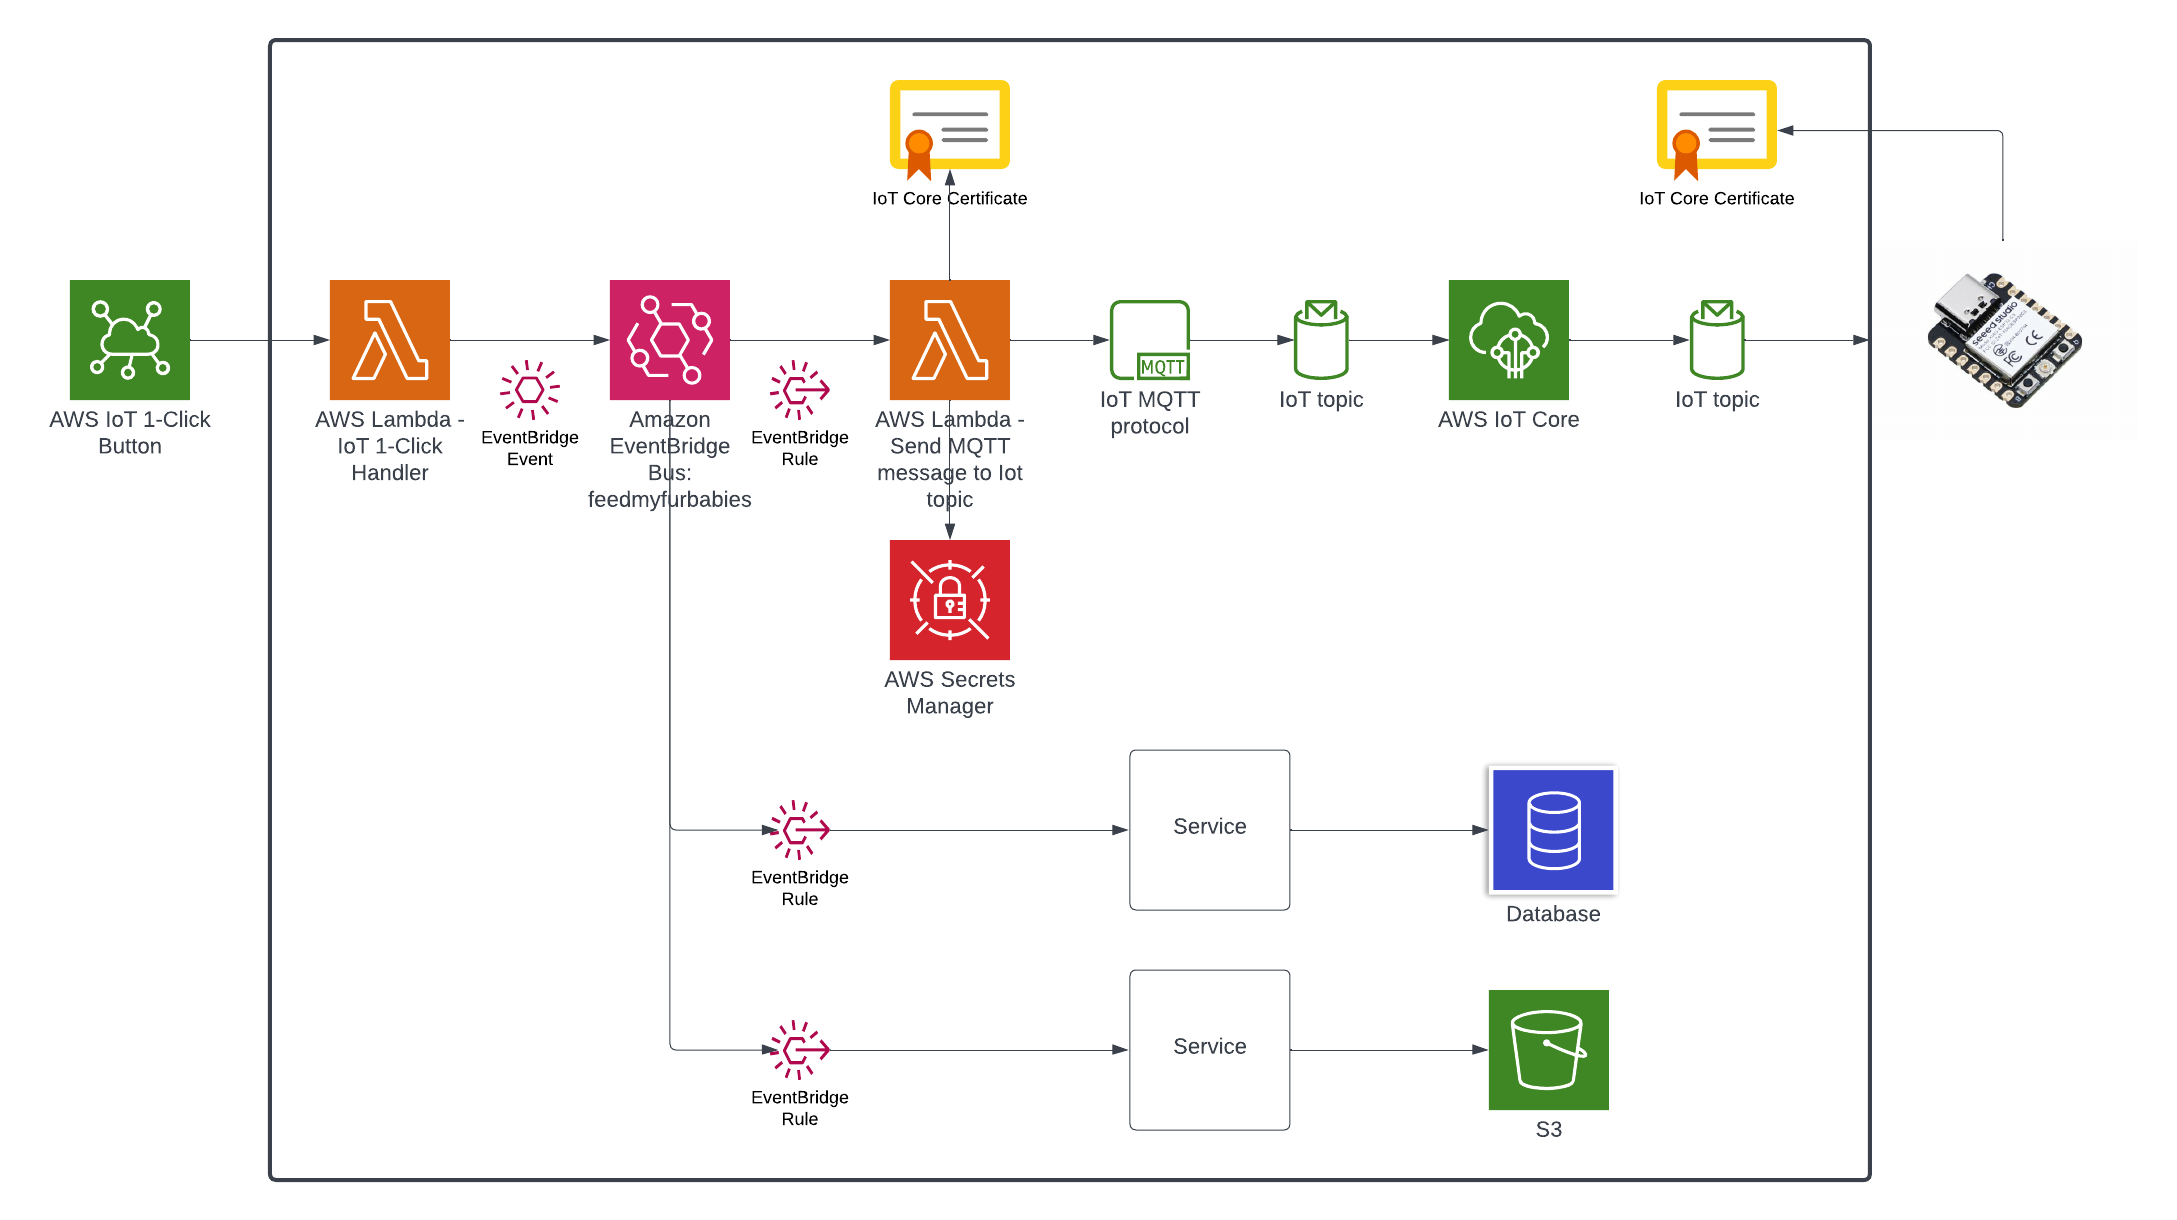
Target State Architecture

Target State Architecture

This is the end result of introducing Event-Sourcing to the architecture; it may not look like much benefits has been gained from adding Amazon EventBridge - in fact one might think that we've added more components and in effect created more moving parts and complexity. But I have decided to specifically introduce this very early into the architecture as an investment so that I am in a position to rapdily build out my micro-service architecture - reaping the rewards from the get go.

Try it out for yourself

I have created a GitHub Repository to deploy a complete working example of the resources shown in the Target State Architecture using Terraform.

I suggest you deploy this to have a play for yourself:

  1. Clone the repository: "git clone git@github.com:chiwaichan/feedmyfurbabies-202303-eventsourcing-using-eventbridge.git"
  2. Setup your Terraform environment
  3. Run: "terraform init && terraform apply"

Also, check out each individual resource deployed by this Terrafrom code.

Create a test IoT 1-Click event to pass the event end-to-end through all the deployed resources

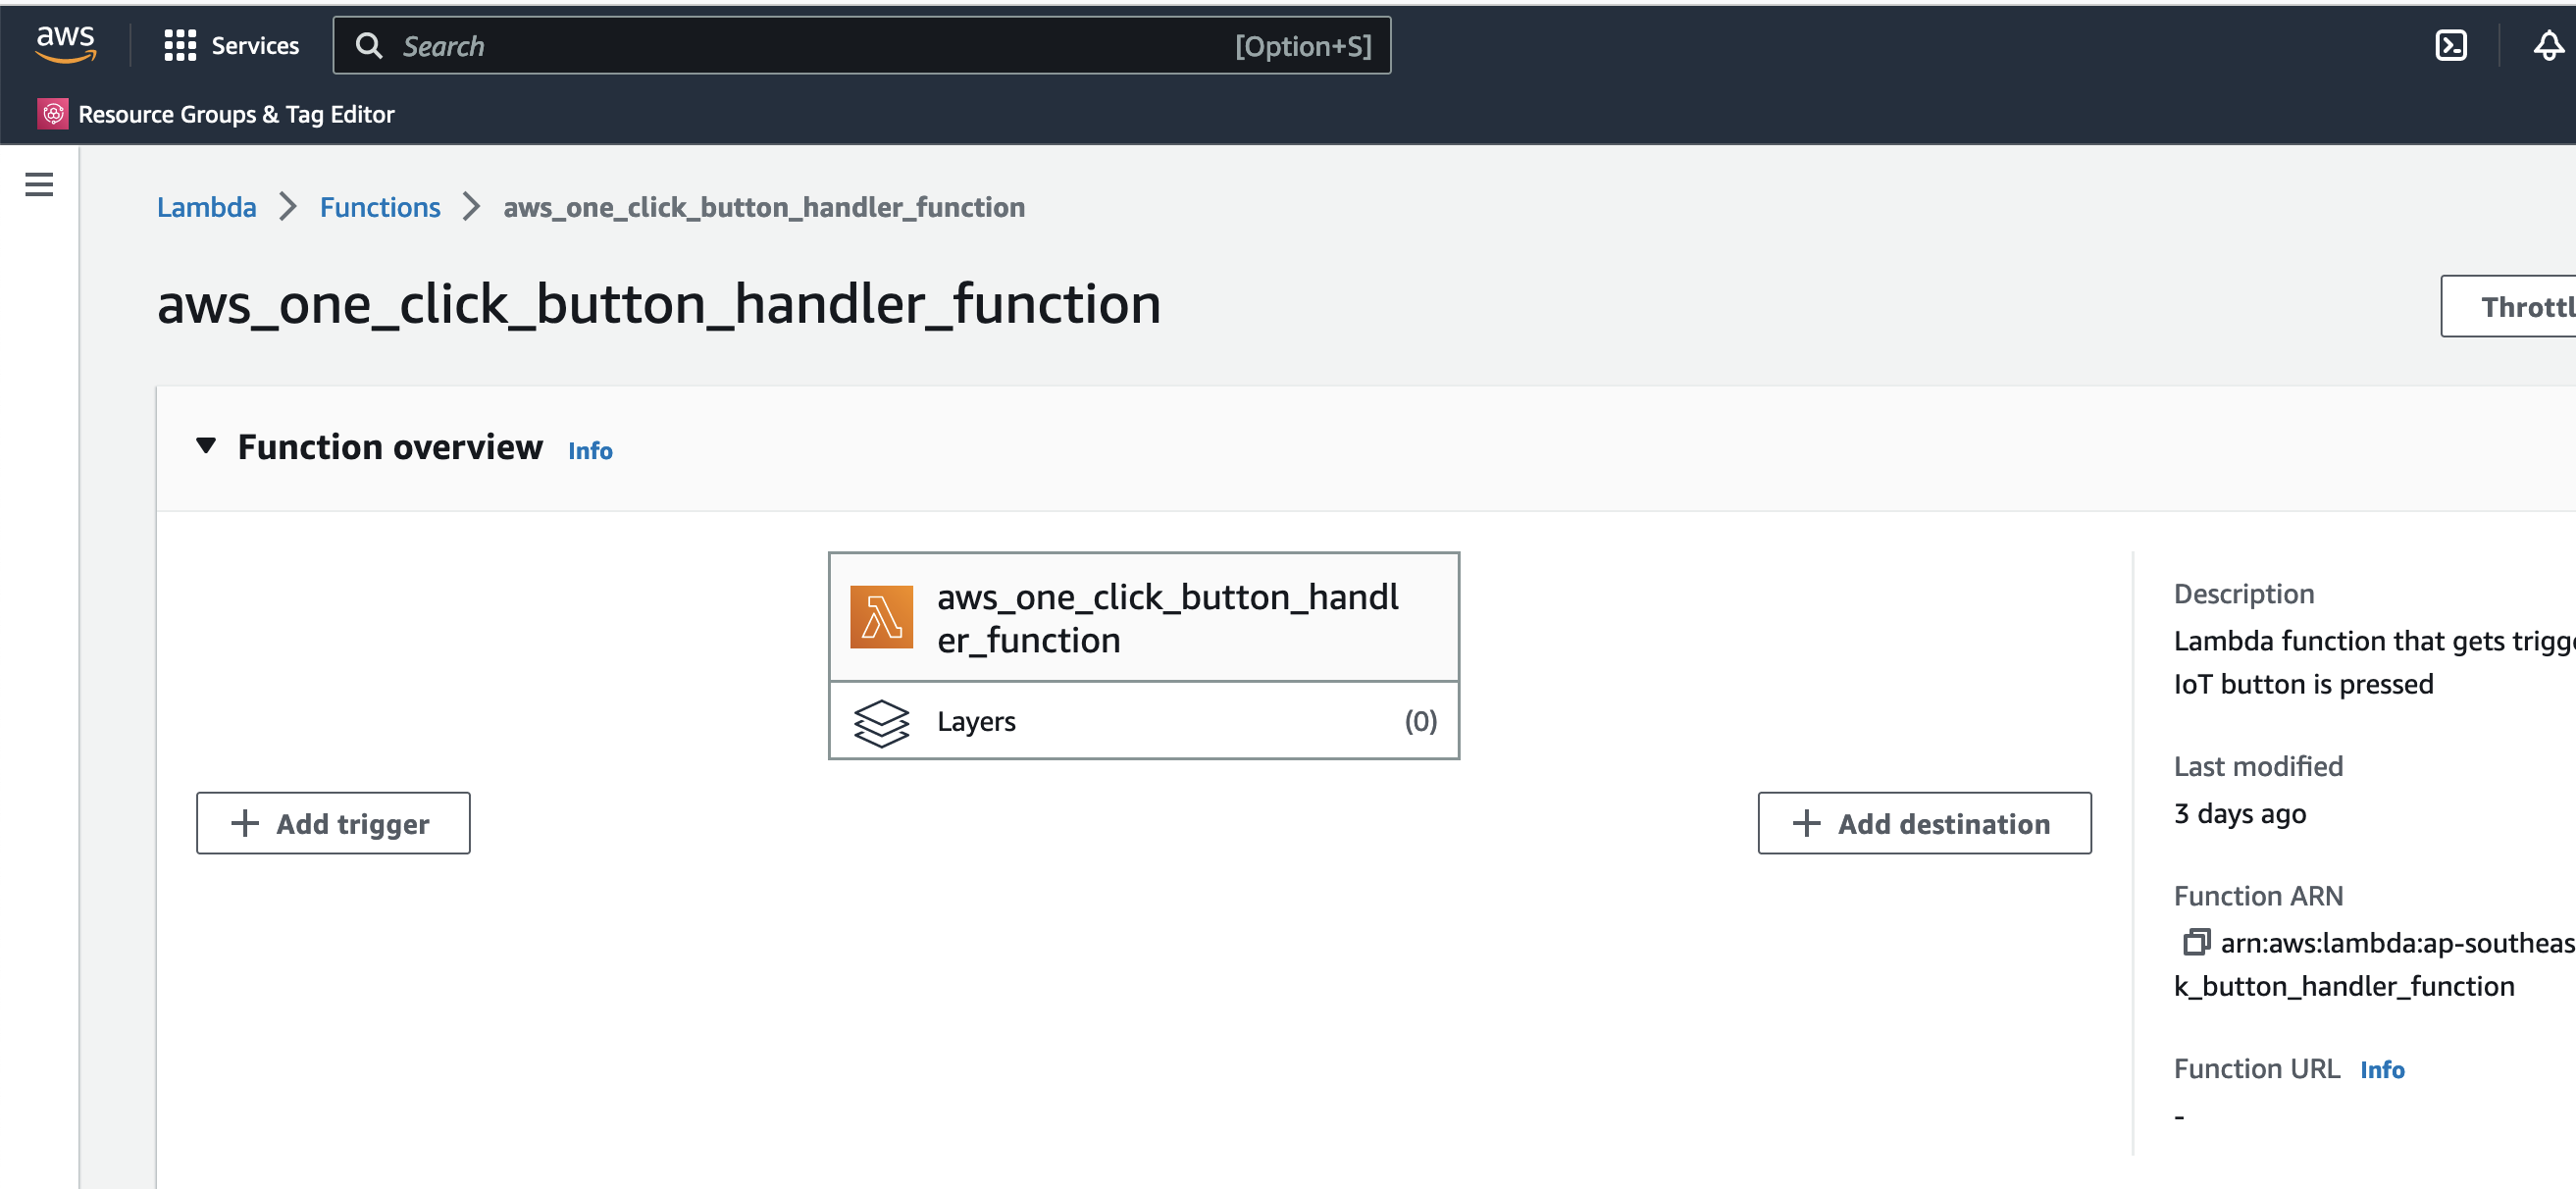
This is the IoT 1-Click Lambda function handler shown in the AWS Console

1-Click Handler Lambda

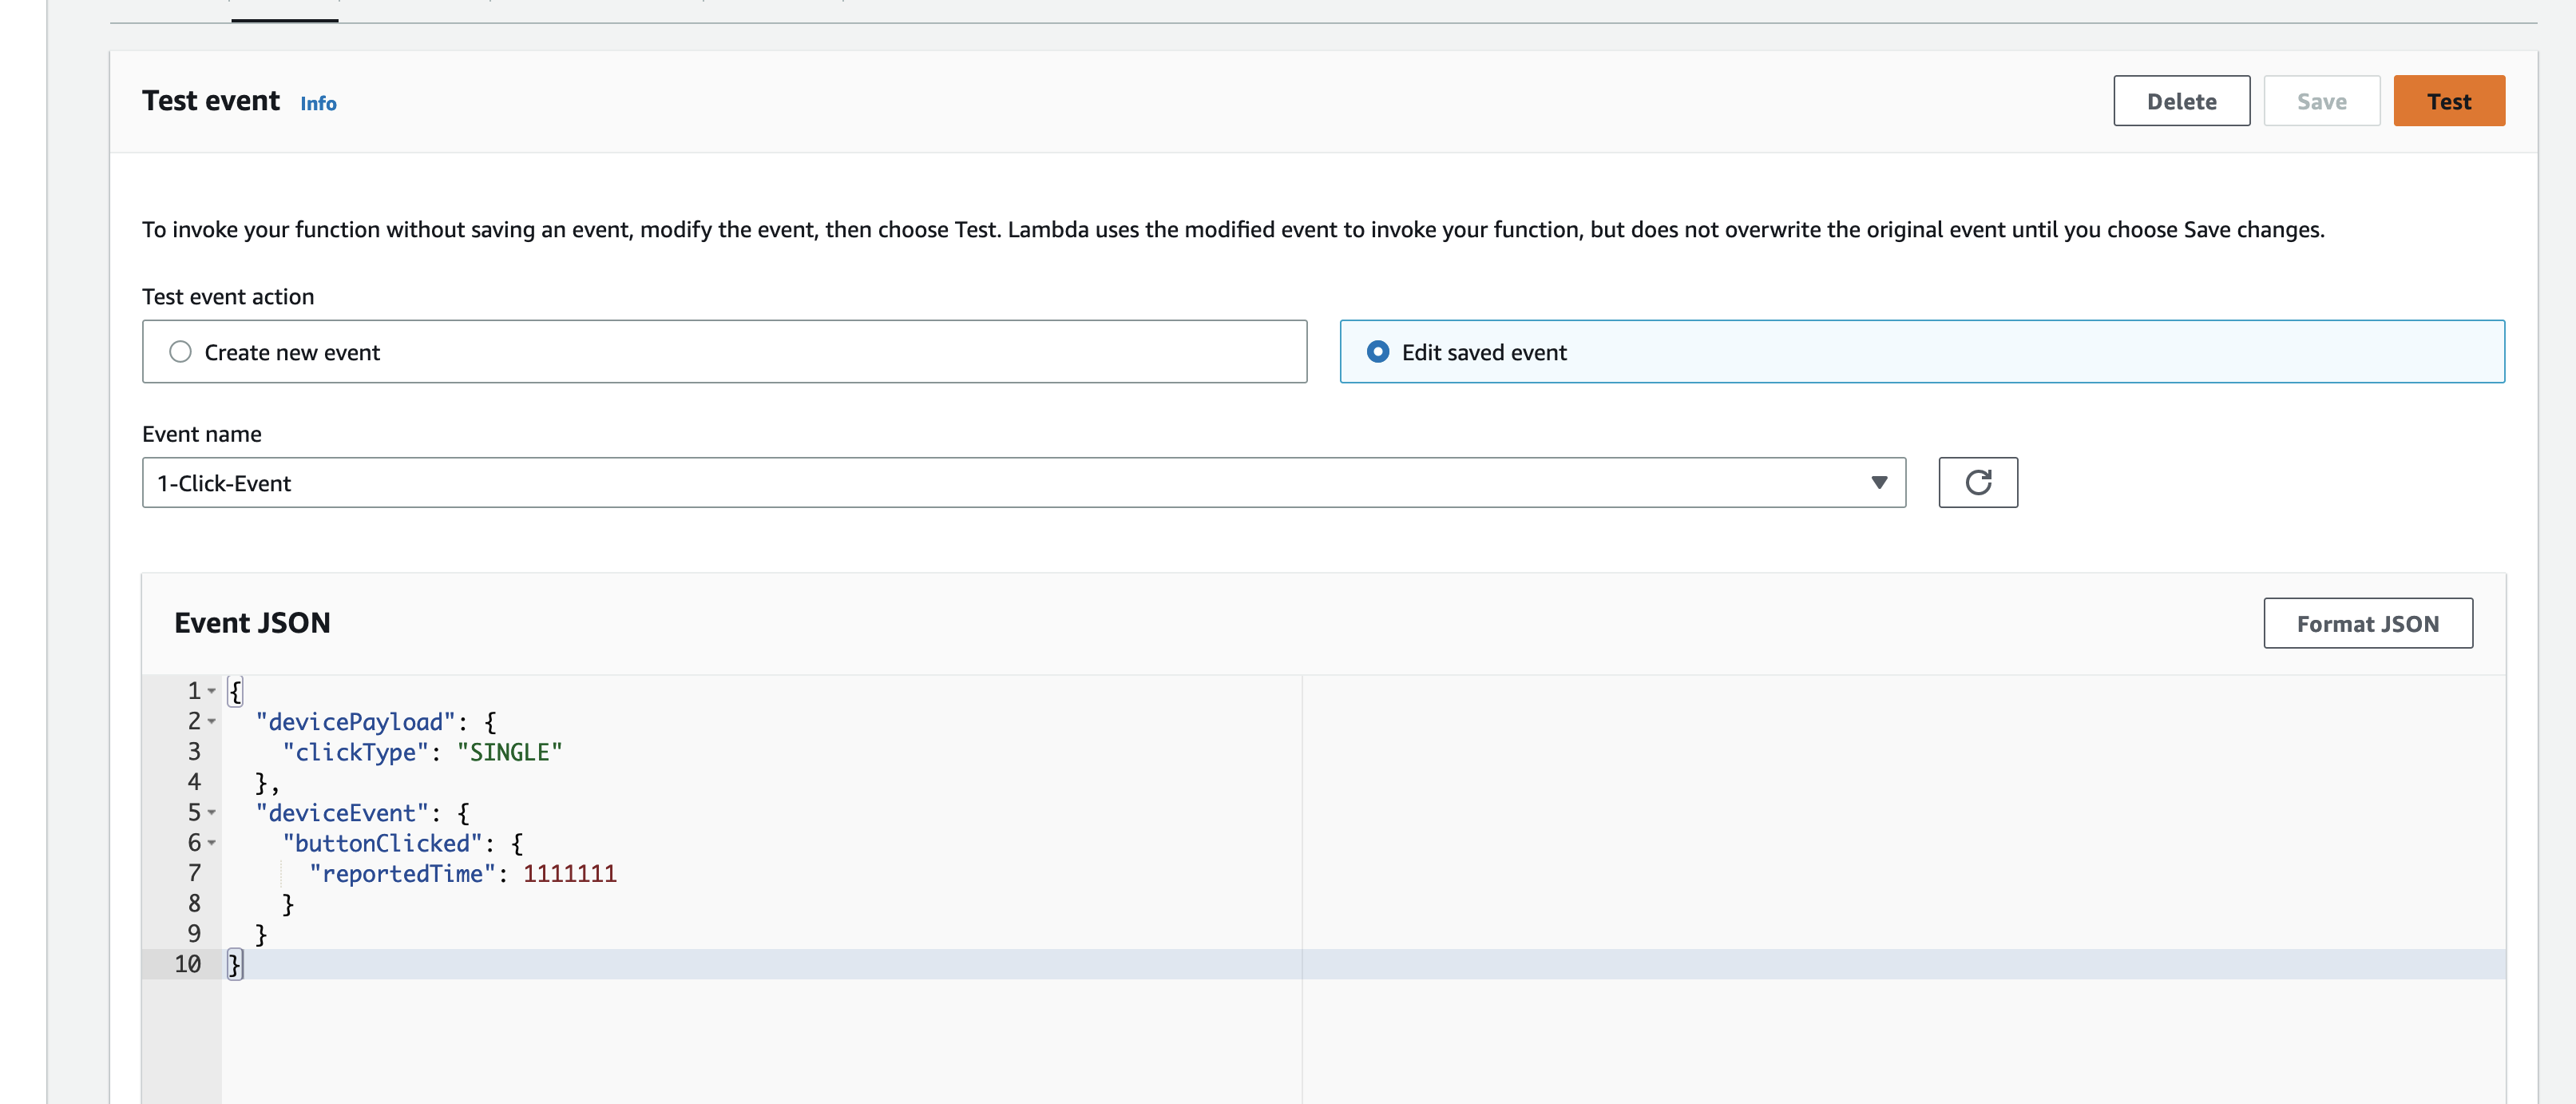
Create a test event so we can invoke the Lambda function to simulate an event as if a physical IoT Button is pressed

1-Click Handler Lambda - Test Event

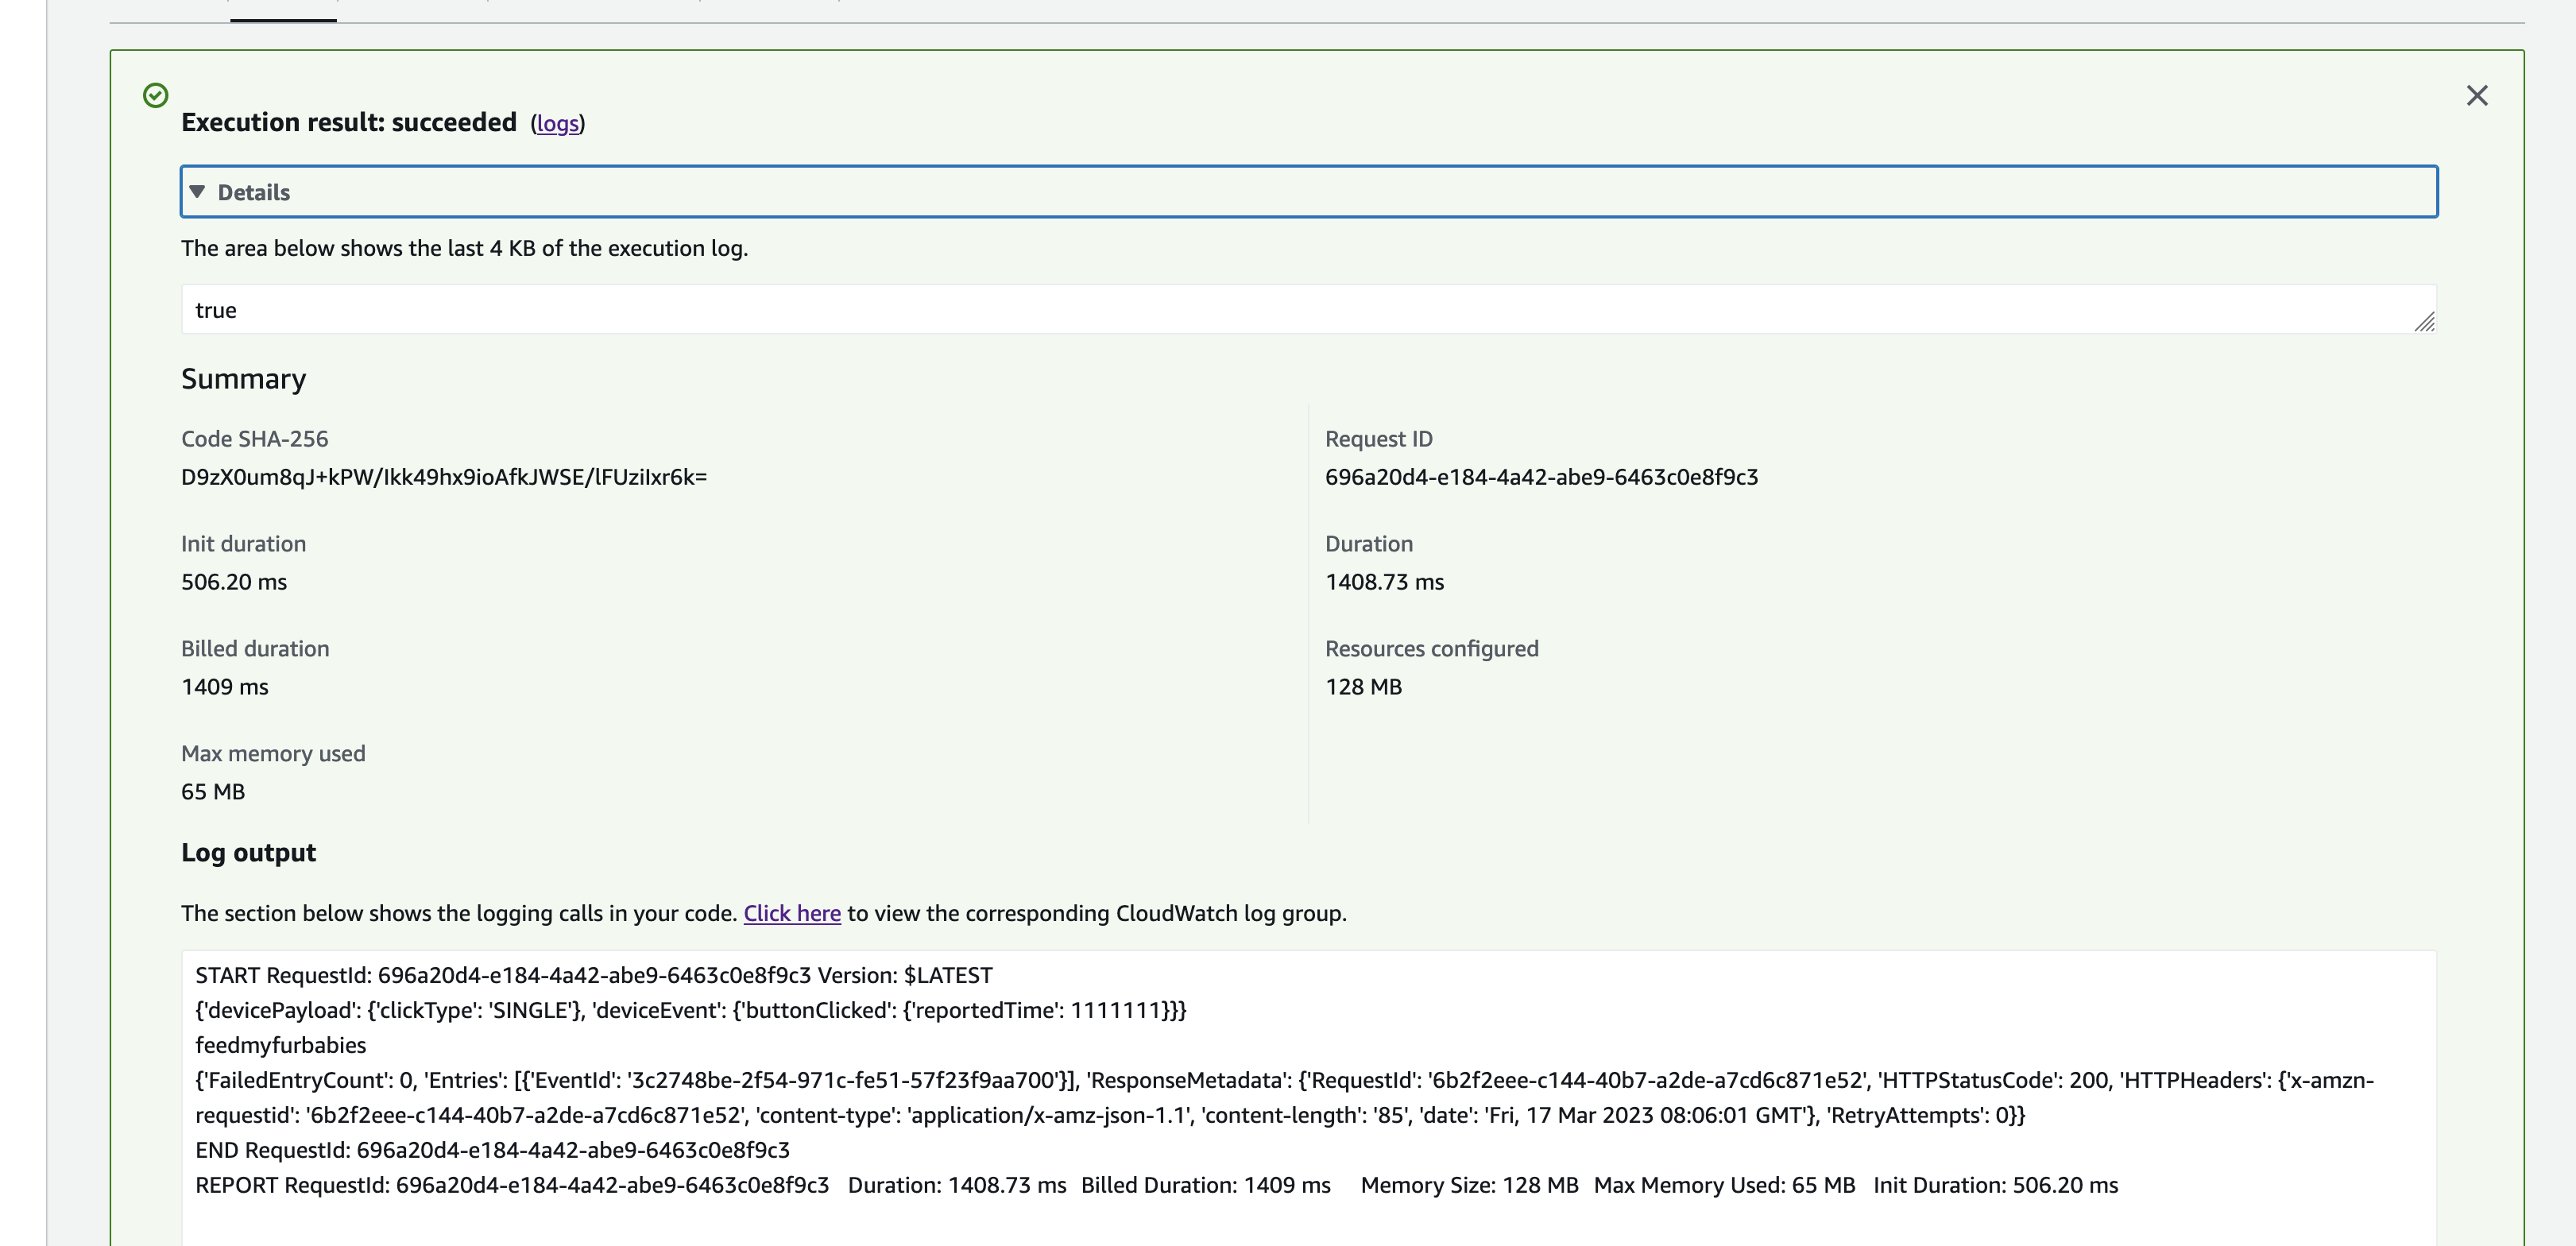
Here we can view the logs for this Lambda function Test invocation

1-Click Handler Lambda - Test Event

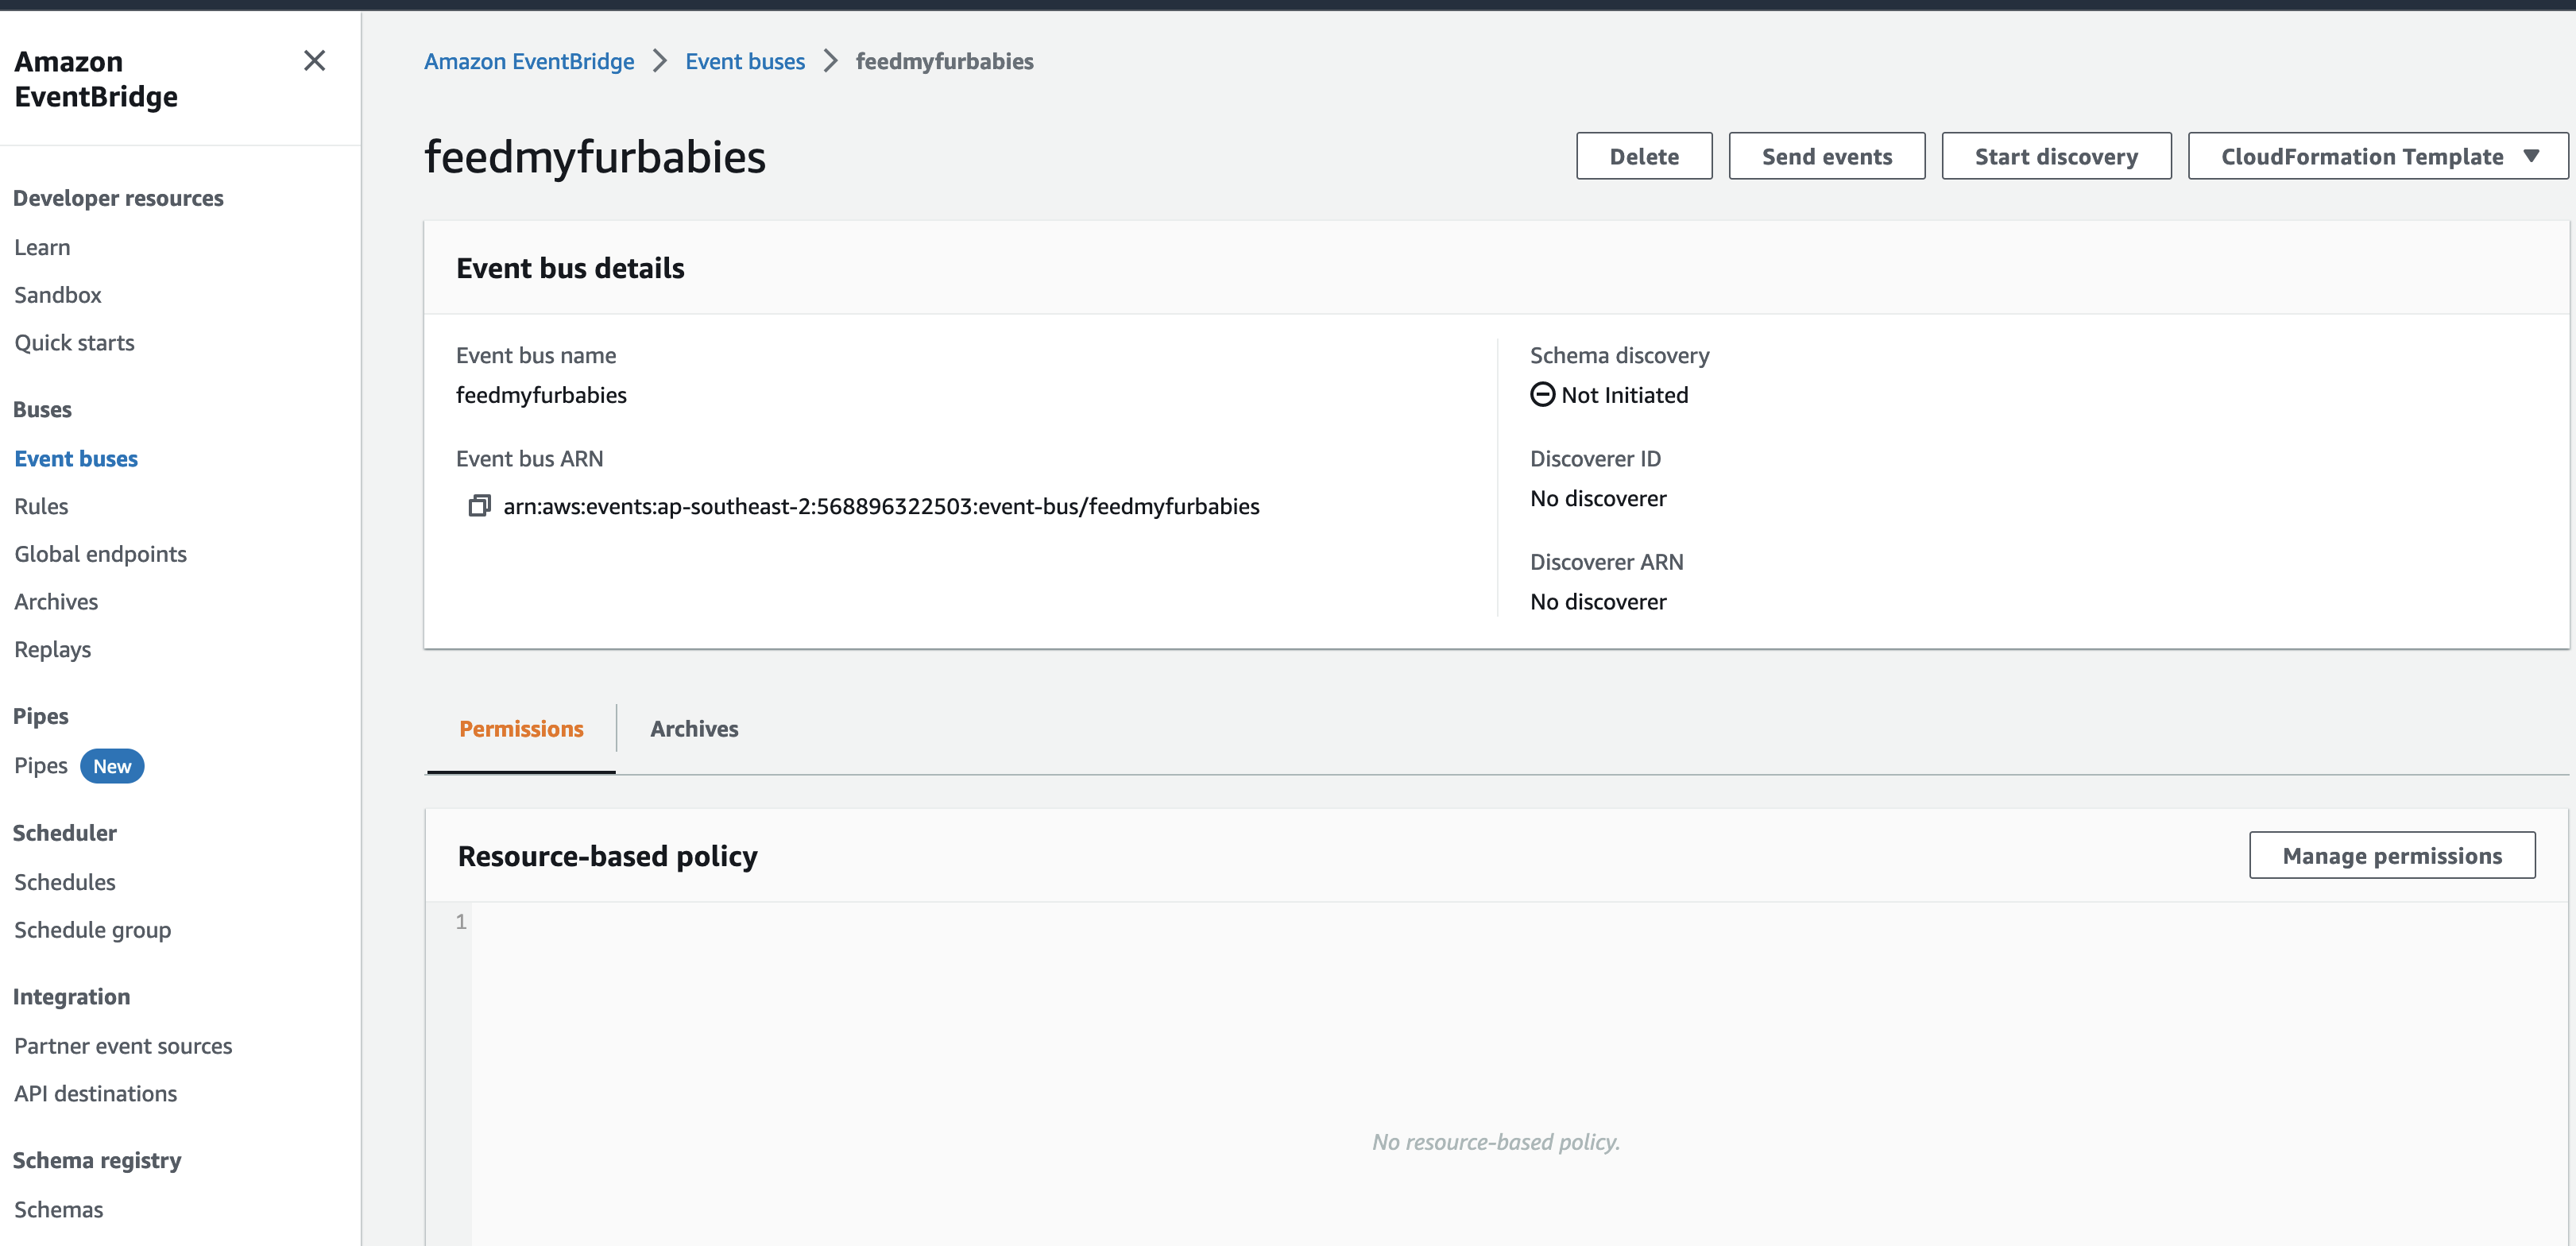
The IoT 1-Click Lambda function handler sends an Event to the Custom EventBridge Event Bus named "feedmyfurbabies"

EventBridge Event Bus

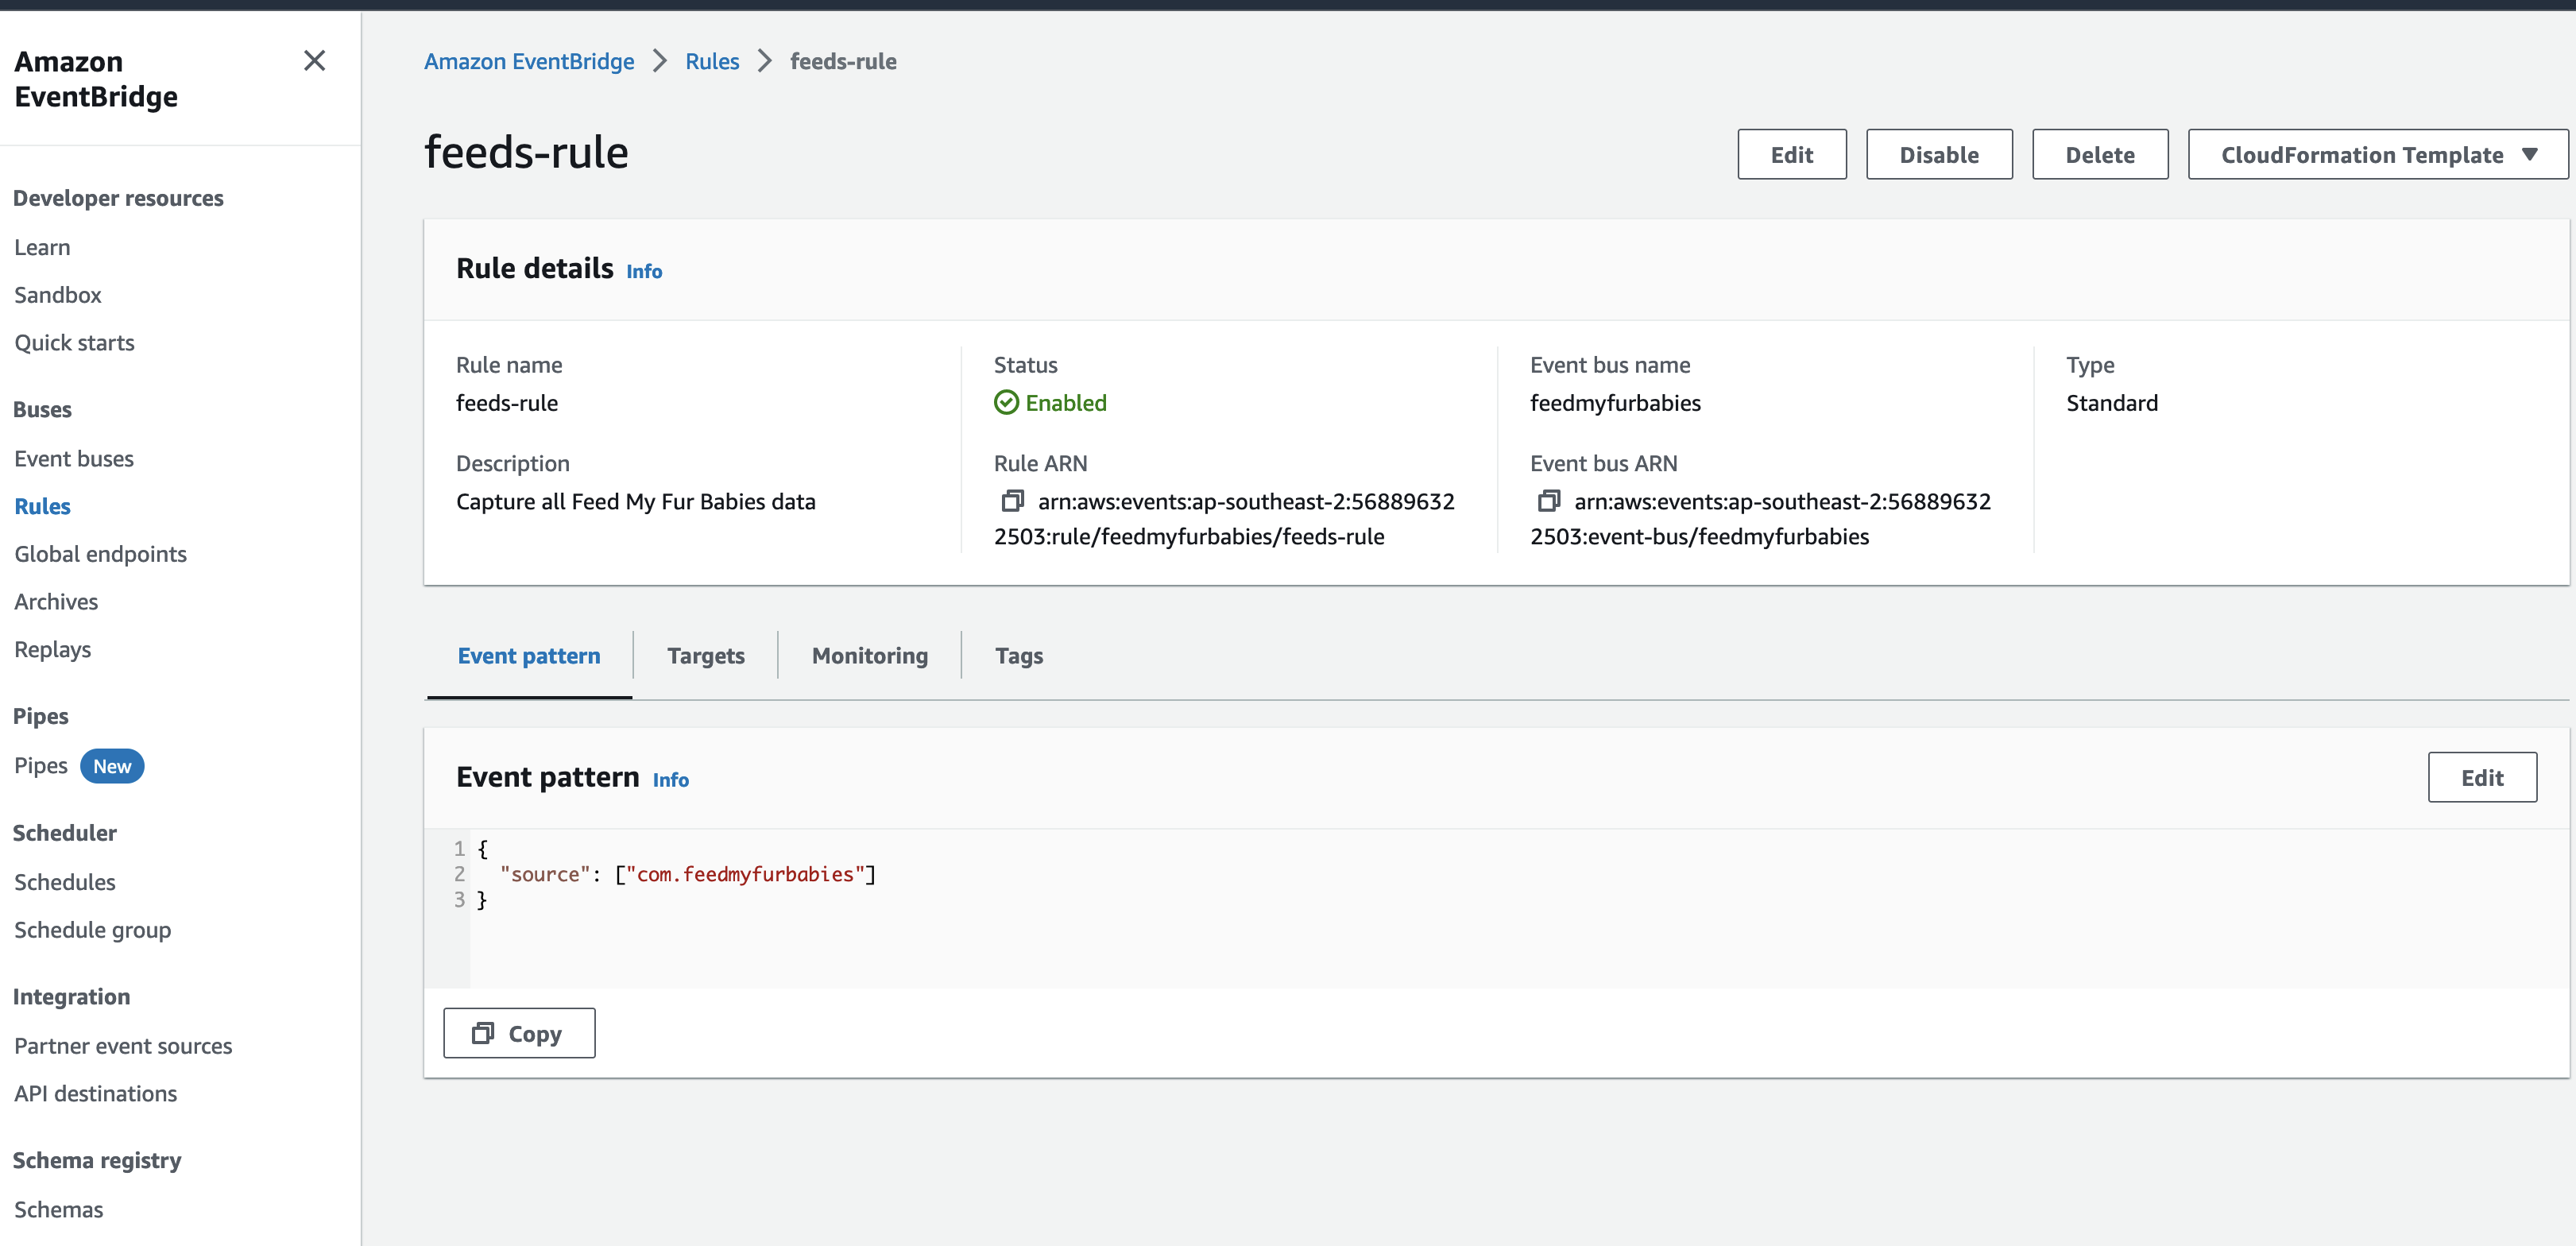
The event sent to the Custom Event Bus matches on the "source" attribute with a value of "com.feedmyfurbabies" with the Custom Event Bus Rule named "feeds-rule"

EventBridge Event Bus Rule

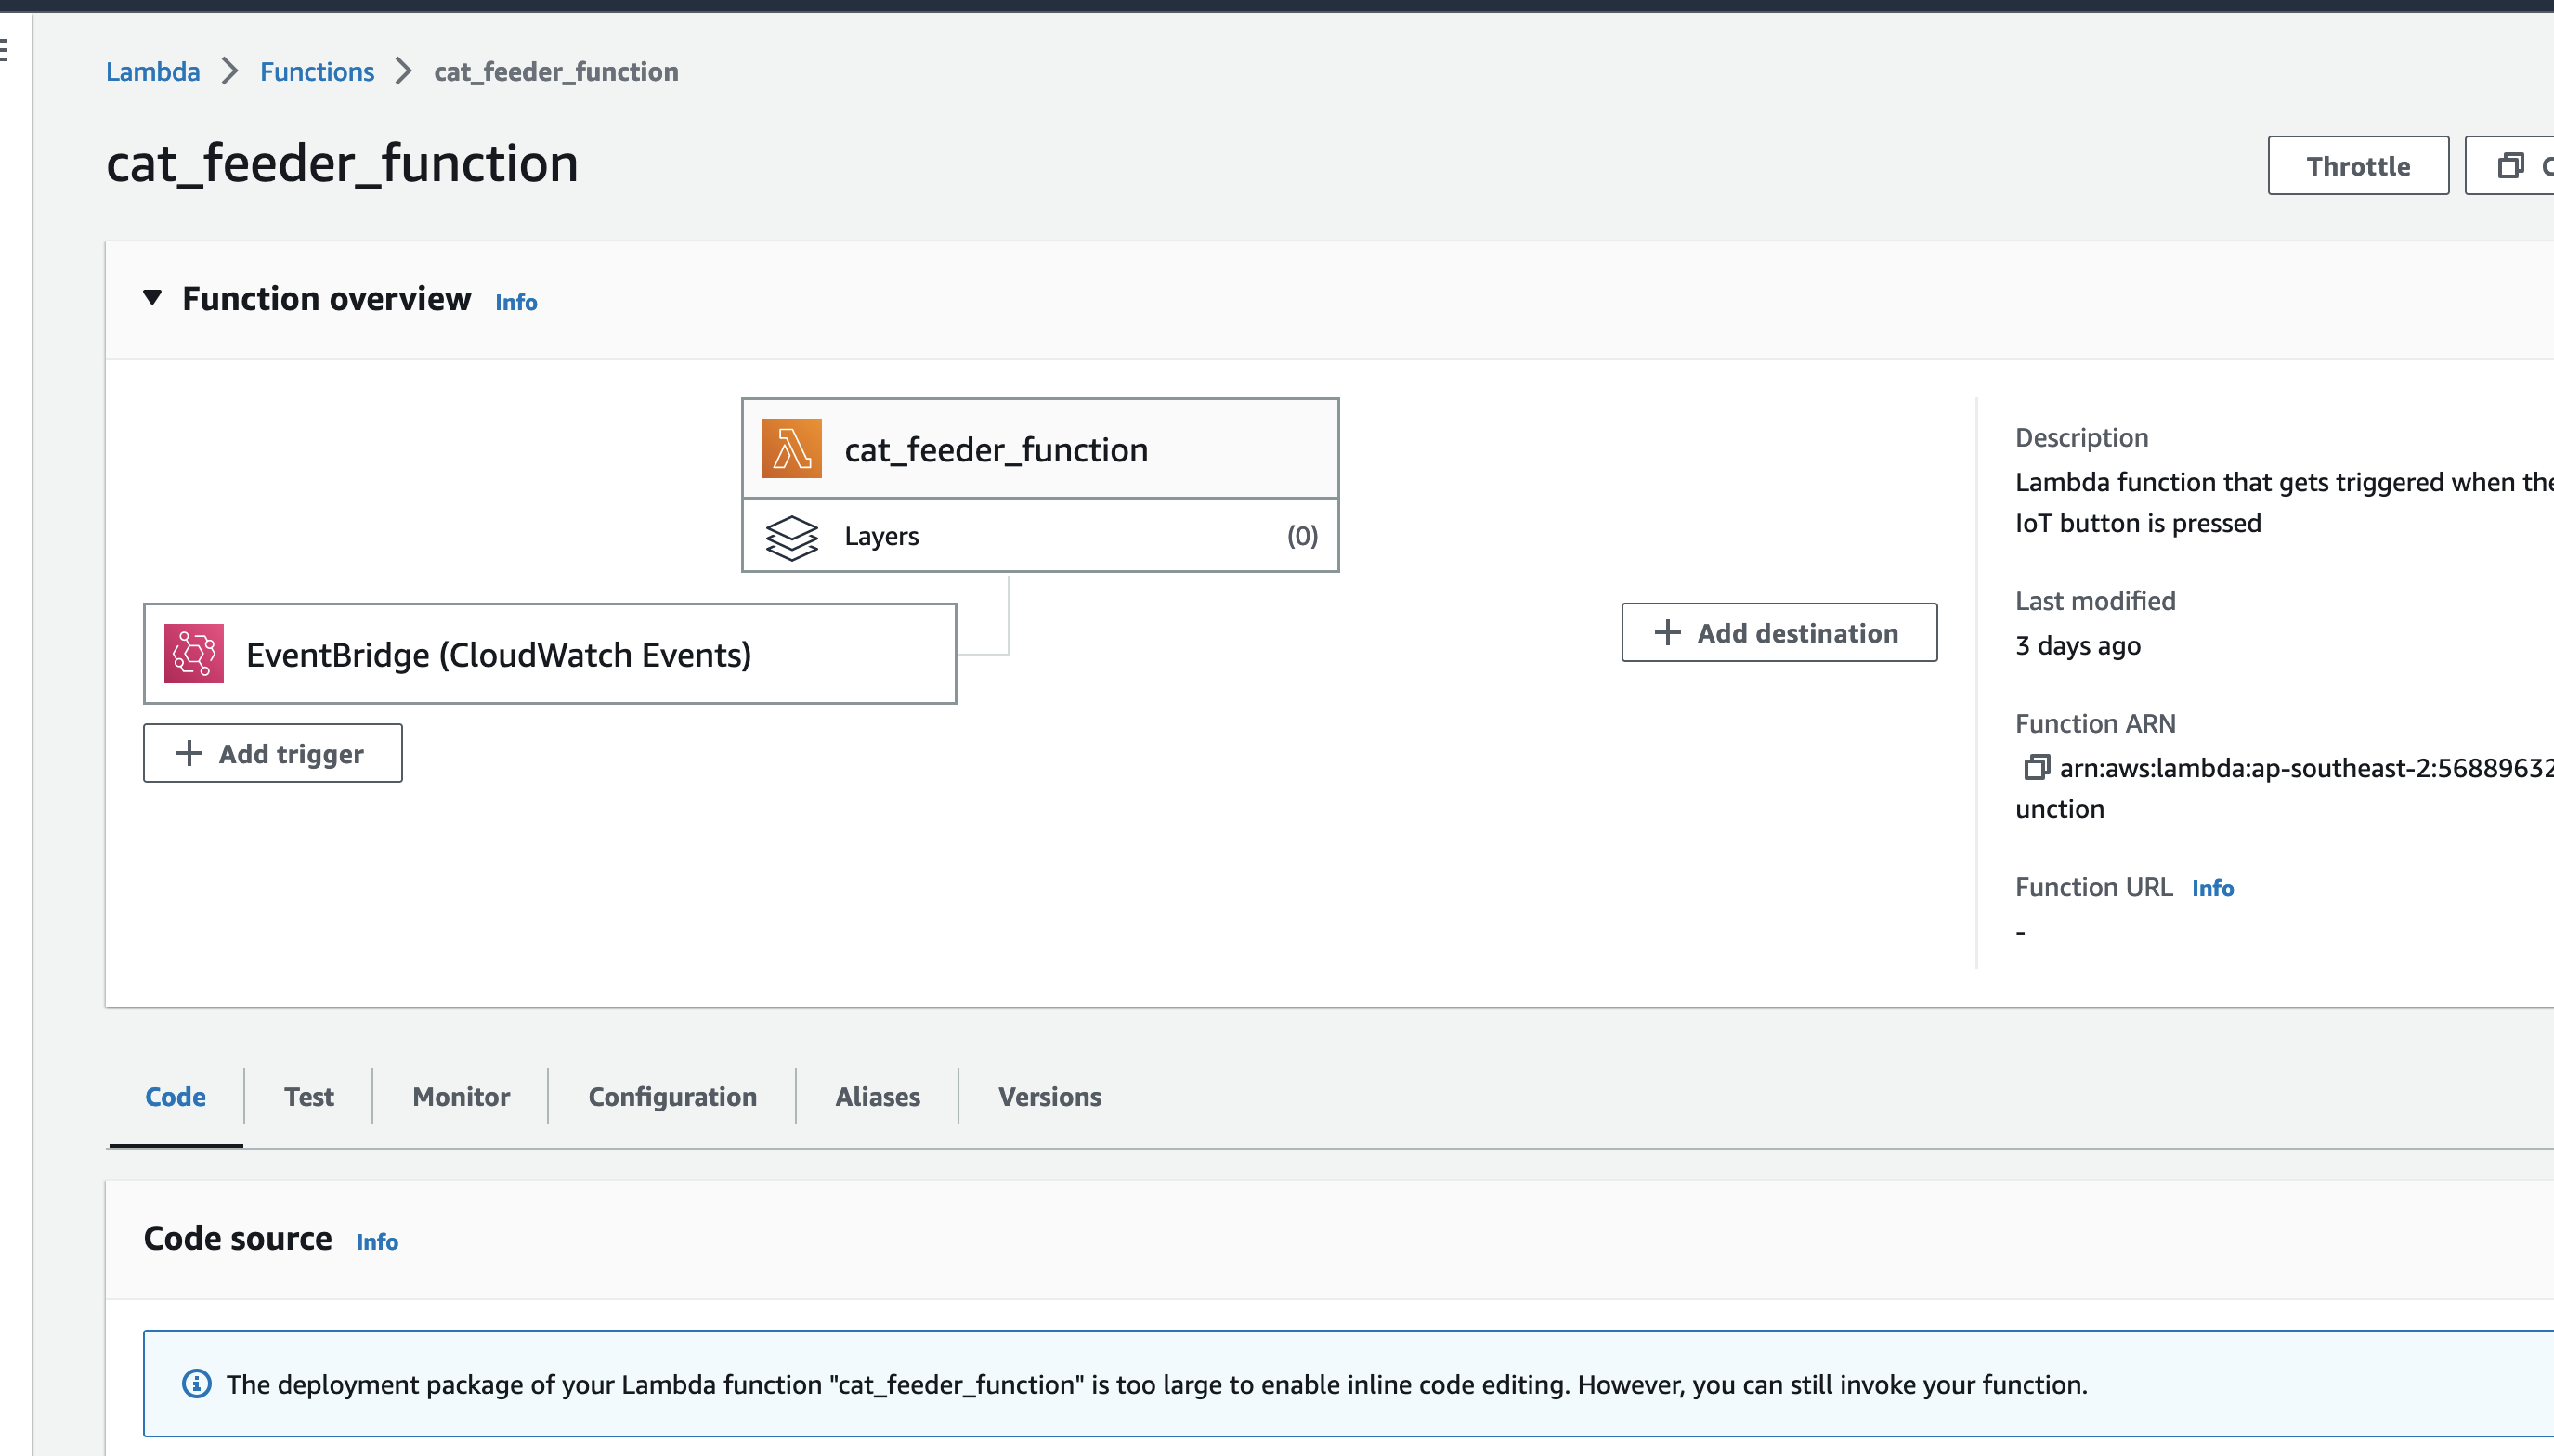
This Lambda function is the downstream target of the Custom Event Bus Rule that was mactched by the event and is responsible for interpreting the event message and translate it into an MQTT message, then in turn sends it to the AWS IoT Core Topic "cat-feeder/action" that you can subscribe to using a micro-controller, e.g. Seeed Studio XIAO ESP32C3.

Send MQTT Message Lambda

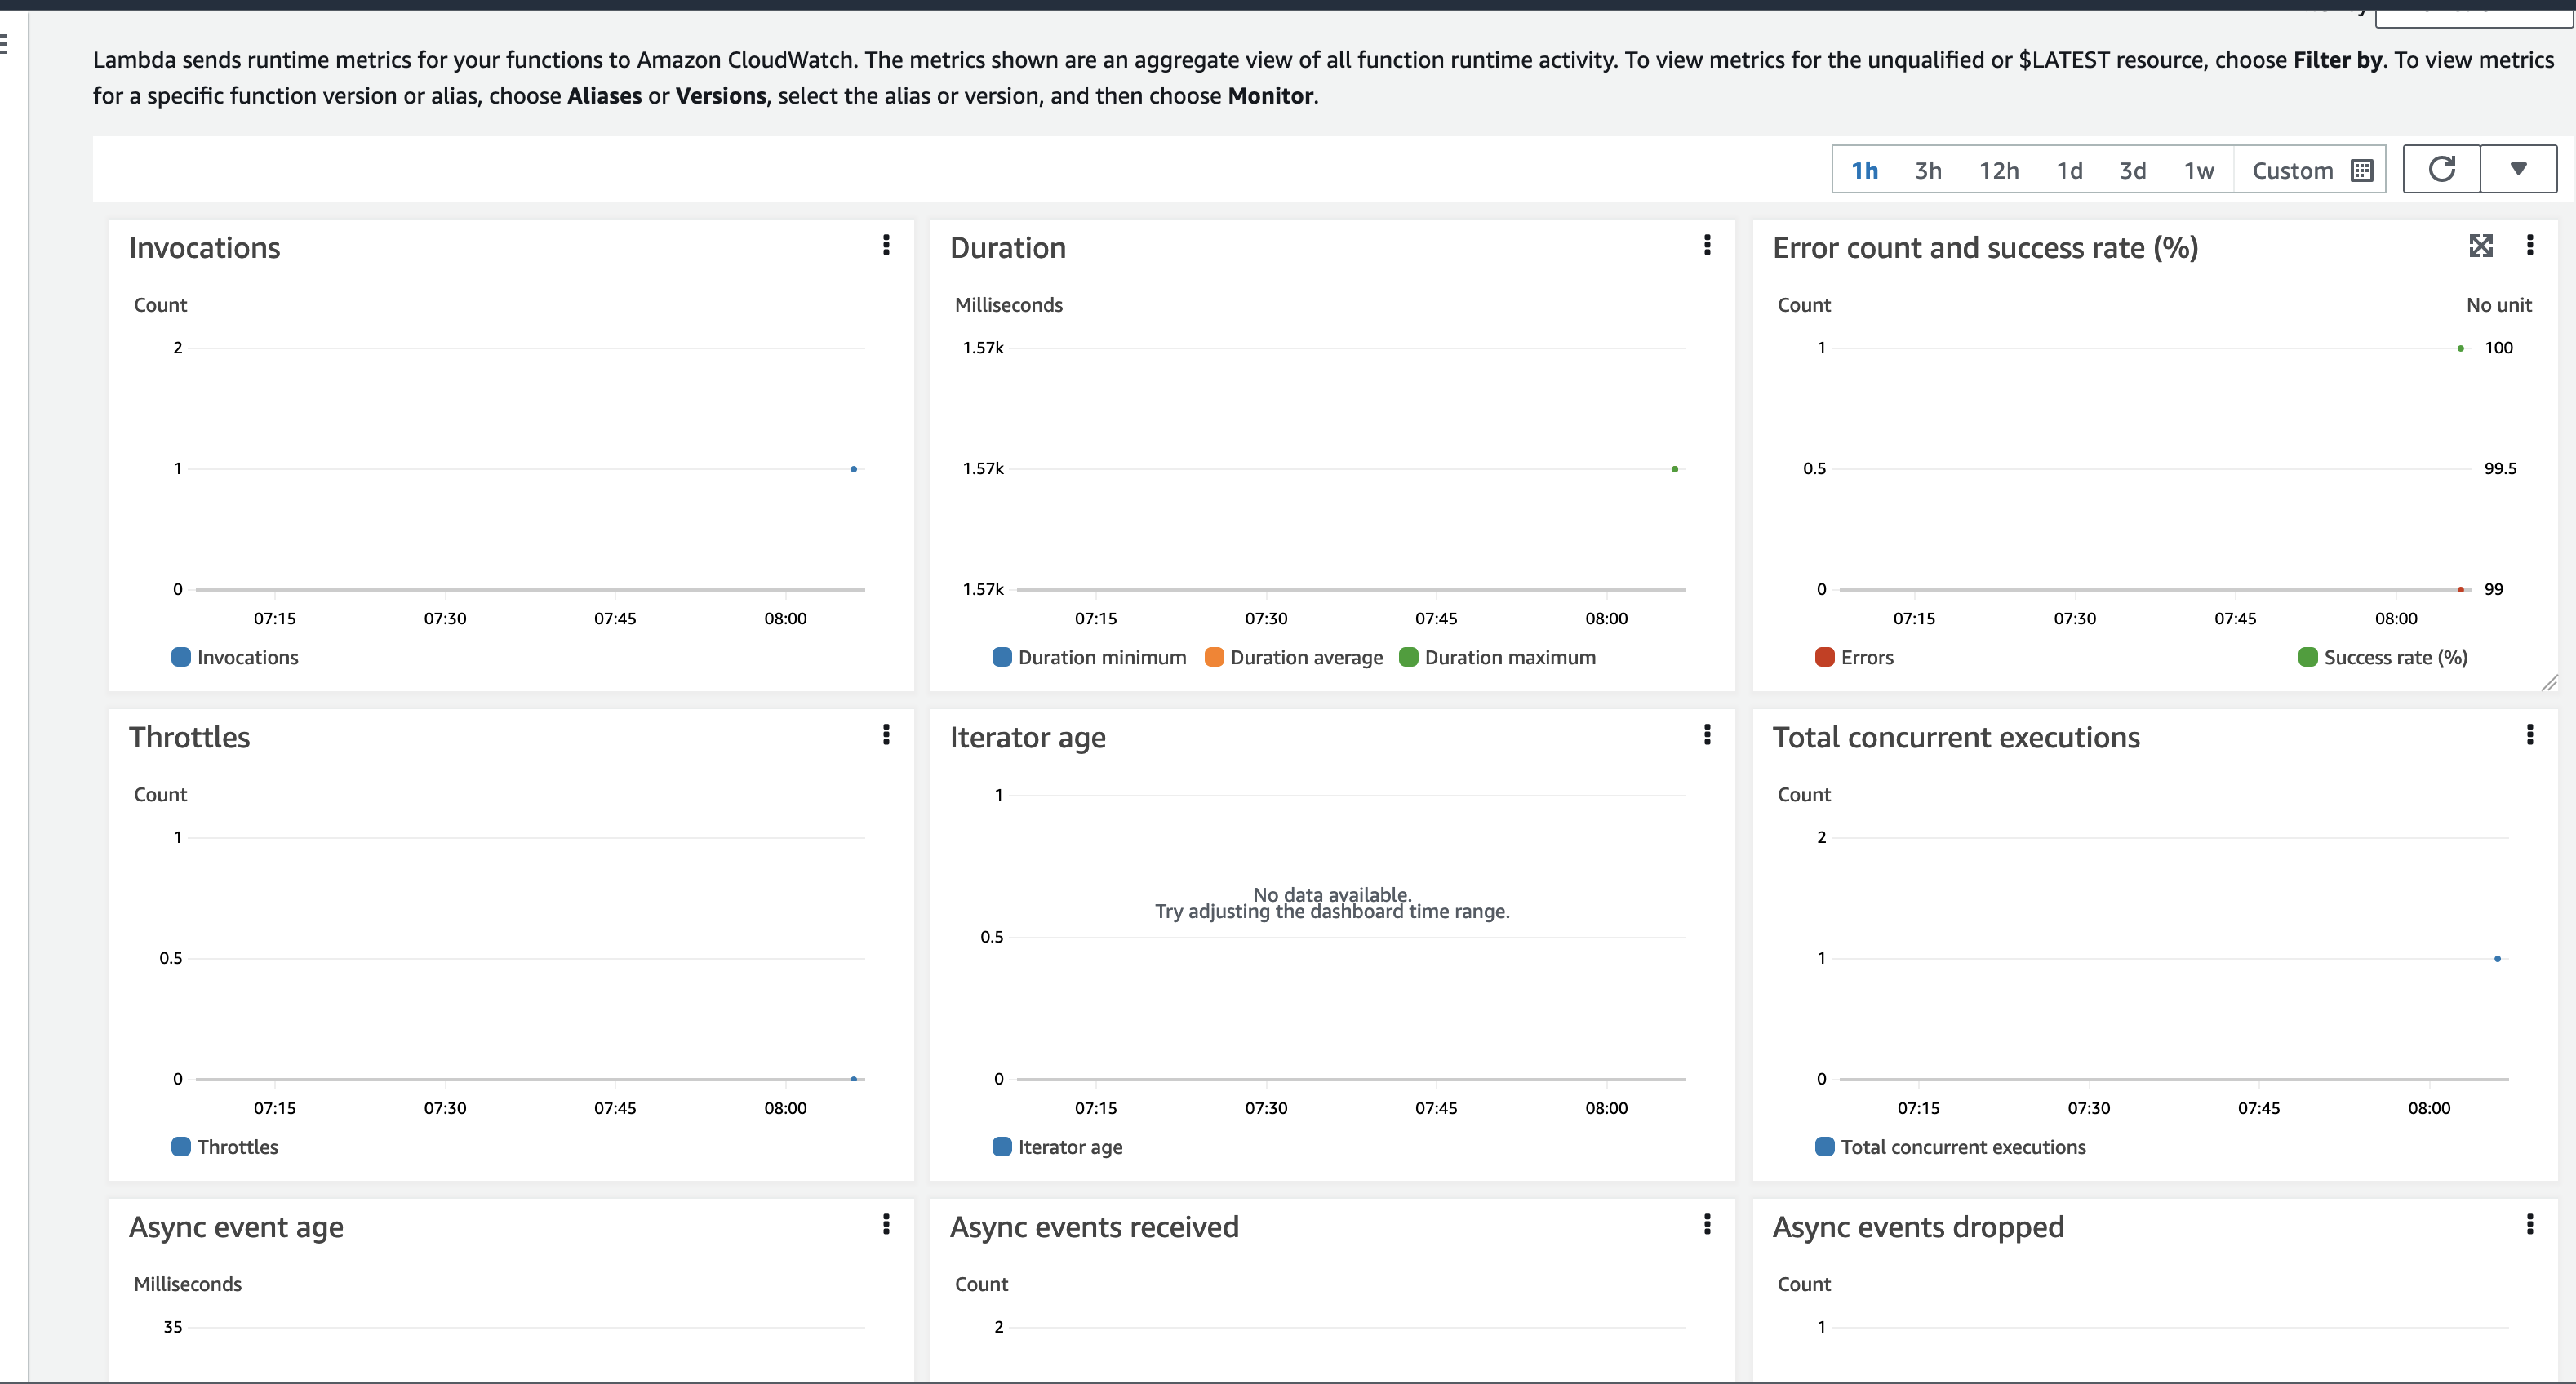
Send MQTT Message Lambda - Monitoring

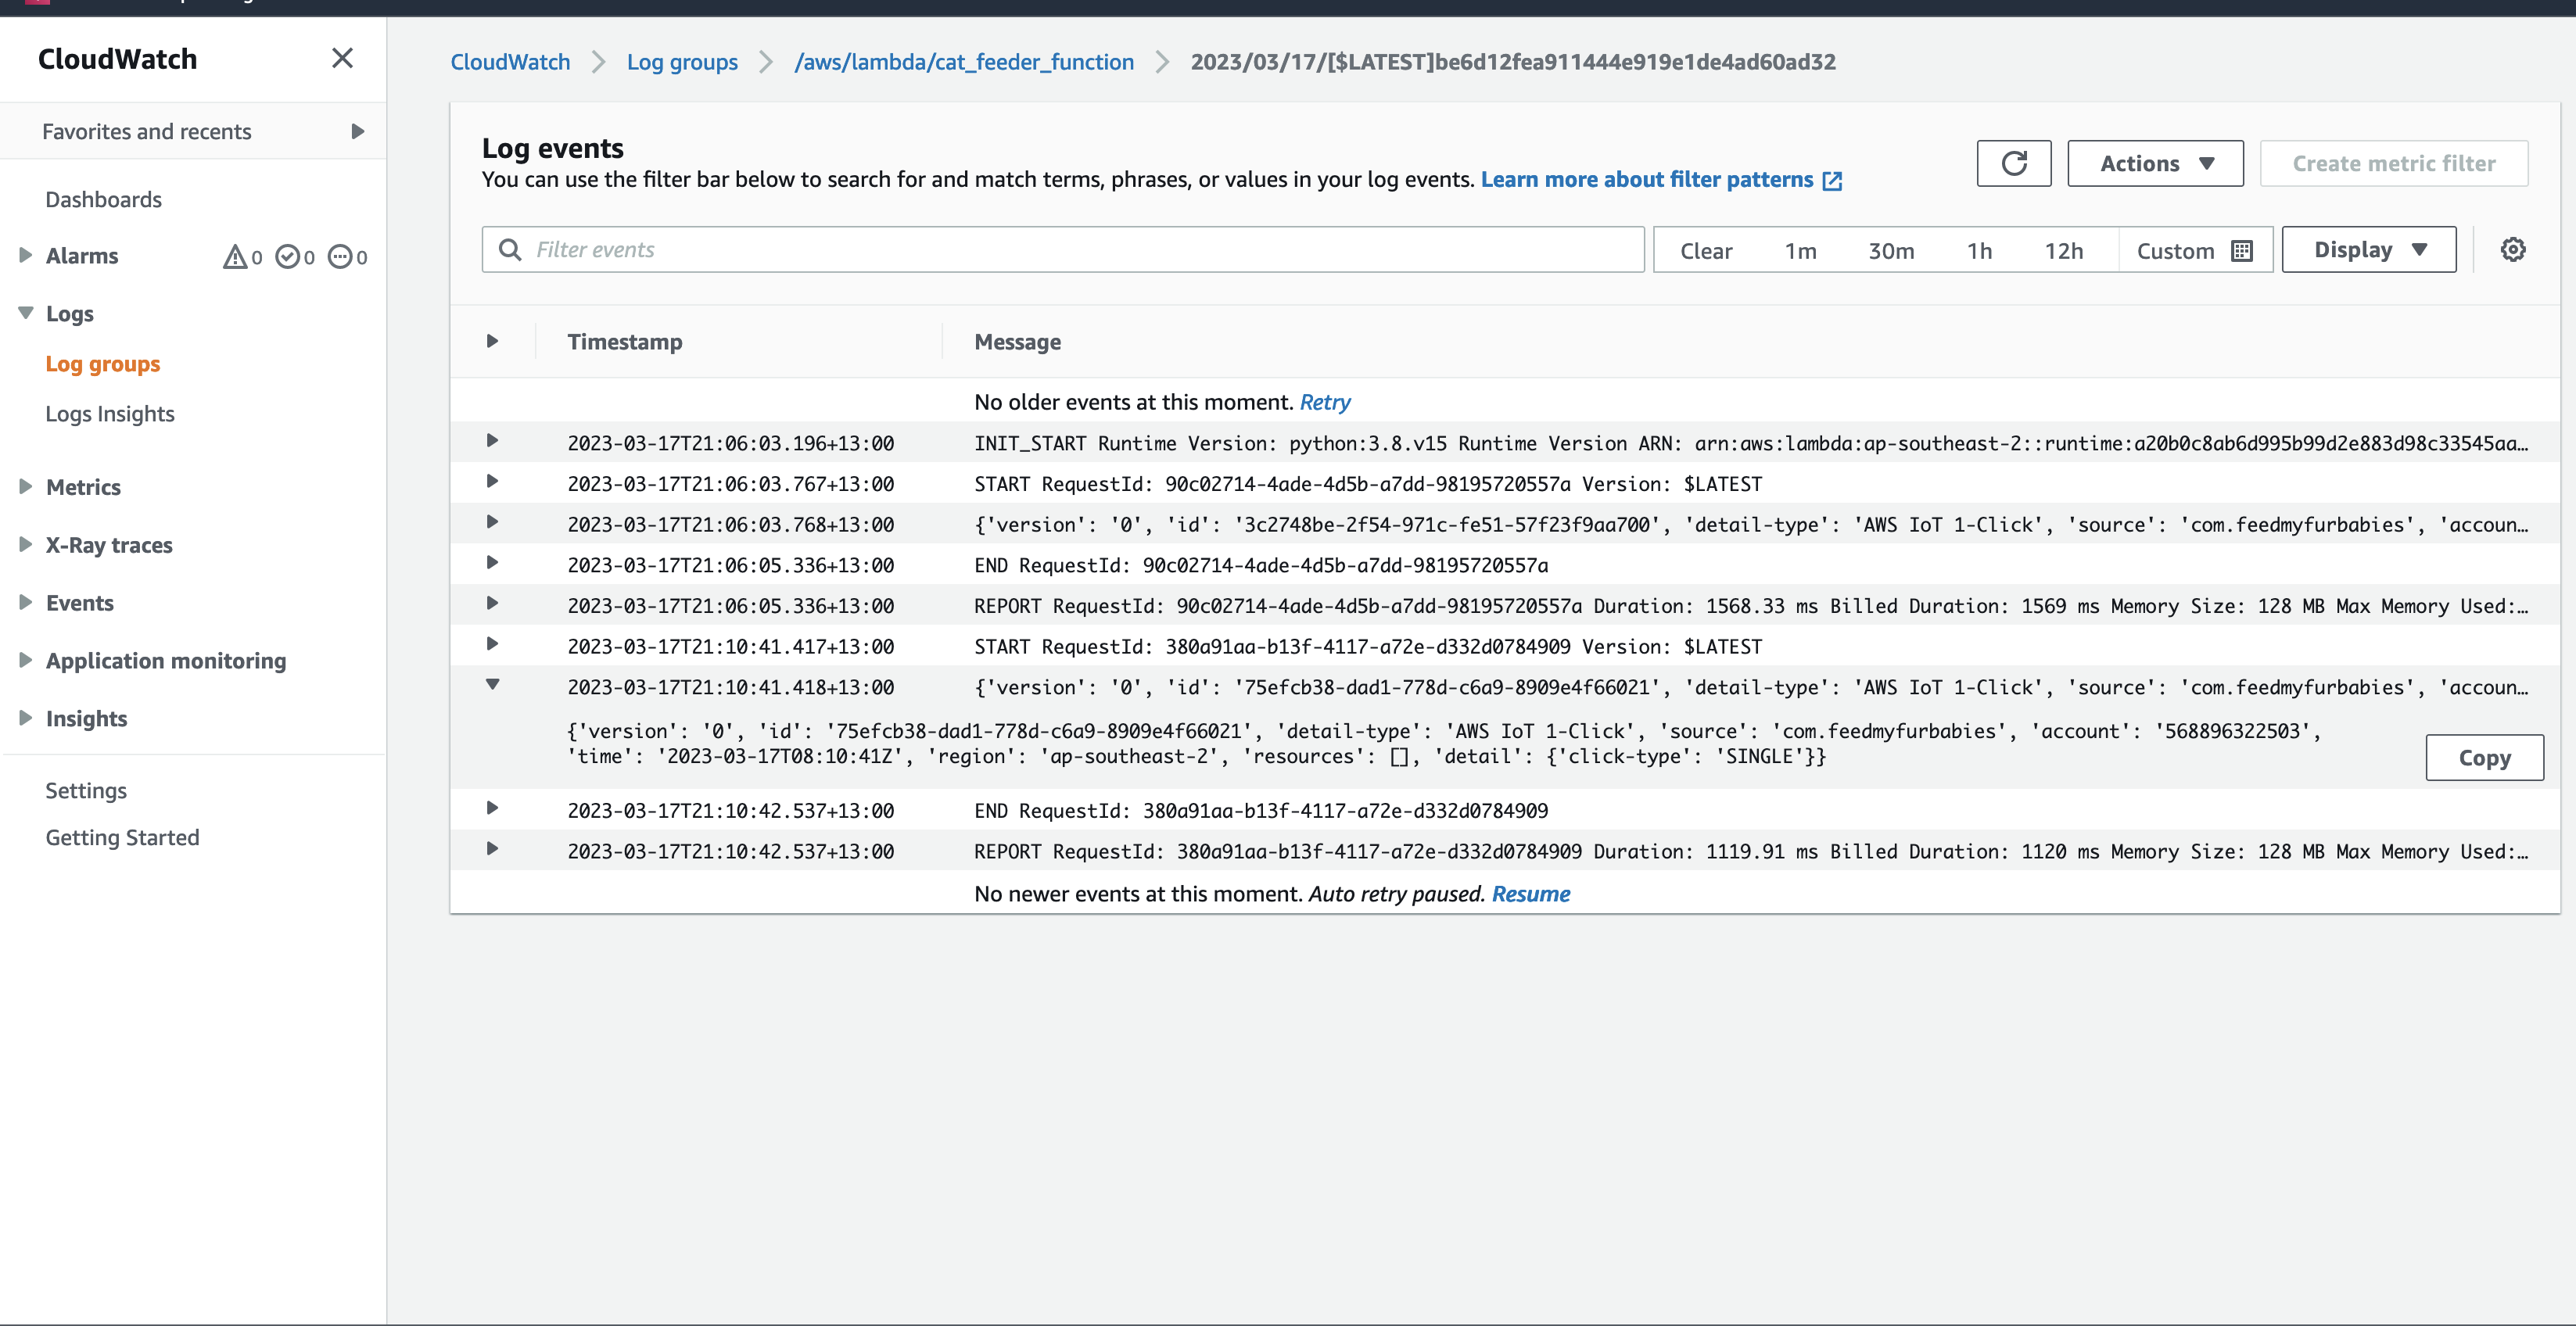
Here we can see the logs of the event received by the EventBridge Custom Bus Rule

Send MQTT Message Lambda - Logs

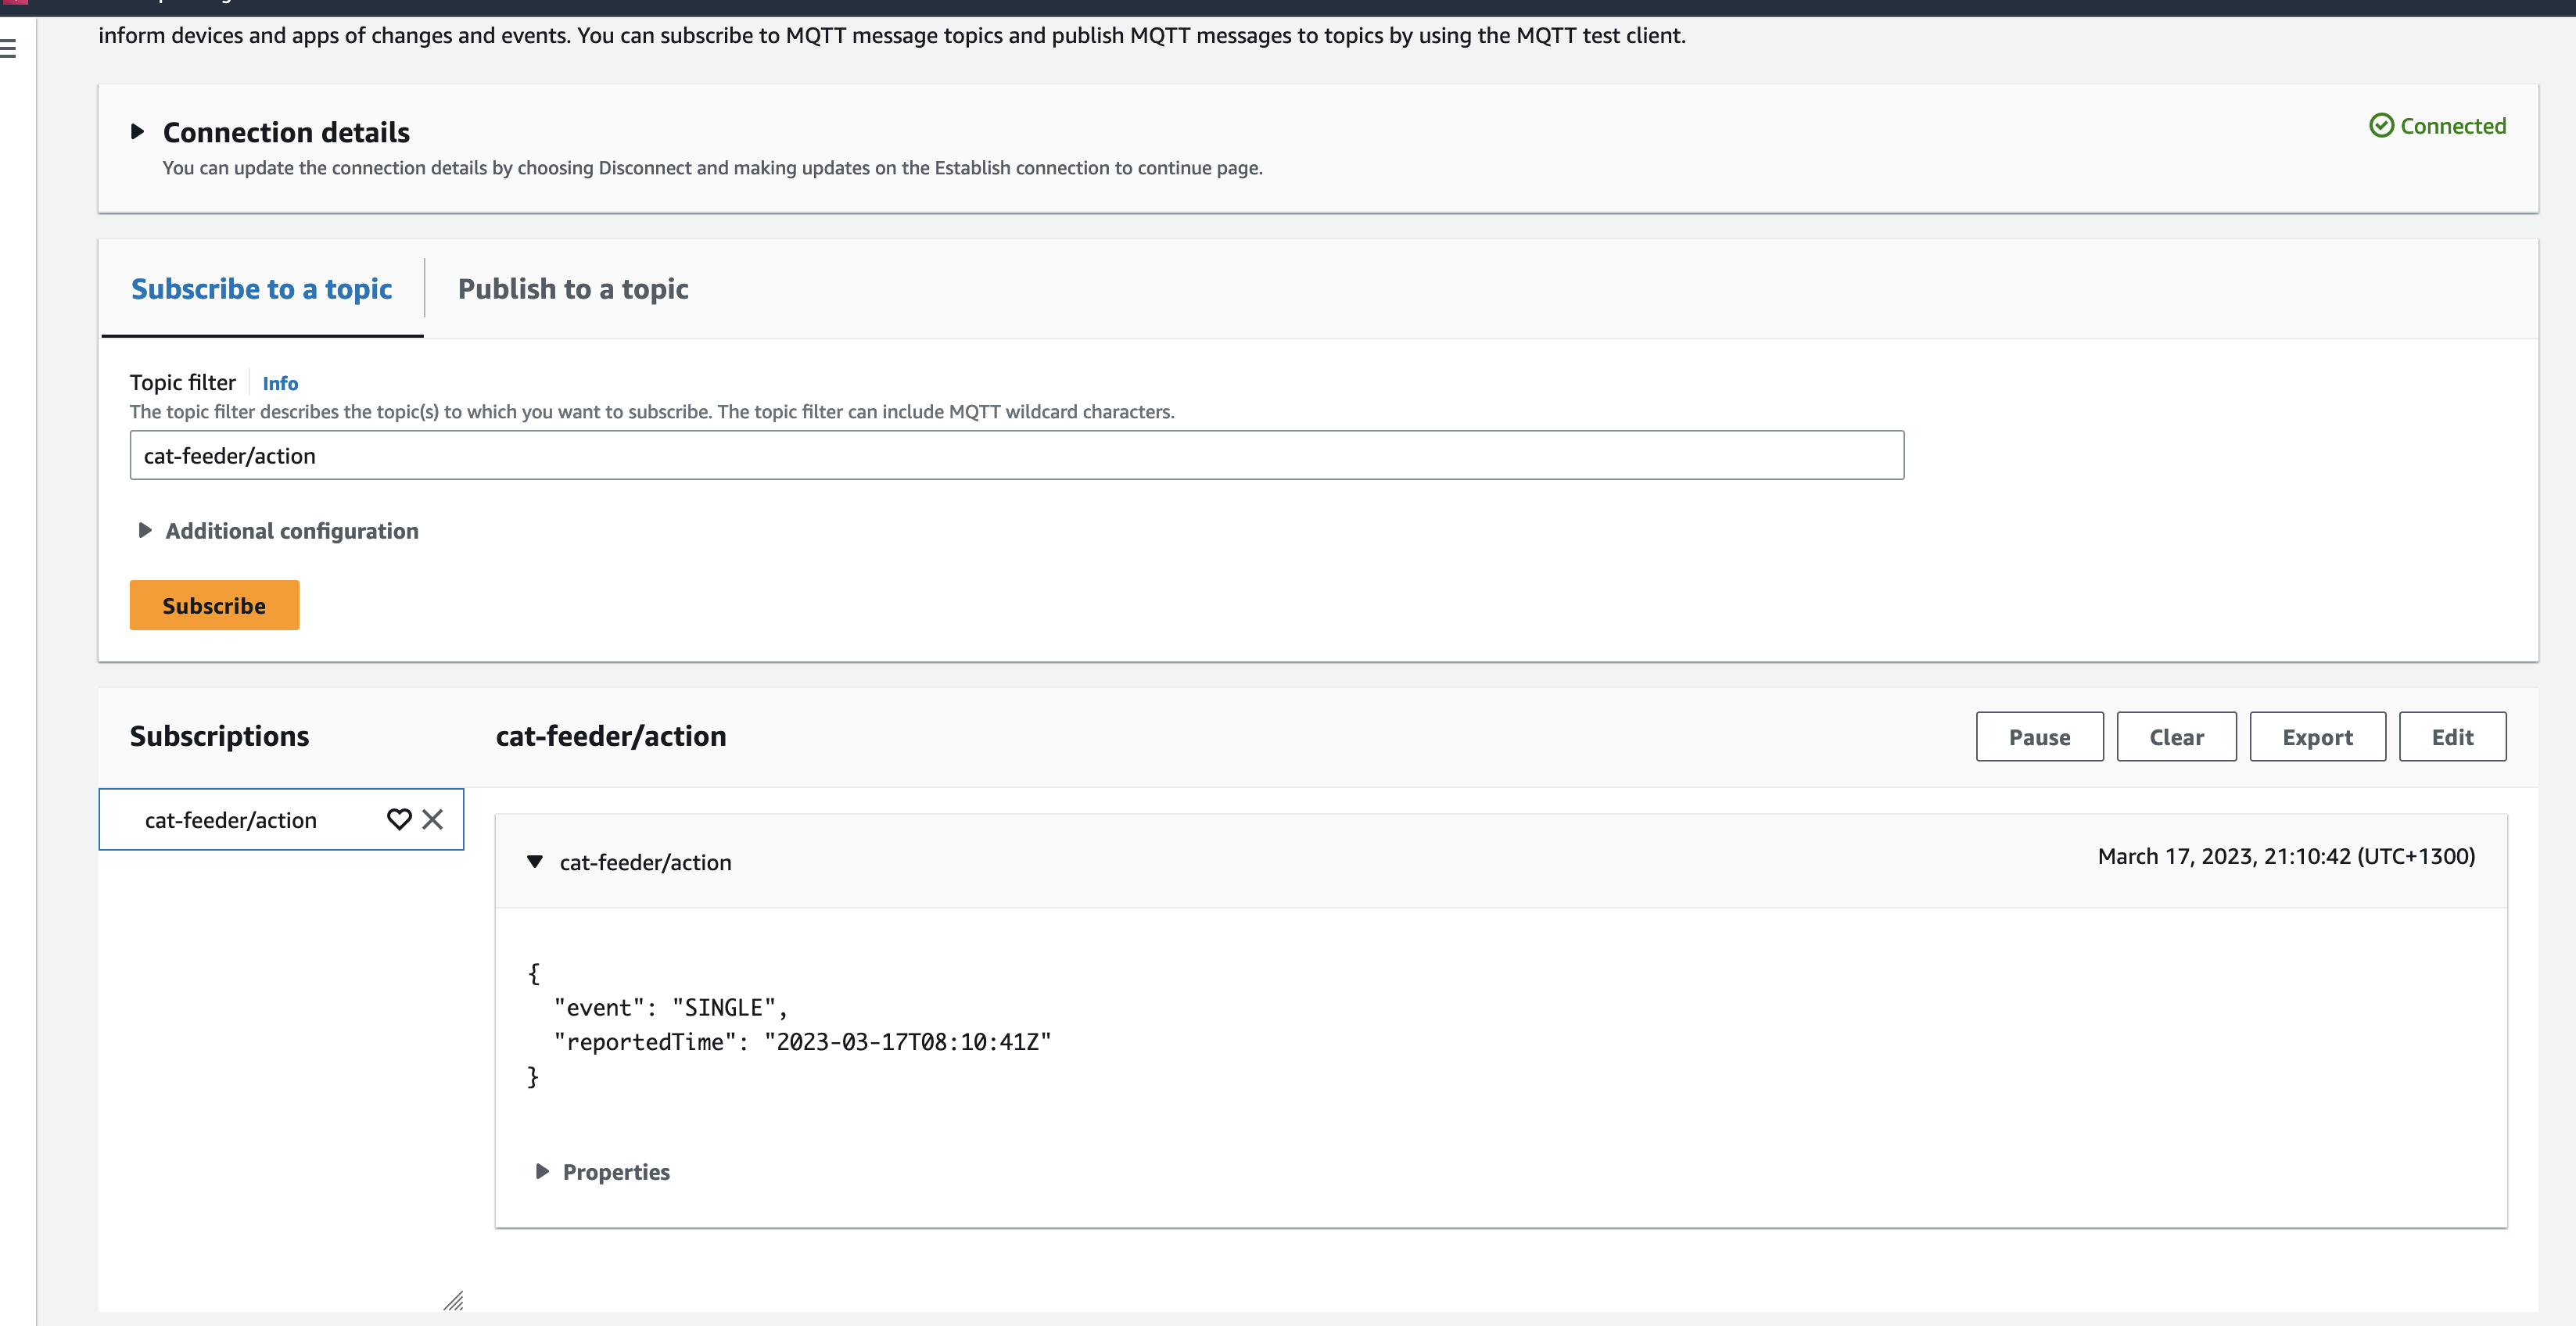
In the AWS Console for the AWS Iot Core Service, we can subscribe to Topics to receive an MQTT message right at the end of the downstream services - this is useful if you don't use a micro-controller

IoT Core - MQTT Client Subscribe Topic

Future State Architecture

Future State Architecture

We end up with an architecture that will enable us to easily add targets to consume events managed by the EventBridge Custom Event Bus, doing so in a way where the IoT 1-Click Lambda function has no knowledge of any newly created subscribers of the Custom Event Bus.

In a future blog I will demonstrate this.

Feed My Fur Babies – AWS Amplify and Route53

· 3 min read
Chiwai Chan
Tinkerer

I'm starting a new blog series where I will be documenting my build of a full-stack Web and Mobile application using AWS Amplify to implement both the frontend, as well as the backend; whilst developing dependent downstream Services outside of Amplify using AWS Serverless components to implement a Micro-Service architecture using Event-Driven design pattern - where we will break the application up into smaller consumable chunks that works together well.

Since we are creating from scratch a completely new application, I will also incorporate a vital pattern that will reduce complexity throughout the lifetime of the application: we will also be implementing the application using the Event-Sourcing pattern - this pattern ensures every Event ever published within a system is stored within an immutable ledger; this ledger will enable new Data Stores of any Data Store Engine to be created at any given time by replaying the Events in the ledger, of Events created from a start date and time to an end Date and Time.

CQRS is a pattern I will write up about with great detailed in a blog in the near future, CQRS will enable the ability to create mulitple Data Stores with identical data, each Data Store using a unique Data Store Engine instance.

What is AWS Amplify?

Amplify is an AWS Service that provides any frontend web or mobile developers with no cloud expertise the ability to build and host full-stack applications on AWS. As a frontend developer, you can leverage it to build and integrate AWS Services and components into your frontend without having to deal with the underlying AWS Services; all Services the frontend is built on top of is managed by AWS Amplify - e.g. no need to managed CloudFormation Stacks, S3 Storage or AWS Cognito.

What will I be doing with Amplify

My experience from a while ago was full-stack application development and I have worked under that role for over 10 years, I've used various frontend/backend frameworks, components and patterns.

I will be building a website called Feed My Fur Babies where I will provide video streams showing live feeds of my cats from web cams placed in various spots around my house, the website will also provide users with the ability to feed my cats using internet enabled devices like the IoT Cat Feeders I recently put together and watch them hoon on their favorite treats; although I am experienced with building websites from the ground up using AWS Service, I am aiming to build Feed My Fur Babies whilst leveraging as little as possible on that experience - this is so I am building the website as close to the targeted demographics skillset of a typical Amplify as possible, i.e. as a developer with only frontend experience.
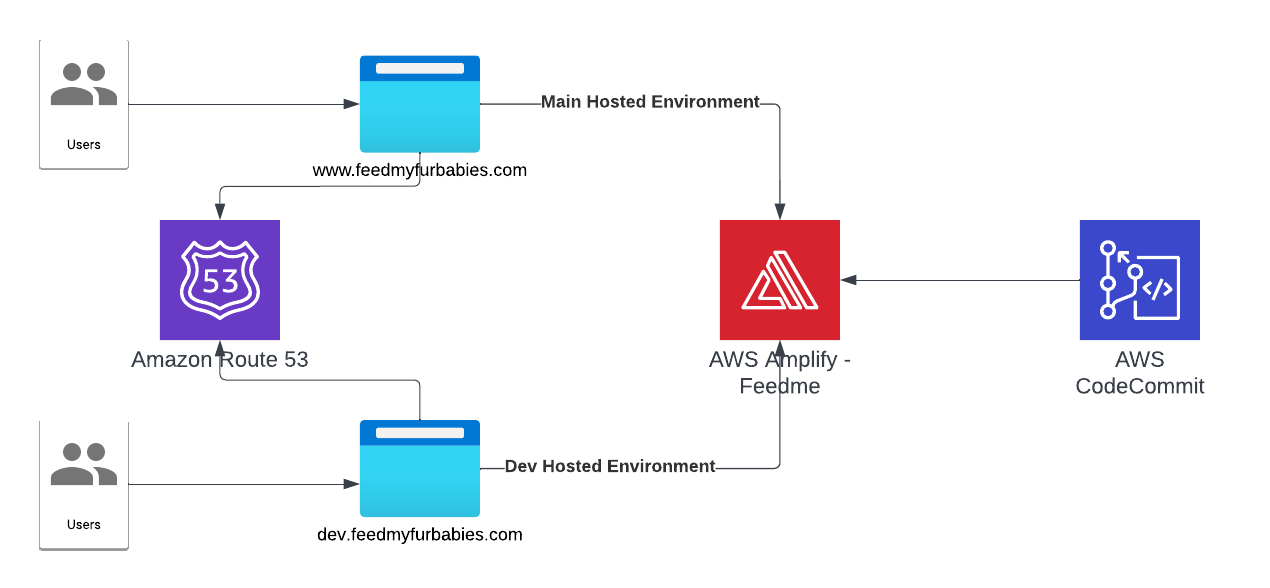
Current Architecture State

Architecture

Update

Let's talk about what was done to get to the current architecture state.

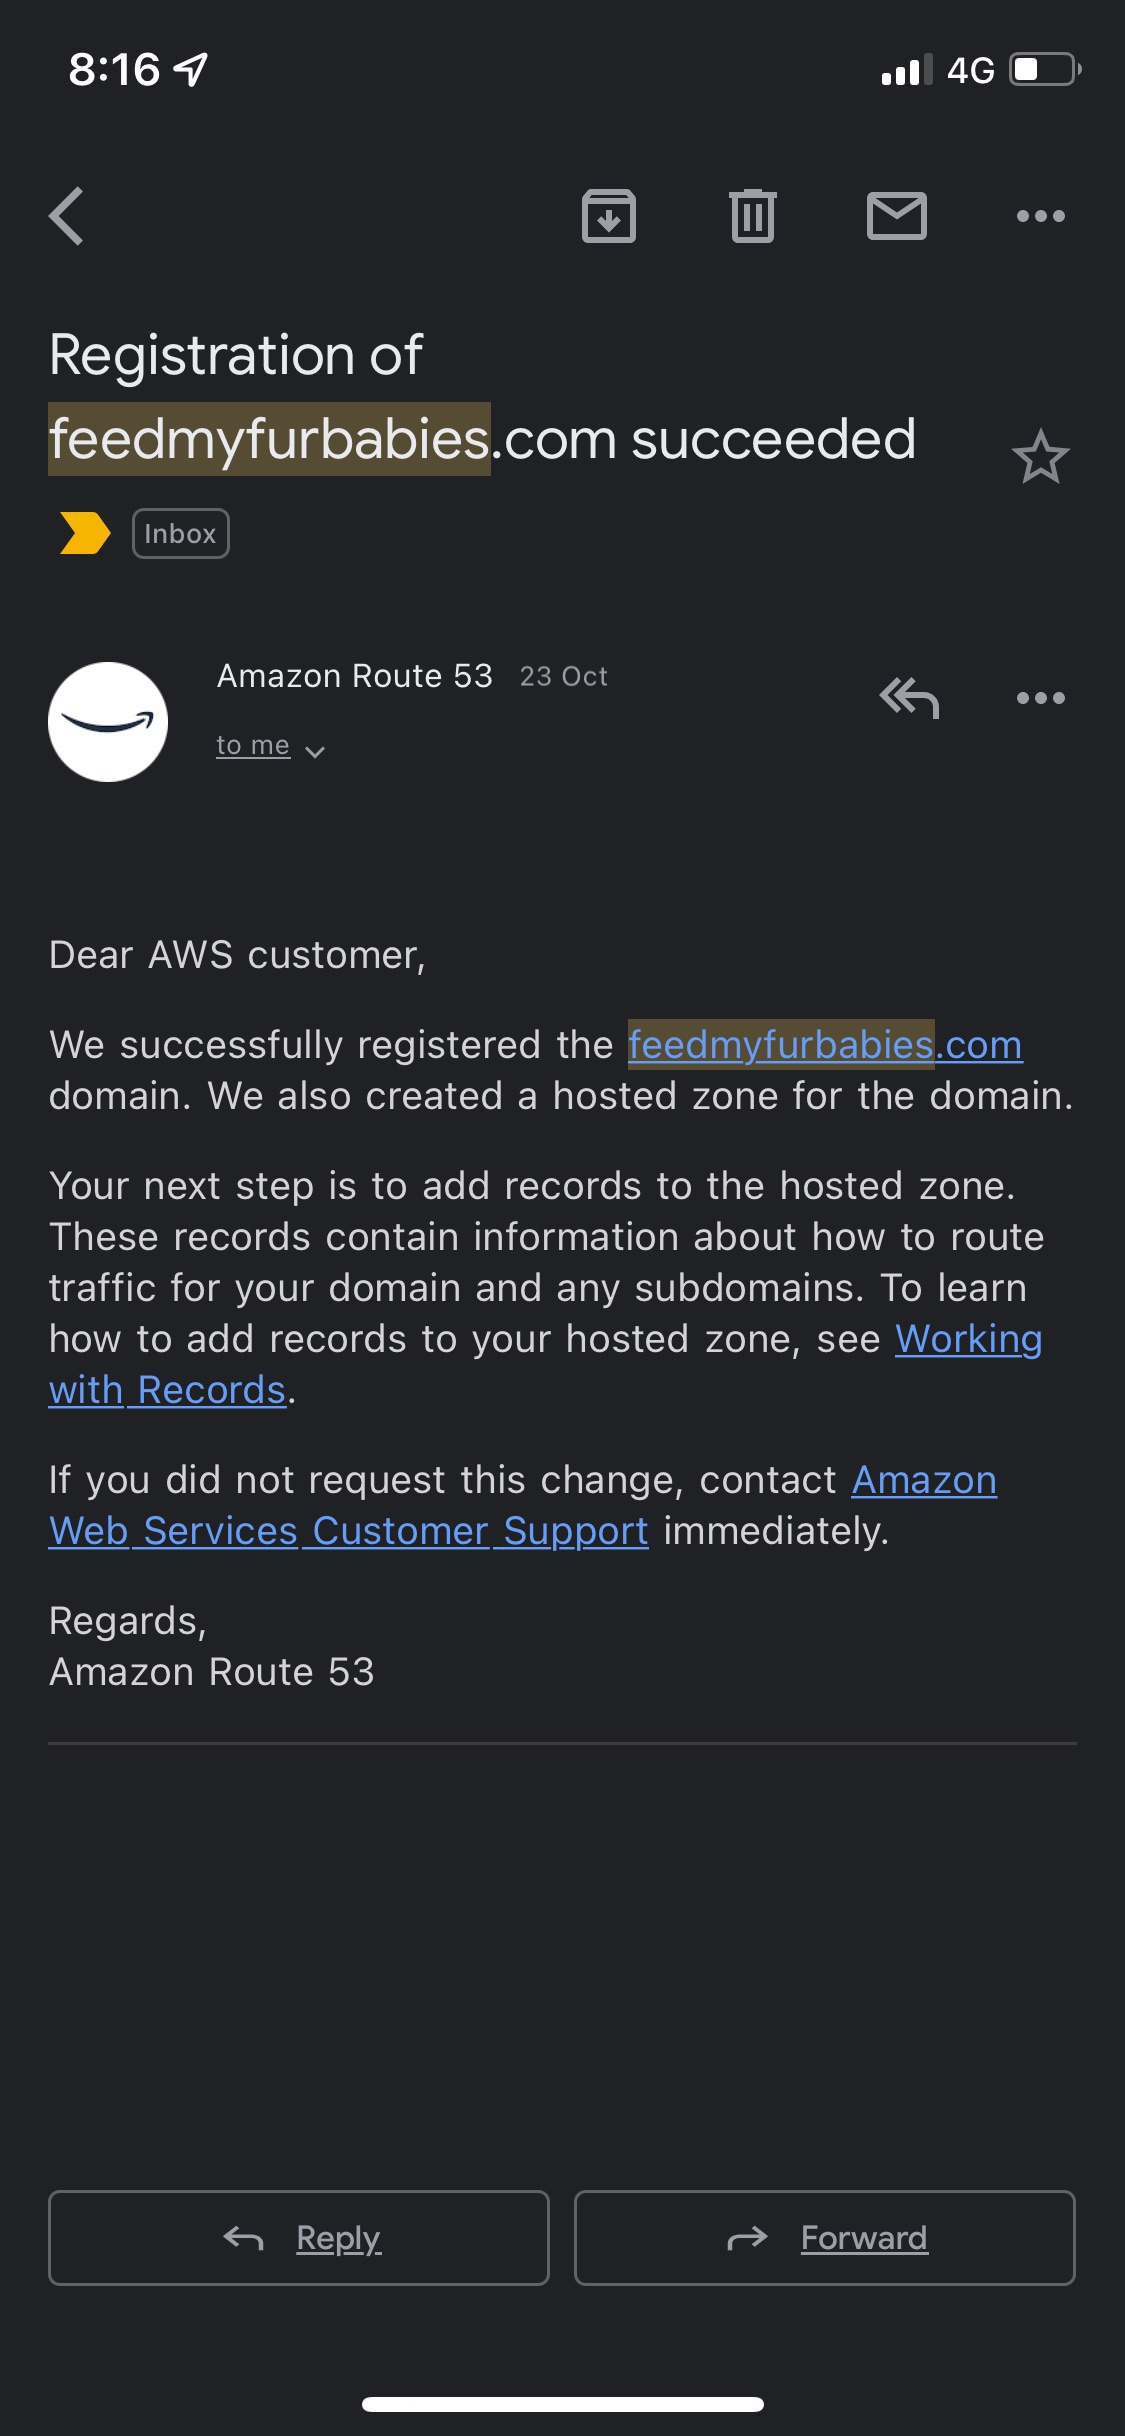
First thing I did was buying the domain feedmyfurbabies.com using AWS Route53.

Route53 Feed My Fur Babies

Next, I created a new Amplify App called "Feedme".

Amplify - App

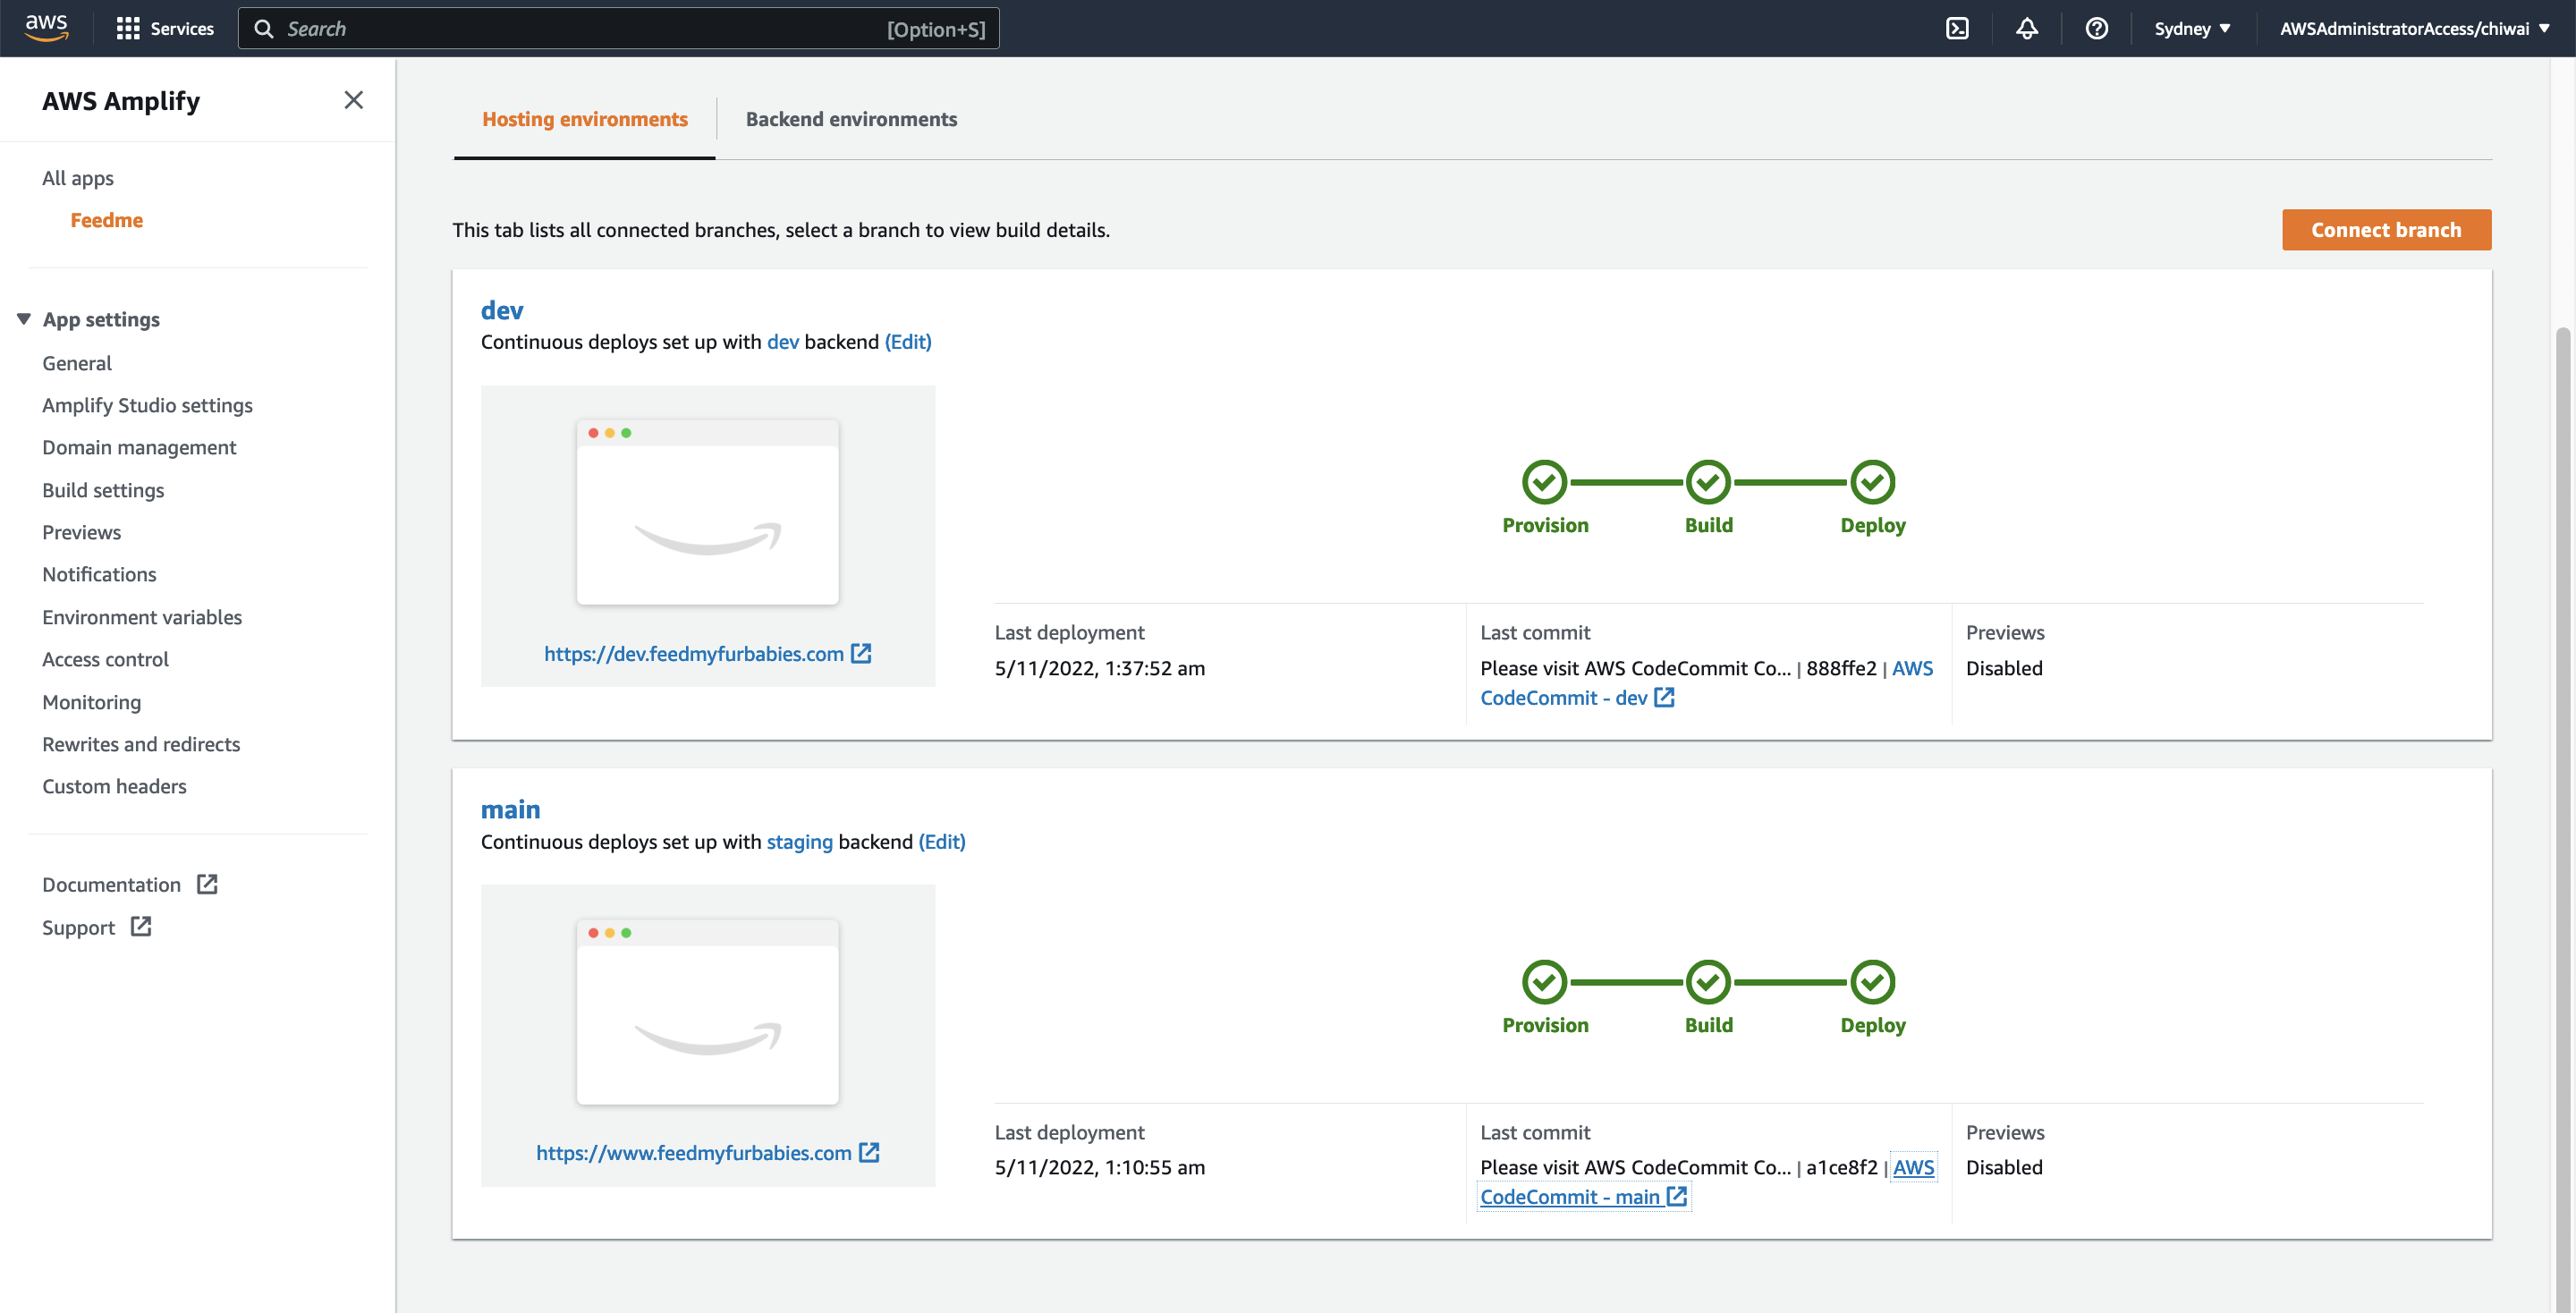
Within the App I created two Hosted Environments: one environment is to host the production environment, the other is to host a development environment. Each Hosted Environment is configured to be built and deployed from a specfic Branch in the shared CodeCommit Repository used to version control the frontend source code.

Amplify - Hosted Environments

Amplify - Hosted Environment - Main

Amplify - Hosted Environment - Dev

Leveraging AWS Prefix Lists

· 7 min read
Chiwai Chan
Tinkerer

AWS VPC Prefix List is a feature of the AWS Networking that has been around for a short while, however, I have yet to see it leveraged to its full potential, and more often than not I have not seen them used at all.

There are 2 types of Prefix Lists:

  • AWS-managed Prefix Lists: as the name indicates these lists are managed by AWS, and they are used to maintain a set of IP address ranges for AWS services, e.g. S3, DynamoDB and CloudFront.
  • Customer-managed Prefix Lists: these are created and maintained by anyone who has access to the AWS Console, AWS APIs or AWS SDKs. This is what we will be focusing on.

In this blog we will go into:

  • What Customer-managed Prefix Lists are
  • How they can be leveraged by AWS Security Groups
  • How they can be leveraged by AWS Subnet Route Tables
  • How they can be leveraged by AWS Transit Gateway Route Tables
  • Considerations

AWS VPC Customer-managed Prefix List is a great tool to have available as it provides the ability to track and maintain a list of CIDR block values, which can then be referenced by other AWS Networking components in their rules or route tables. Each Prefix List supports either IPv4 or IPv6 based addresses, and a number of expected Max Entries for the list must be defined; the number of entries in the list cannot exceed the Max Entries.

You can use Prefix List to maintain a list of CIDR blocks of Subnets or VPCs; or, track a list of similiar IP addresses based on a grouping of your choice, e.g. EC2 instances with a certain function - you can even track CIDR values of Subnets, VPCs and EC2 within the same list.

I have a blog on how to automatically maintain a list of EC2 instances Private IP addresses based on a Tag set against an EC2 instance: Maintain a Prefix List of EC2 Private IP Addresses using EventBridge

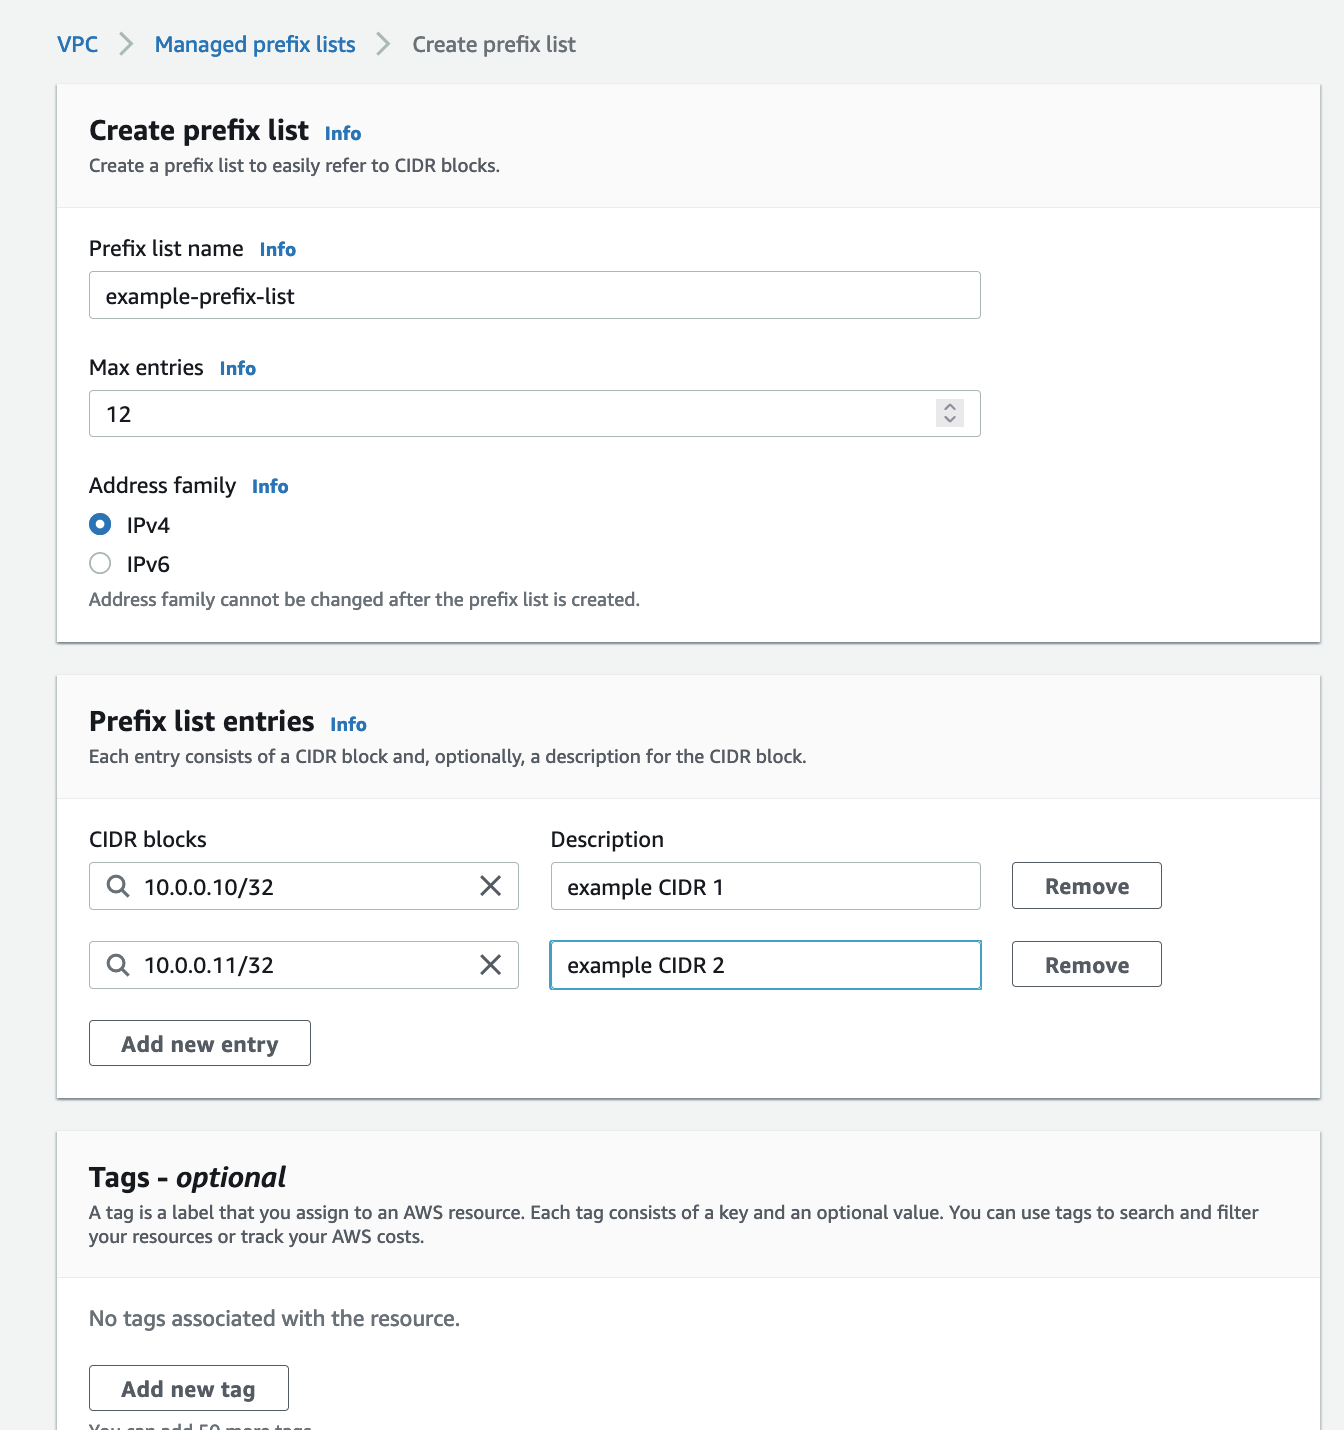
Let's create a Prefix List in the AWS Console

1

2

3

Prefix List – Security Group Reference

Customer-managed Prefix List is great option to have to centrally manage and track a list of CIDR blocks allowed to ingress an ENI by referencing Prefix Lists in Security Groups, a single Prefix List instance can be referenced by one or many Security Groups within the same account or cross-account.

Let's take a look at an example

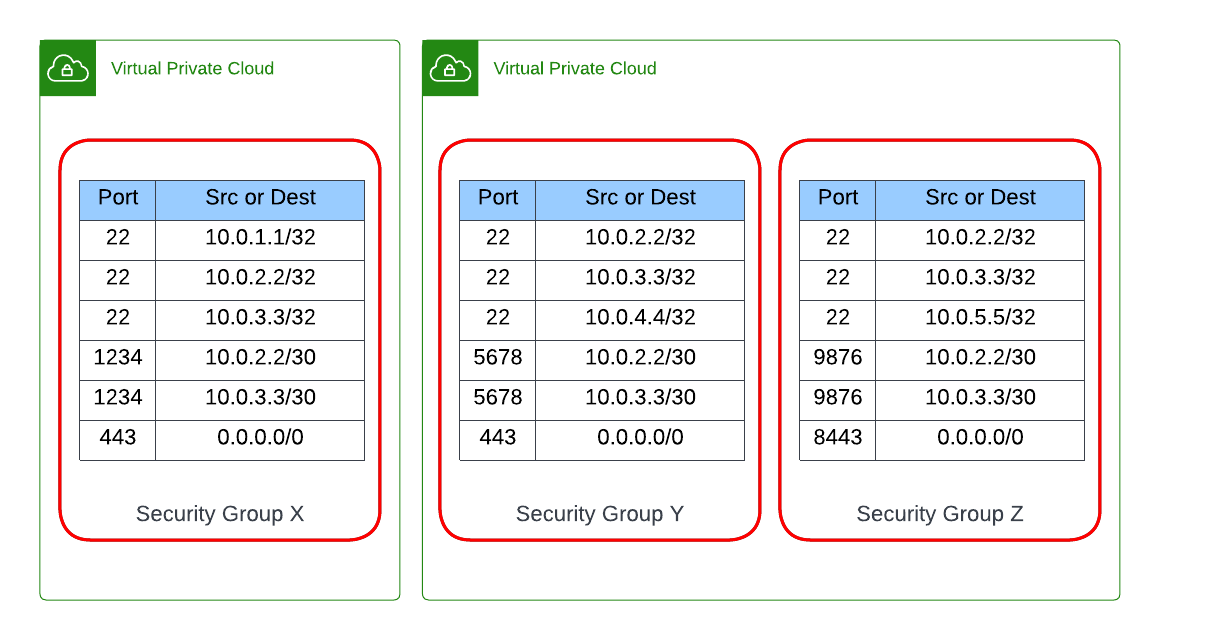
This is especially useful in scenarios where you have fleet of EC2 instances where you like to allow the same network traffic sources to ingress on Port 22 to perform administration tasks, these fleet EC2 instances could scatter across multiple VPCs, and may even be scattered across multiple AWS accounts.

4

Often, we add a new Source CIDR to all Security Groups as we allow a new machine to perform administration tasks to the same fleet of EC2 instances, or even remove (or not when we forget) a CIDR Source when a machine is retired. In the past we would have modified each and every one of these Security Groups.

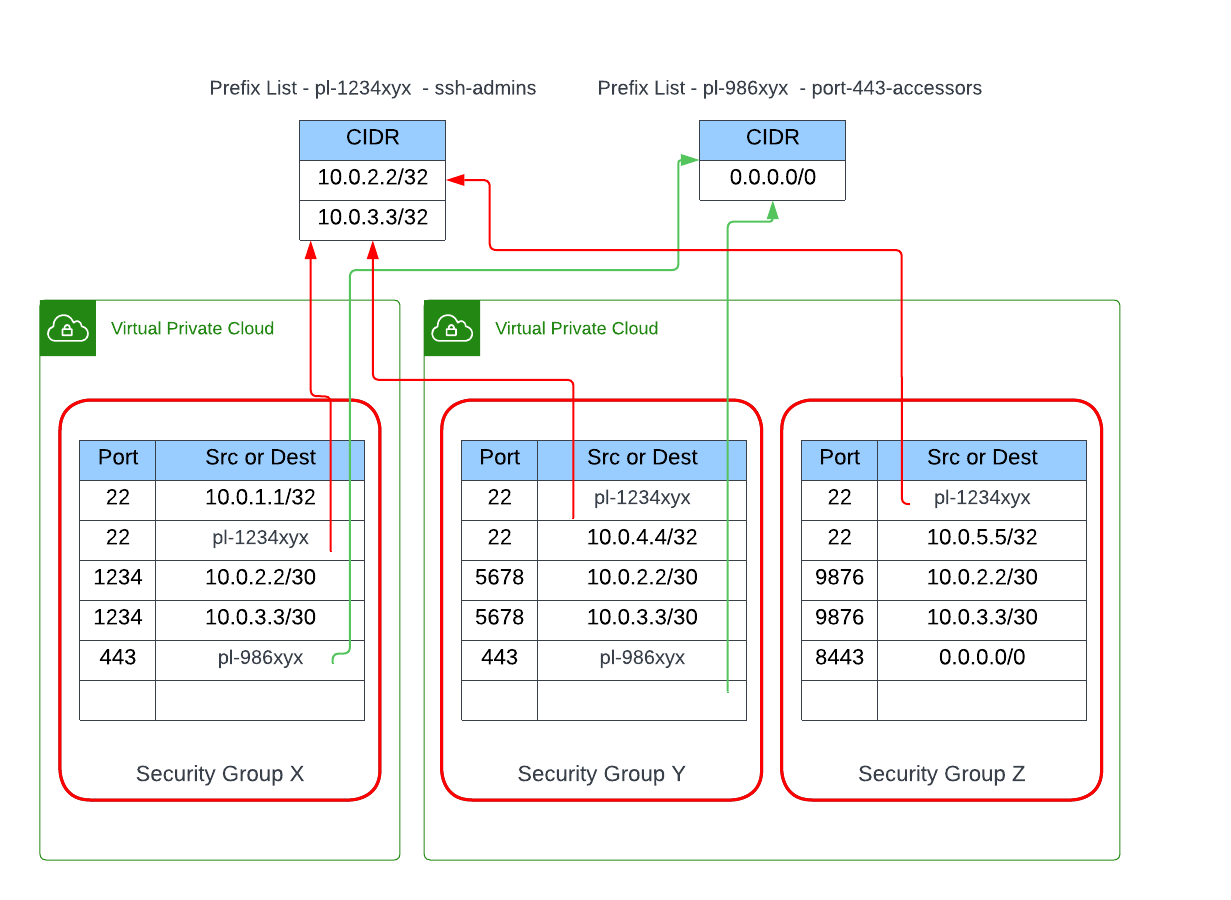
Here is how we can leverage Customer-managed Prefix Lists with Security Groups:

5

Here, under the same Security Group rules outcome we externalise the CIDR values into a Prefix List and reference the list in all 3 Security Groups; in the case of Security Groups spanning across multiple AWS accounts the Prefix Lists can be shared with other AWS accounts using Resource Access Manager (RAM). Now, we can allow a new machine to perform administration tasks across the entire fleet of EC2 instances by only adding a new CIDR Source to a single location, conversely, we can remove a machine by deleting a CIDR Source. There is also an added benefit of reduced effort in the need to identify which Security Groups have a rule for an IP address if we were to remove access across the entire fleet using this pattern – because it is maintained in a single location.

Prefix List – Subnet Route Table Reference

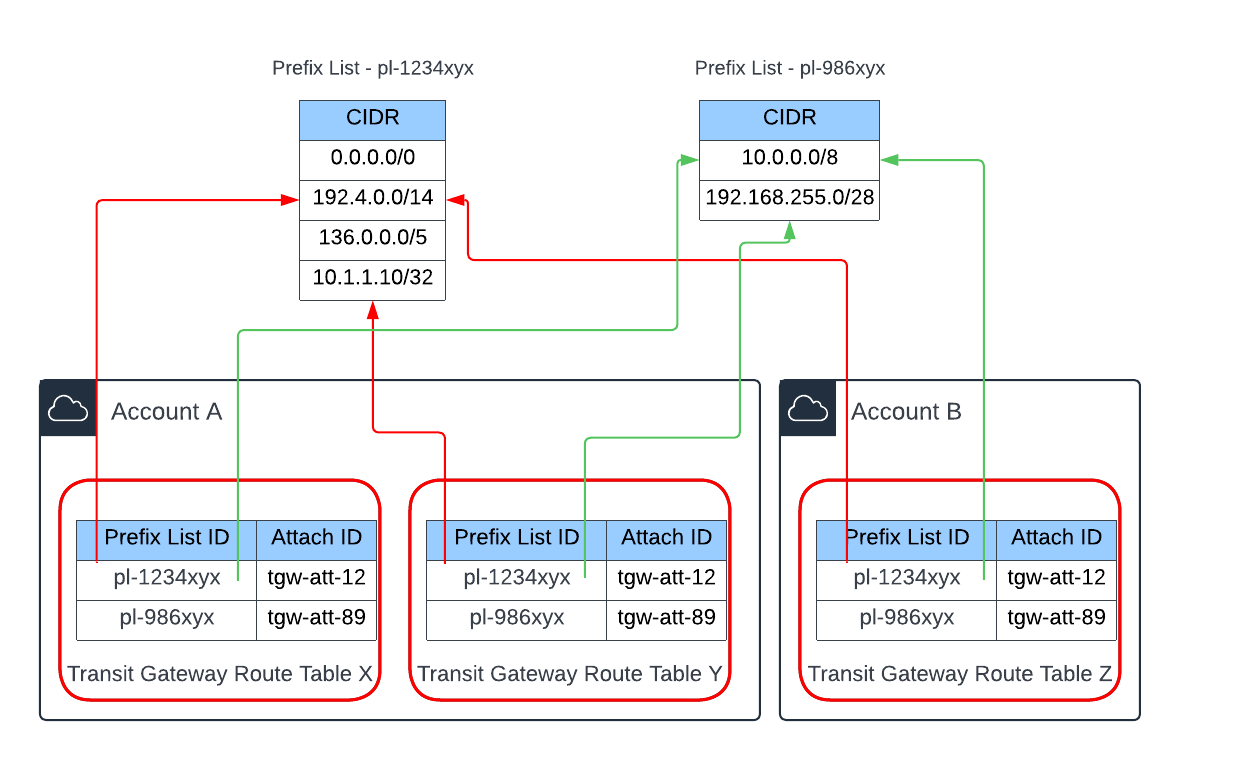
Another way to use Prefix Lists is to use them to centrally manage and track a list of CIDR block destinations to route traffic out of a Subnet’s Route Table to the same Target, a Prefix List can be referenced by one or many Subnet Route Tables within the same account or cross-account using RAM.

Let's take a look at an example

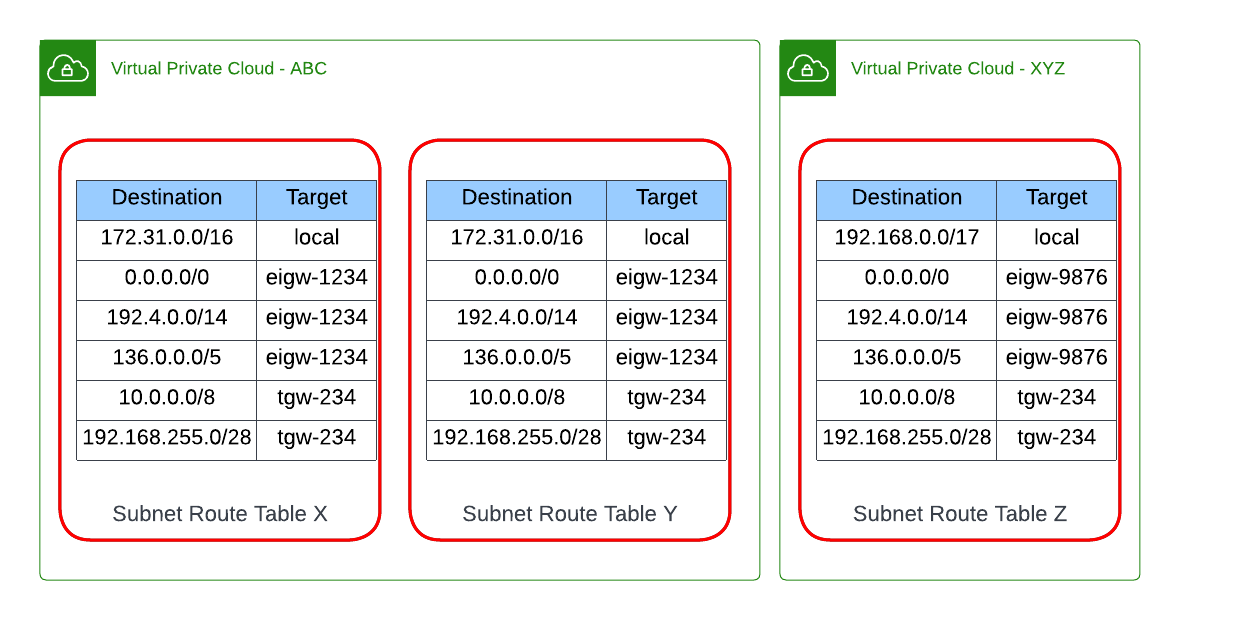
Below, we have a scenario with 3 different Route Tables across the two VPCs, with each Route Table with the same Transit Gateway Target for the same set of Destinations; and also the same Destinations routed to their respective Egress Only Internet Gateway (EIGW) for their VPC.

6

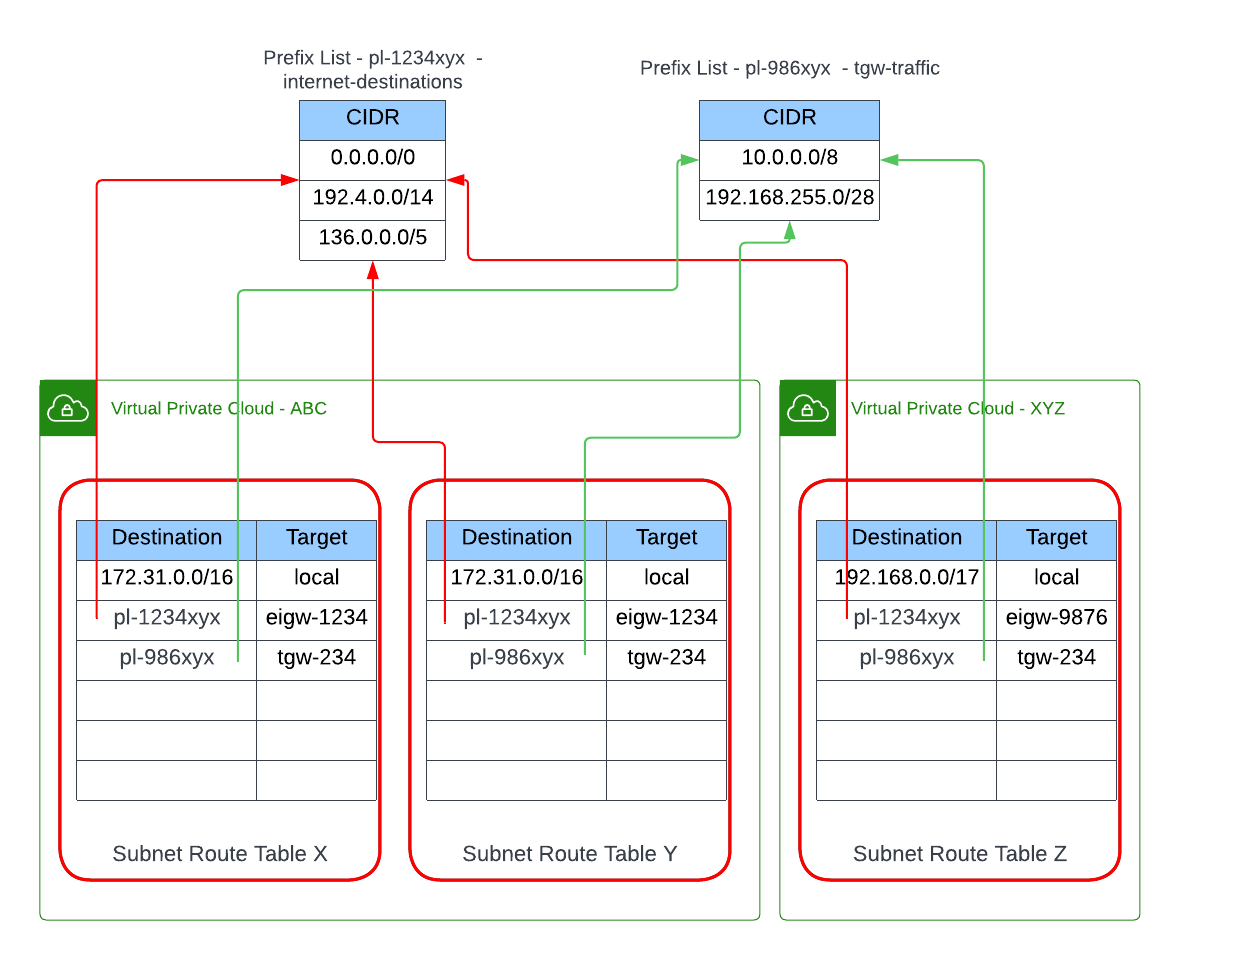
Here is how we can leverage Customer-managed Prefix Lists with Subnet Route Tables:

7

We have externalised the Destination CIDR values of the 3 Route Tables into 2 separate Prefix Lists: 1st Prefix List contains the CIDR block values of Destinations routed for the EIGW in their respective VPC; the 2nd Prefix List contains CIDR block values of Destinations routed for the same Transit Gateway instance all VPCs is an attachment of.

Prefix List – Transit Gateway Route Table Reference

Lastly, in a Transit Gateway Route Table you have the option to either to define static routes or have routes dynamically propagated from a Transit Gateway attachment. You also have the option to use a Prefix List for routing.

Here is how we can leverage Customer-managed Prefix Lists with Transit Gateway Route Tables:

8

To reference a Prefix List in a Transit Gateway Route Table, you have to reference it under the "Prefix list references" section:

9

Considerations

  • The aggregated total Max Entries of all Prefix Lists referenced by a resource (e.g. a Security Group) is counted towards the resource's quota - not the aggregated total of actual entries of all Prefix Lists. Be conscious of the Prefix List you reference in a resource, does the resource referencing the Prefix List require all the CIDR values offered in the list? if not, you are not using Prefix Lists economically.
  • If the same Prefix List instance is referenced by multiple AWS resources then consistency is enforced - operational effort is reduced due to fewer changes by not having to change a values in multiple locations.
  • Before you add or remove a CIDR value from a Prefix List, consider the flow on impact it may have to the downstream resources that reference this list, as you may inadvertently terminate some traffic flow, or worse, open up traffic to sources you don't intend to.

Conclusion

One of the things I have noticed during my short time in consulting so far is that organising Cloud resources (in particular Networking), structuring them correctly and consistently across multiple environments will set up a solid foundation for organisations in the long term, however, it is often an area that is overlooked and is only paid attention to when the rate of innovation is slowed down due to complexities and inconsistencies. Prefix Lists is a great option to have to improve consistency and operational efficiencies.

Here I have only detailed the basic use of Customer-managed Prefix Lists, but in my other blog I have a more advanced use case leveraging Prefix Lists: Work-around for cross-account Transit Gateway Security Group Reference

This solution compliments the use of networking solutions in other blogs I have written:

Maintain a Prefix List of EC2 Private IP Addresses using EventBridge

· 7 min read
Chiwai Chan
Tinkerer

AWS VPC customer-managed prefix list is a great feature to have in a tool box as it provides the ability to track and maintain a list of CIDR block values, that can be referenced by other AWS Networking component’s in their rules and tables. Each Prefix List supports either IPv4 or IPv6 based addresses, and a number of expected Max Entries for the list must be defined; the number of entries in the list cannot exceed the Max Entries. Check out my blog on AWS Prefix List to learn how it could be referenced and leveraged by other AWS Networking components.

In this blog we will:

  • Walk-through the proposed solution
  • Deploy the solution from a SAM project hosted in my GitHub repository
  • Stop the running EC2 instance provisioned by the SAM project's CloudFormation stack - this will de-register the Private IP address of the EC2 instance from the Prefix List (also provisioned by the CloudFormation stack)
  • Start the same EC2 instance - this will register the Private IP address of the provisioned EC2 instance back into the Prefix List
  • Manually create an EC2 instance with a Tag value of "prefix-list=eventbridge-managed-prefix-list"

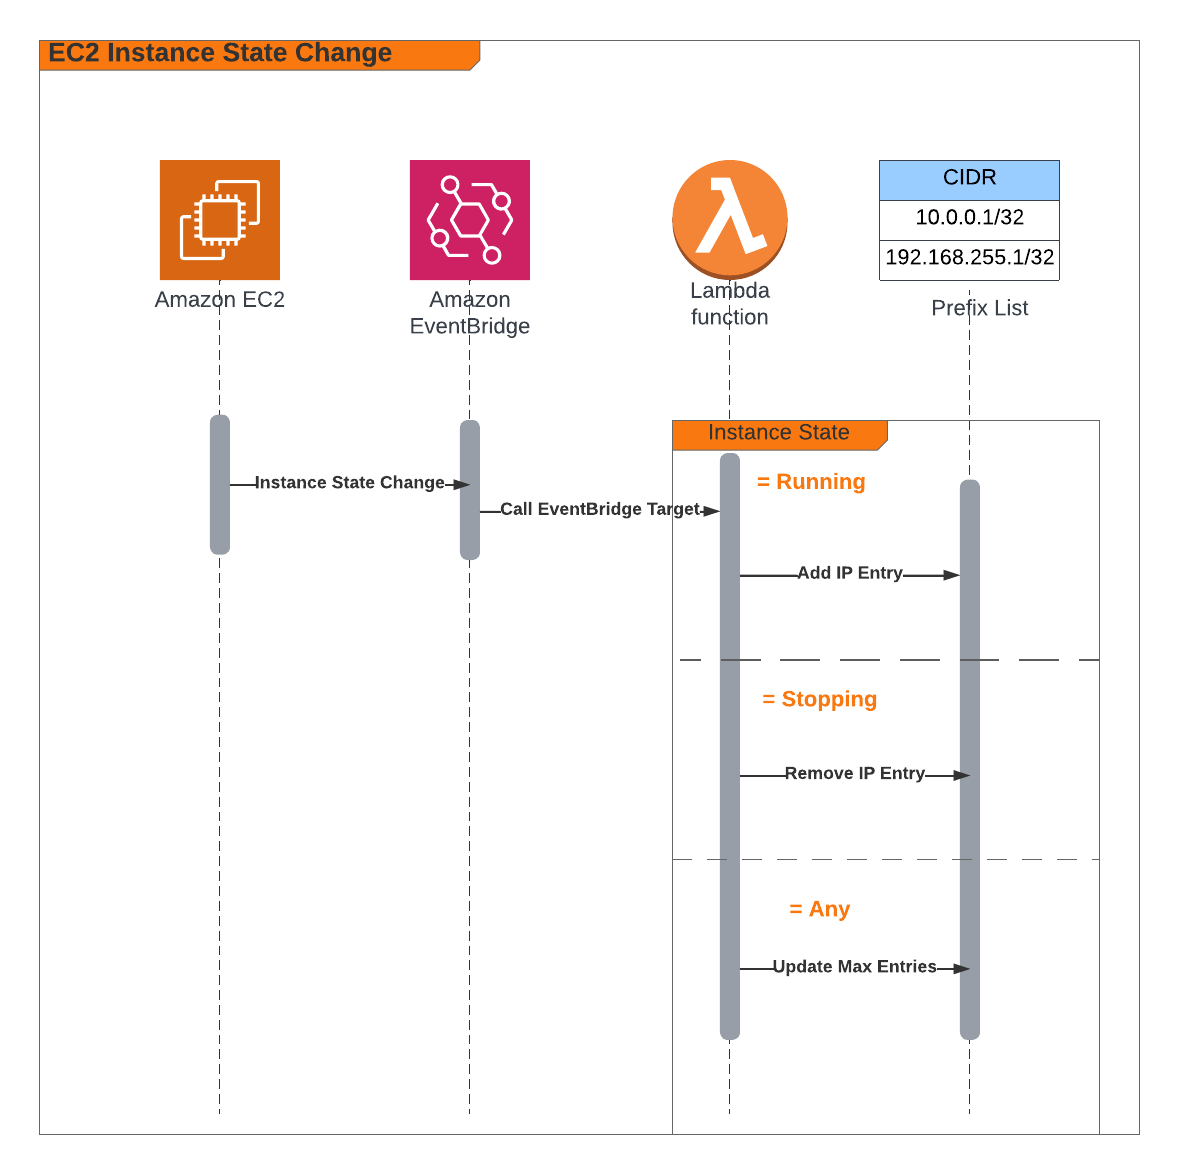
In this solution we propose an architecture to maintain a list of EC2 Private IPs in a Prefix List by leveraging EventBridge to listen for EC2 Instance State Change Events.

1

Depending on the EC2 Instance State Change value we will perform a different action against the Prefix List using a Lambda Function: if the Instance State is “running" then we register the Private IP address into the Prefix List; or, deregister the Private IP address from the Prefix list when the Instance State is “stopping”.

2

When the event is received by the Lambda function, it will perform a lookup on the Tags of the EC2 instance for a Tag (e.g. prefix-list=eventbridge-managed-prefix-list) that indicates which Prefix List (or Lists) the Lambda function will register/de-register the Private IP against. The Prefix List should be maintained economically - because it affects the quotas of resources that reference this Prefix List as described by the AWS documentation: Prefix lists concepts and rules, so the Lambda function should ideally set the Prefix List Max Entries to the number of entries expected in the list before an entry is registered, or, afterwards if an entry de-registered.

By maintaining a Prefix List and leveraging this pattern in your solutions, your solutions may potentially benefit in the following ways:

  • Reusability of configurations which will reduce the operational burden and improve consistency.
  • Re-use of Prefix Lists by sharing it with other AWS accounts by leveraging Resource Access Manager
  • Creates an automated mechanism to track and maintain a definitive list of Private IP addresses of similarly grouped of EC2 instances with non-deterministic IP addresses
  • High cohesion and low Coupling designs: reduce manual flow on changes when a change is implemented
  • Leverage programmatic mechanisms for automatically changes and maintenance – minimise deployments and/or manual tasks
  • Improve Security posture: this may potentially reduce occurances of overly broad CIDR values used in rules or route tables where it is used to encompass a few number of IP address within a wide IP range

Deploying the solution

Here we will walk-through the steps involved to deploy a SAM project of this solution hosted in my GitHub repository: https://github.com/chiwaichan/prefix-list-of-ec2-private-ip-addresses-using-eventbridge

Prerequisites:

Run the following command to checkout the code

git clone git@github.com:chiwaichan/prefix-list-of-ec2-private-ip-addresses-using-eventbridge.git

cd prefix-list-of-ec2-private-ip-addresses-using-eventbridge/

3

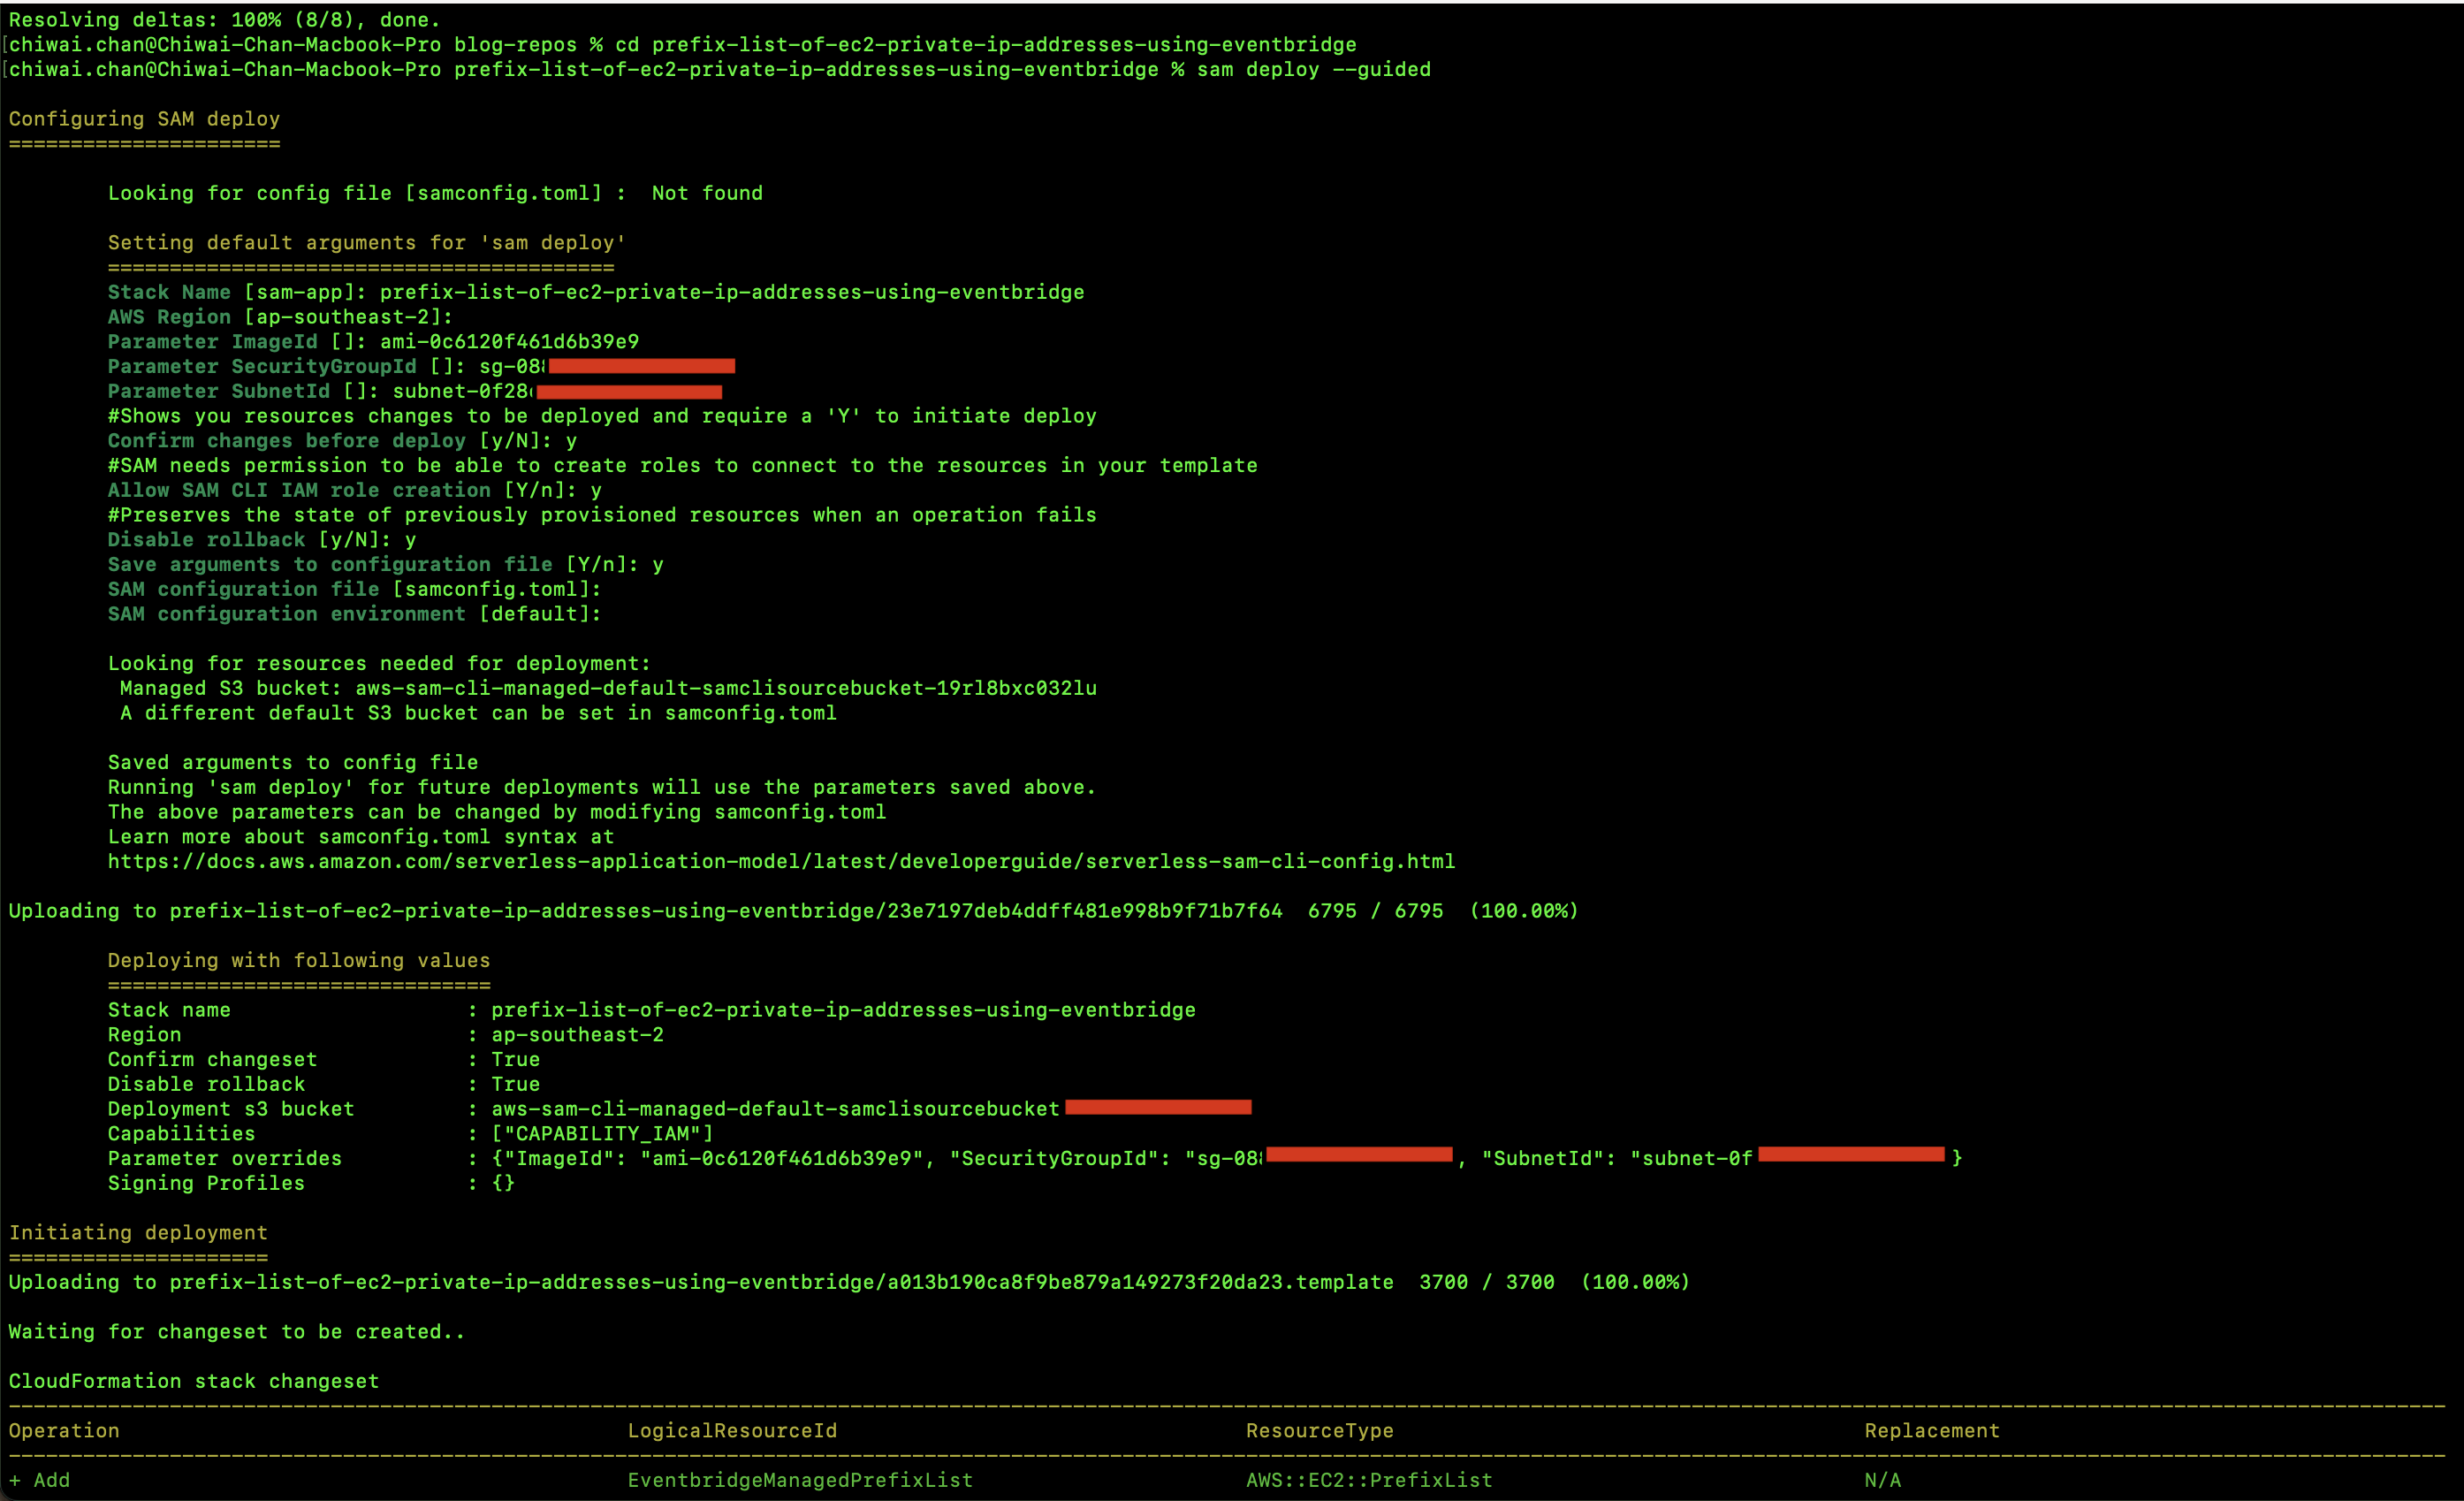
Run the following command to configure the SAM deploy

sam deploy --guided

Enter the following arguments in the prompt:

  • Stack Name: prefix-list-of-ec2-private-ip-addresses-using-eventbridge
  • AWS Region: ap-southeast-2 or the value of your preferred Region
  • Parameter ImageID: ami-0c6120f461d6b39e9 (the Amazon Linux AMI ID in ap-southeast-2), you can use any AMI ID for your Region
  • Parameter SecurityGroupId: the Security Group ID to use for the EC2 instance provisioned, e.g. sg-0123456789
  • Parameter SubnetId: the Subnet ID of the Subnet to deploy the EC2 instance in, e.g. subnet-0123456678

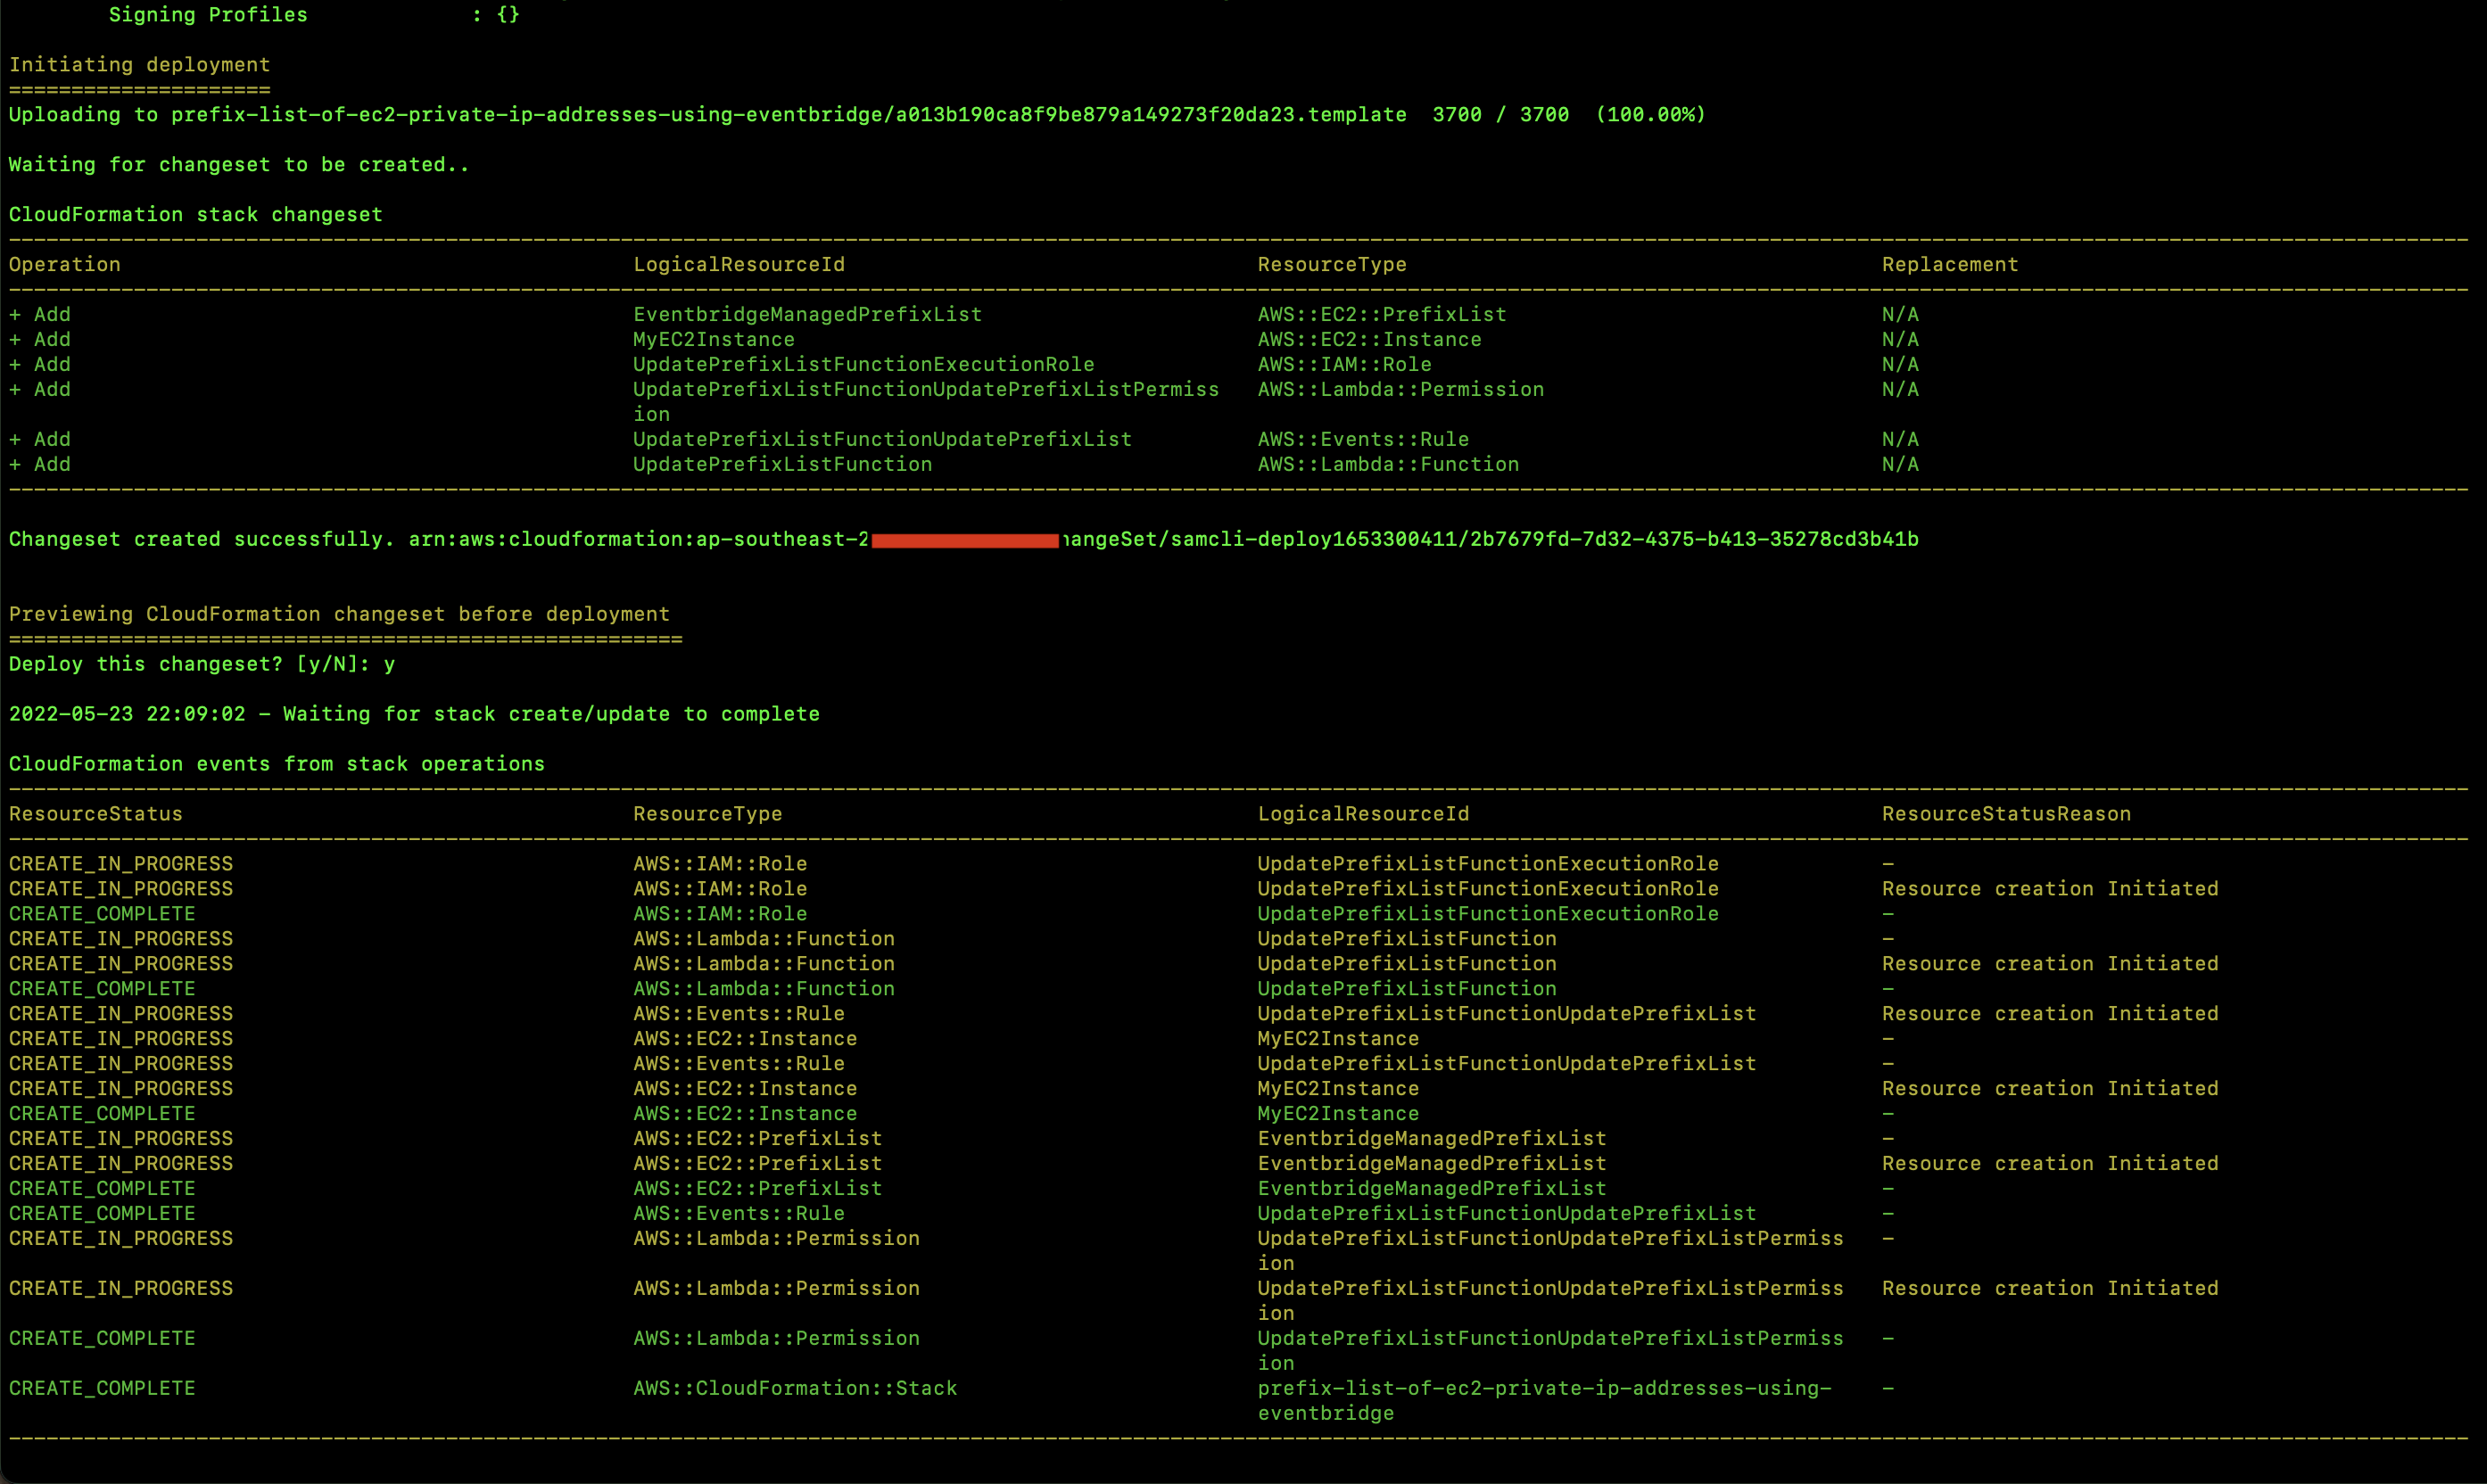
4

5

6

Confirm the deployment

Let's check to see that everything has been deployed correctly in our AWS account.

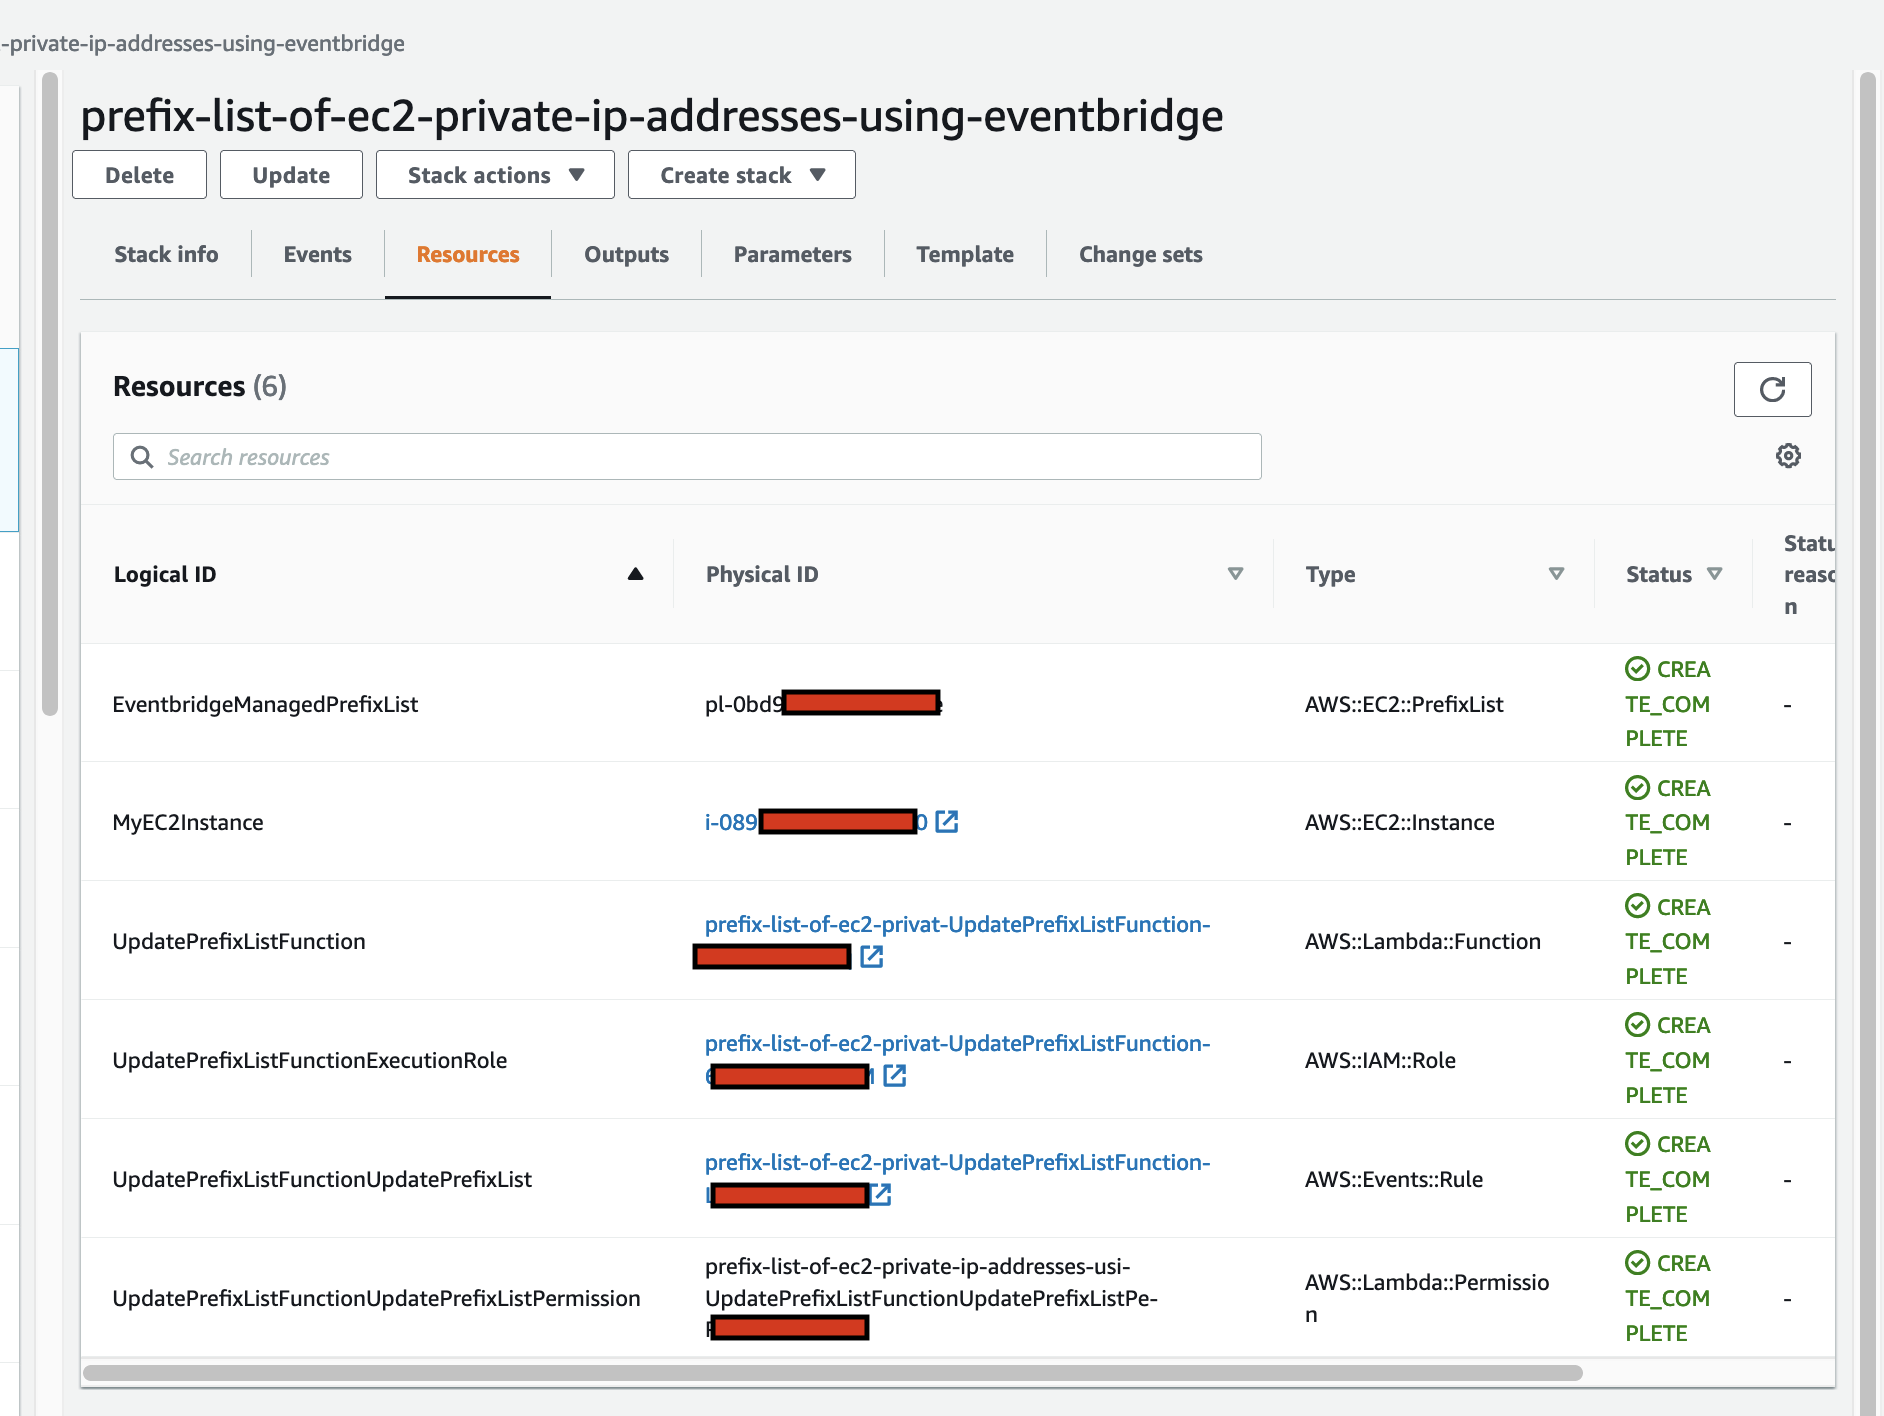
Here we can see the list of AWS resources deployed in the CloudFormation Stack

7

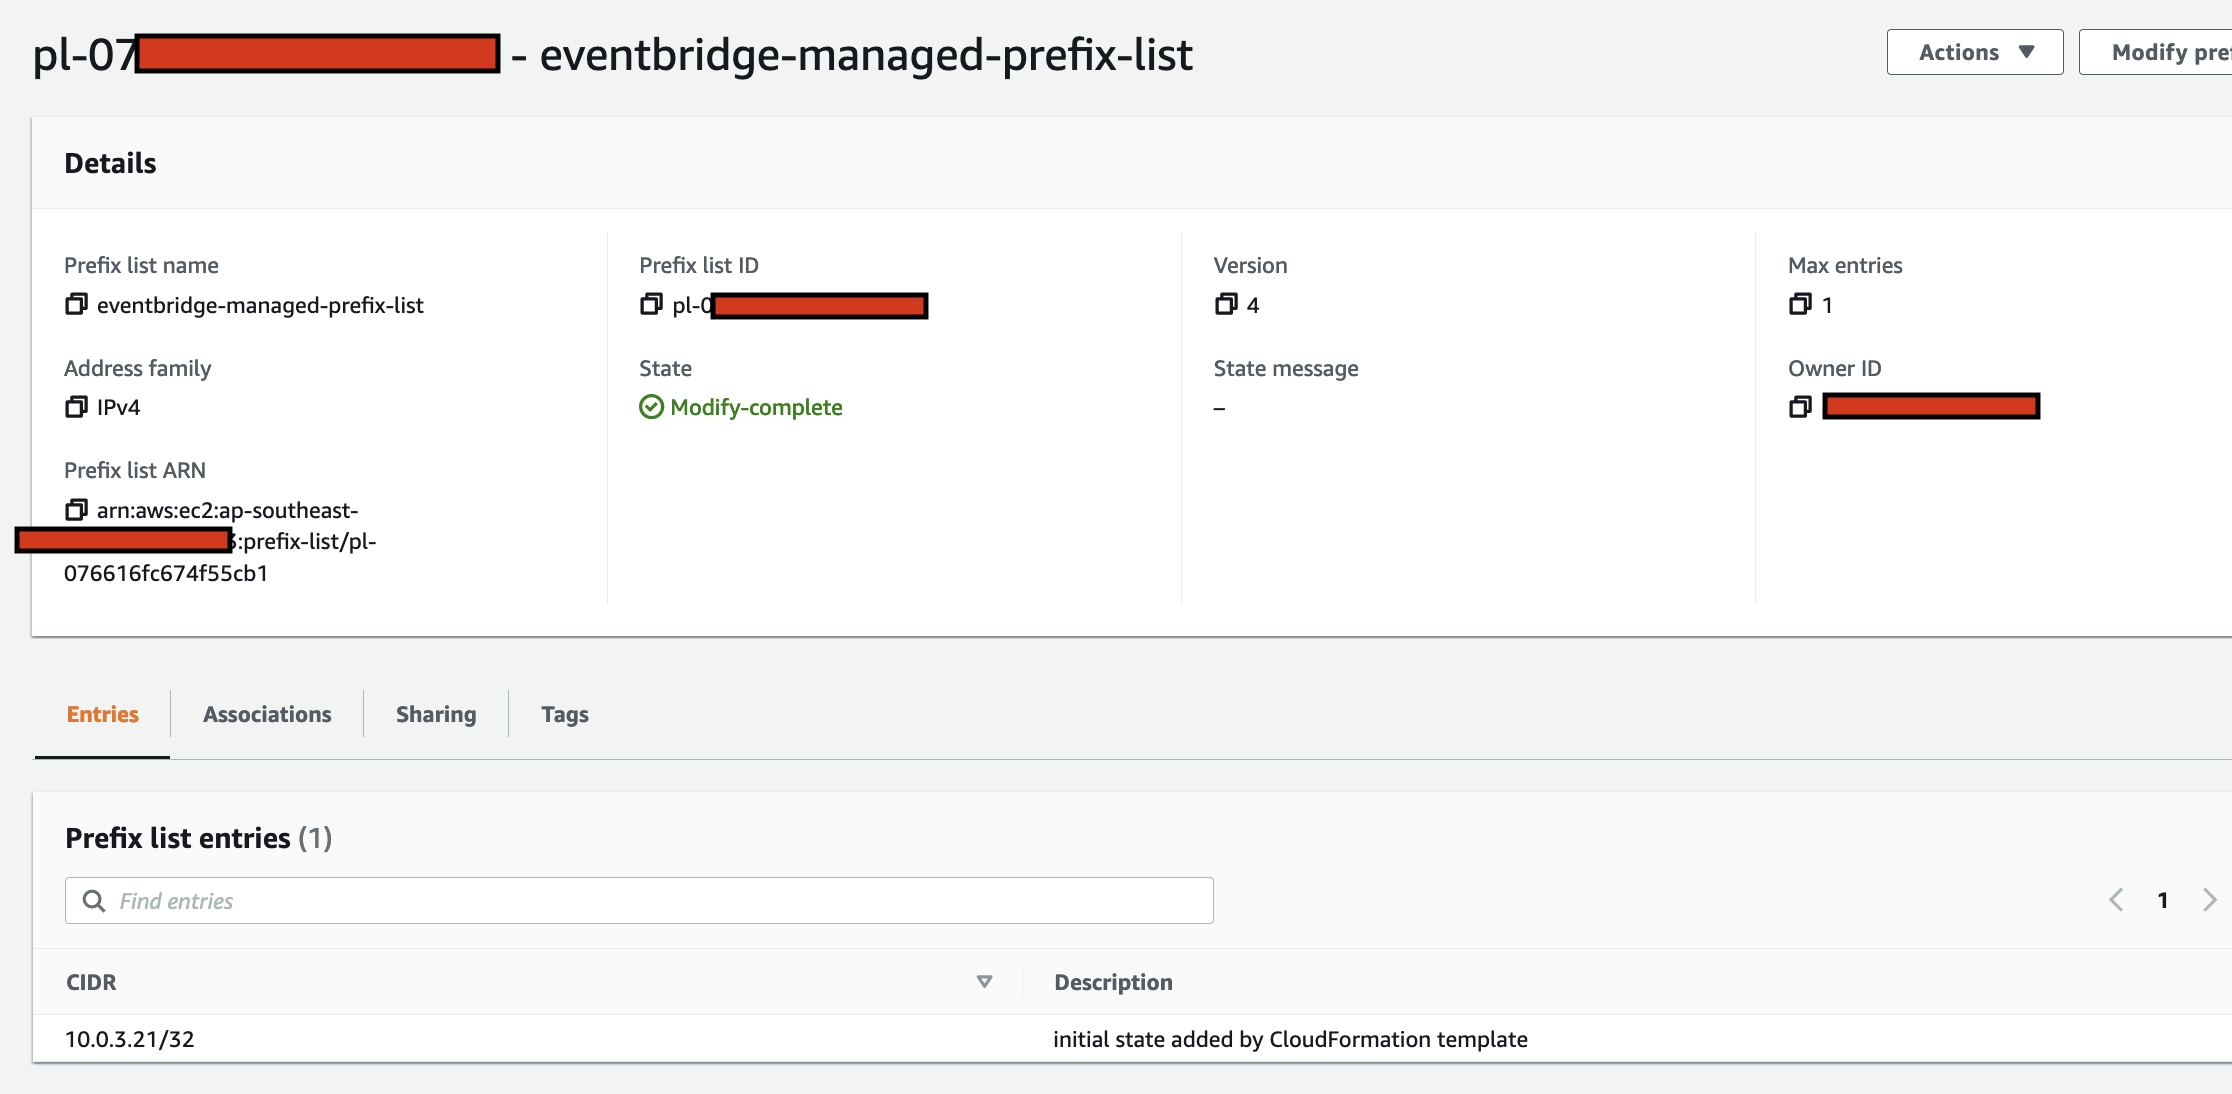
Here we can see the details of the EC2 instance provisioned in a "Running" state. Take note of the Private IPv4 address. 8

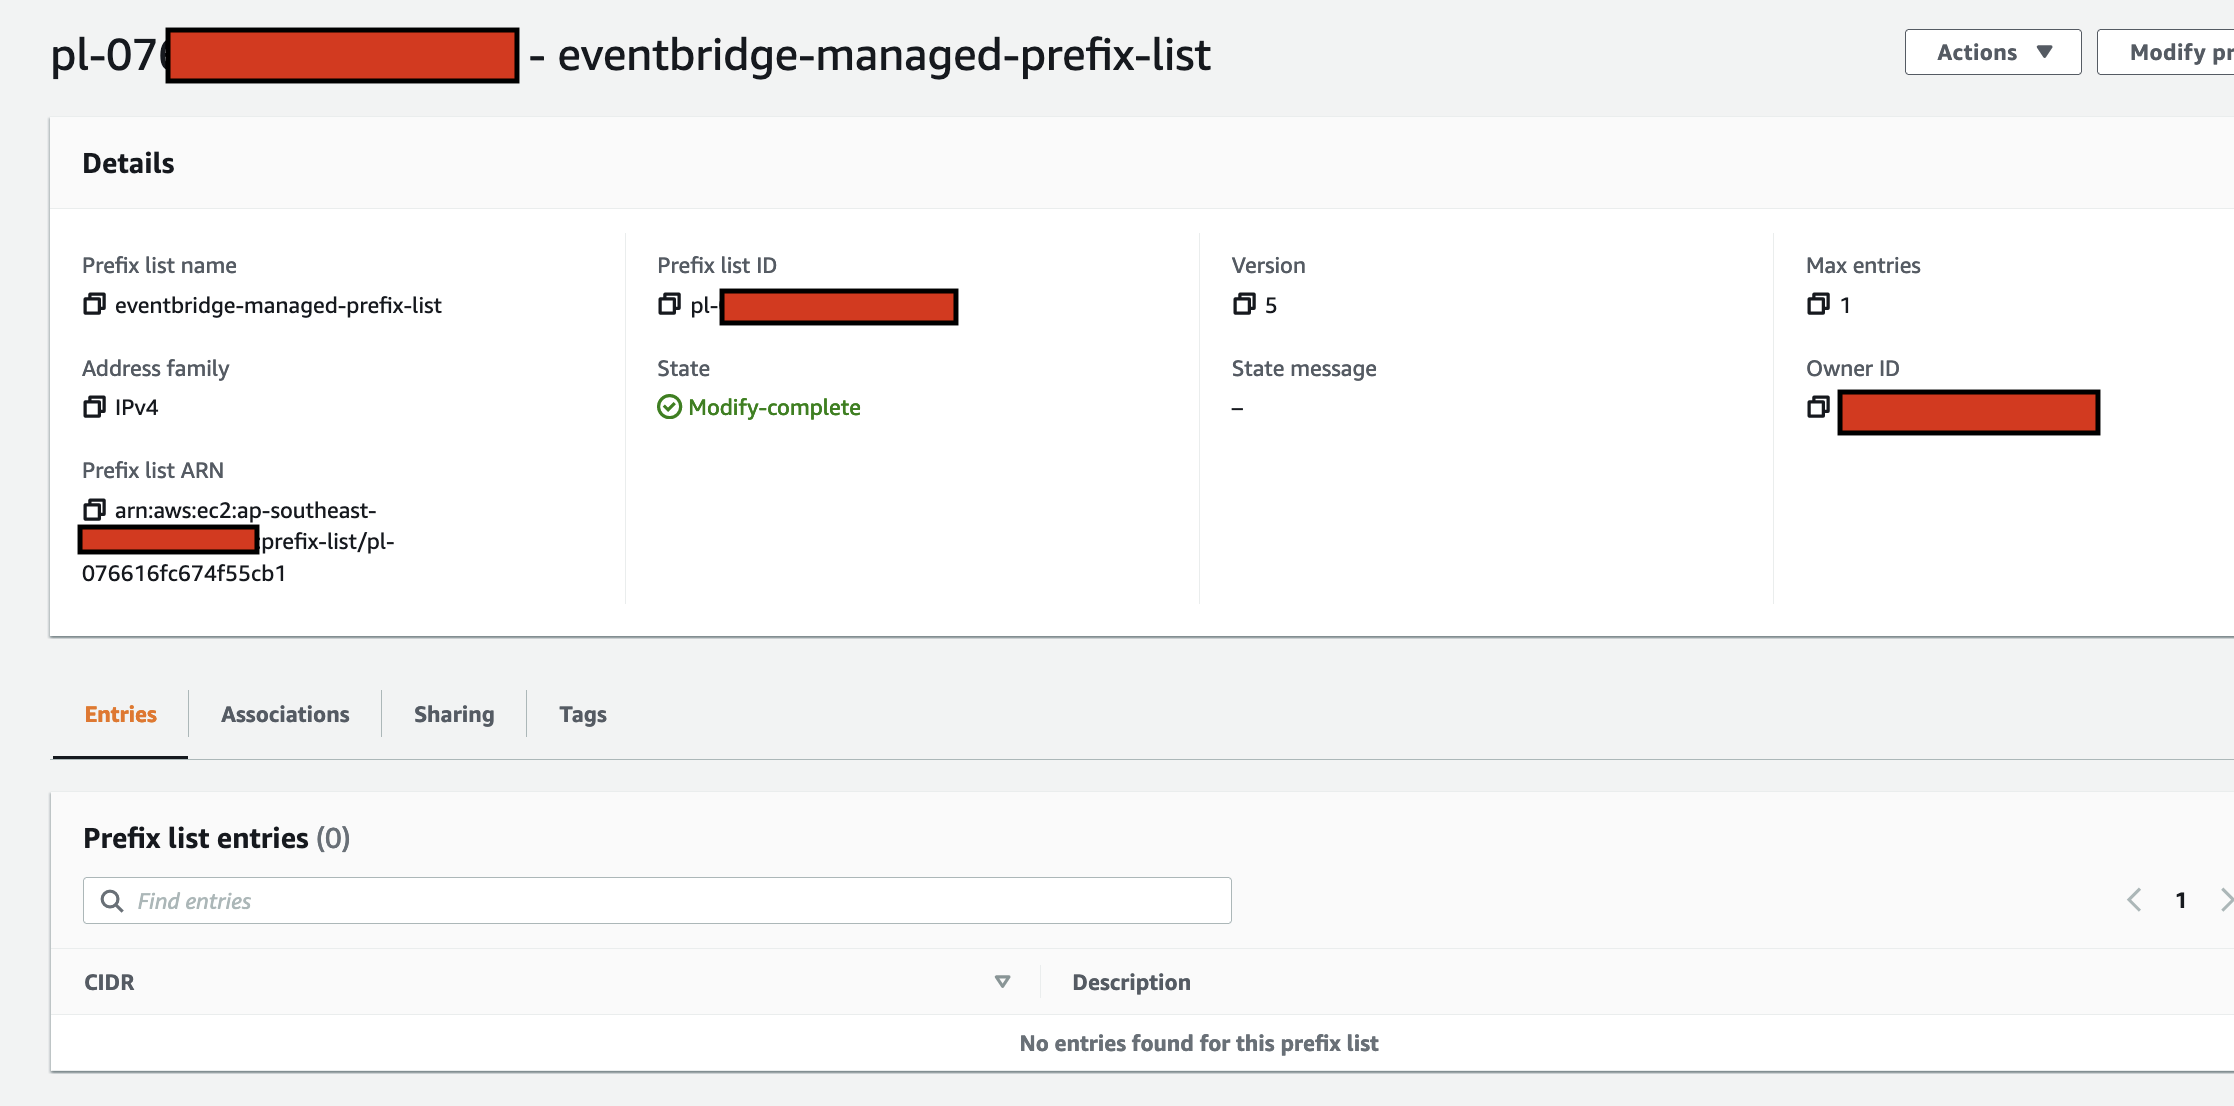
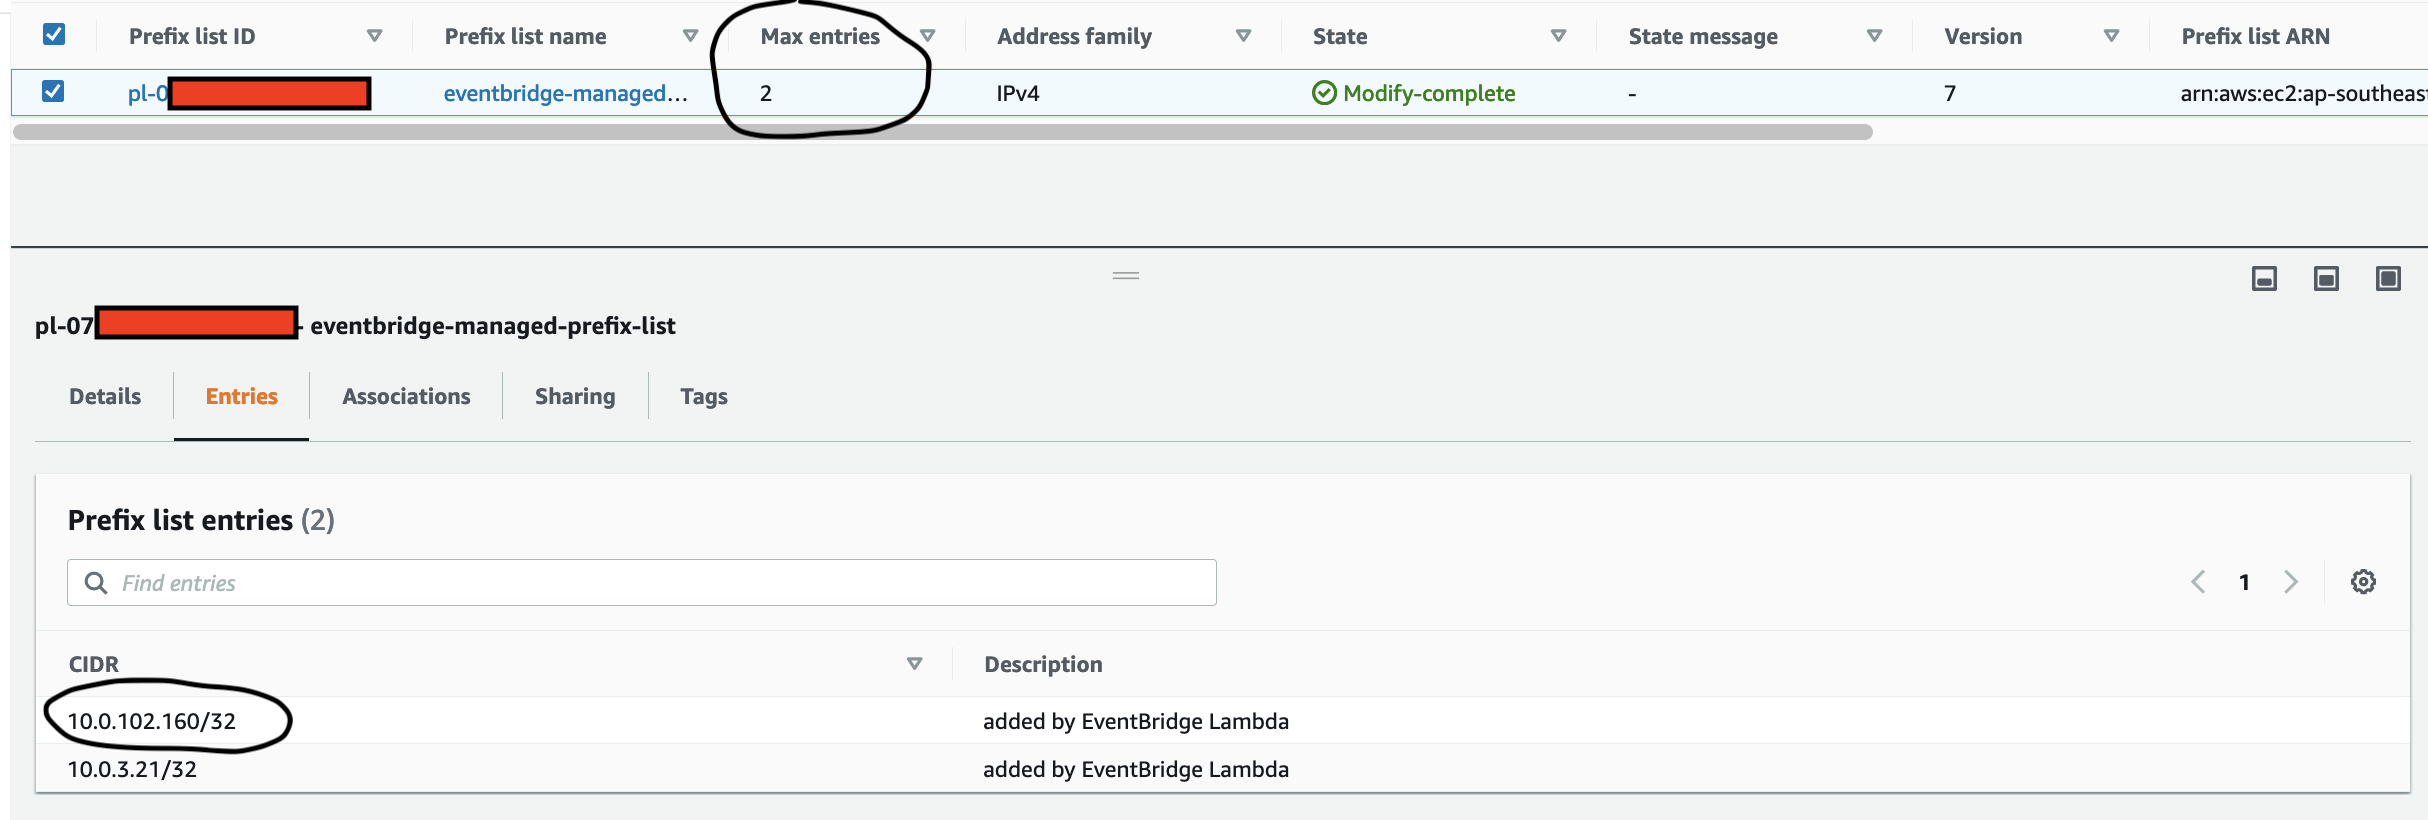
This is the Prefix List provisioned; here we can see the Private IPv4 address of the EC2 instance in the Prefix list entries. Also, note that the Max Entries is currently set to 1. 9

Stopping the running EC2 Instance

Let's stop the EC2 instance

10

We should see the Private IP address of the EC2 instance removed from the Prefix List Entries, the Max Entries remains as 1 - this is because the minimum value must be 1 even when there are no Entries in the Prefix List

11

This is the sniplet of Python code in the Lambda function that removes the Private IP address from the Prefix List:

# if the instance state change is 'stopping' so we remove the private IP CIDR to the Prefix List
elif ec2_state == "stopping":
if is_in_list:
print("remove")

response = client.modify_managed_prefix_list(
PrefixListId=prefix_list_id,
CurrentVersion=current_prefix_list_version,
RemoveEntries=[
{
'Cidr': private_id_address + "/32"
},
]
)

if len(current_entries) != 1:
sleep(3)

response = client.modify_managed_prefix_list(
PrefixListId=prefix_list_id,
MaxEntries=len(current_entries) - 1
)
else:
print("not in list so no action")

Starting the stopped EC2 Instance

Let's start the EC2 instance

12

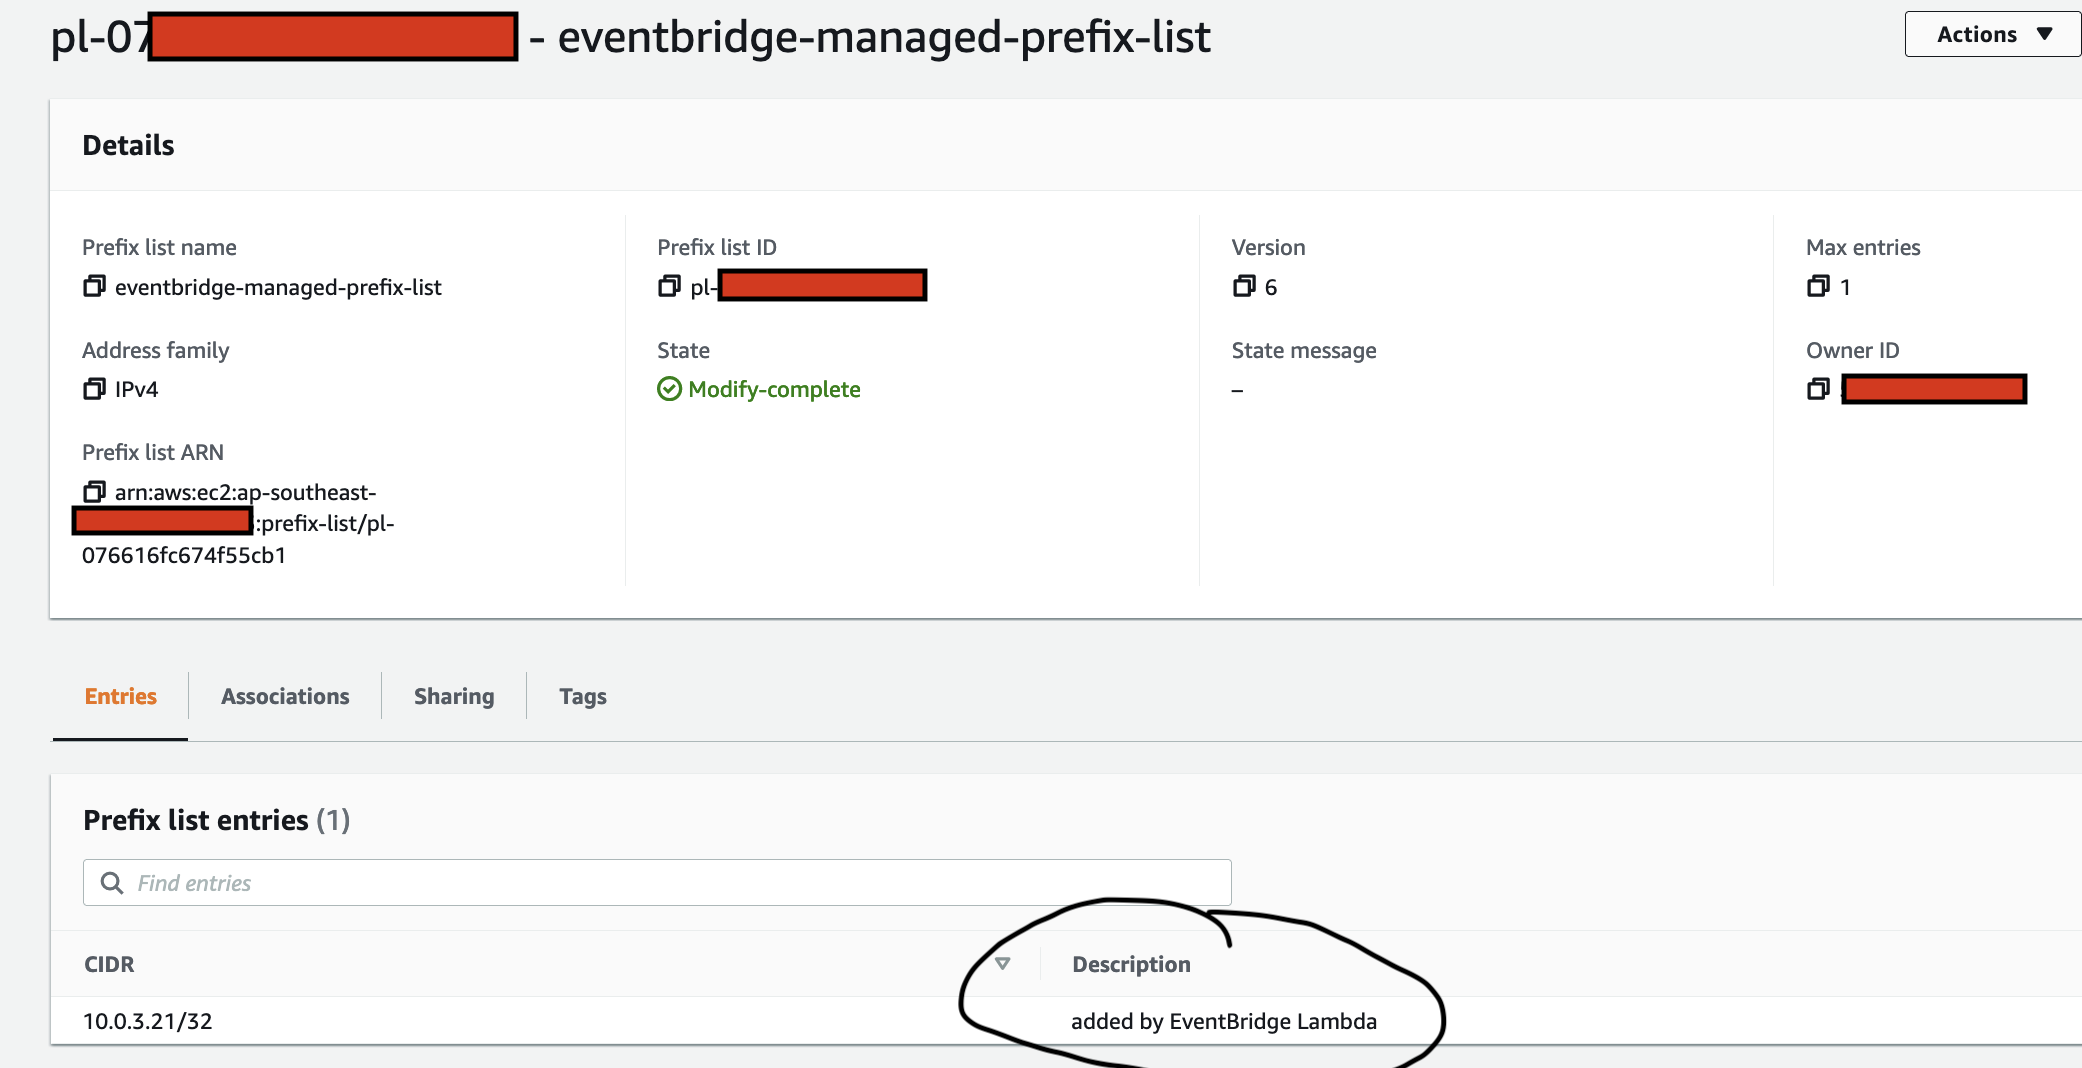
We should see the Private IP address of the EC2 instance added back to the Prefix List Entries. Note the description is different to what it was when we first saw it earlier.

13

This is the sniplet of Python code in the Lambda function that adds the Private IP address to the Prefix List:

# if the instance state change is 'running' so we add the private IP CIDR to the Prefix List
if ec2_state == "running":
if is_in_list:
print("already in list so no action")
else:
print("add")

if len(current_entries) + 1 != prefix_list["MaxEntries"]:
response = client.modify_managed_prefix_list(
PrefixListId=prefix_list_id,
MaxEntries=len(current_entries) + 1
)

sleep(3)

response = client.modify_managed_prefix_list(
PrefixListId=prefix_list_id,
CurrentVersion=current_prefix_list_version,
AddEntries=[
{
'Cidr': private_id_address + "/32",
'Description': 'added by EventBridge Lambda'
},
]
)

Manually create an EC2 instance with a Prefix List Tag

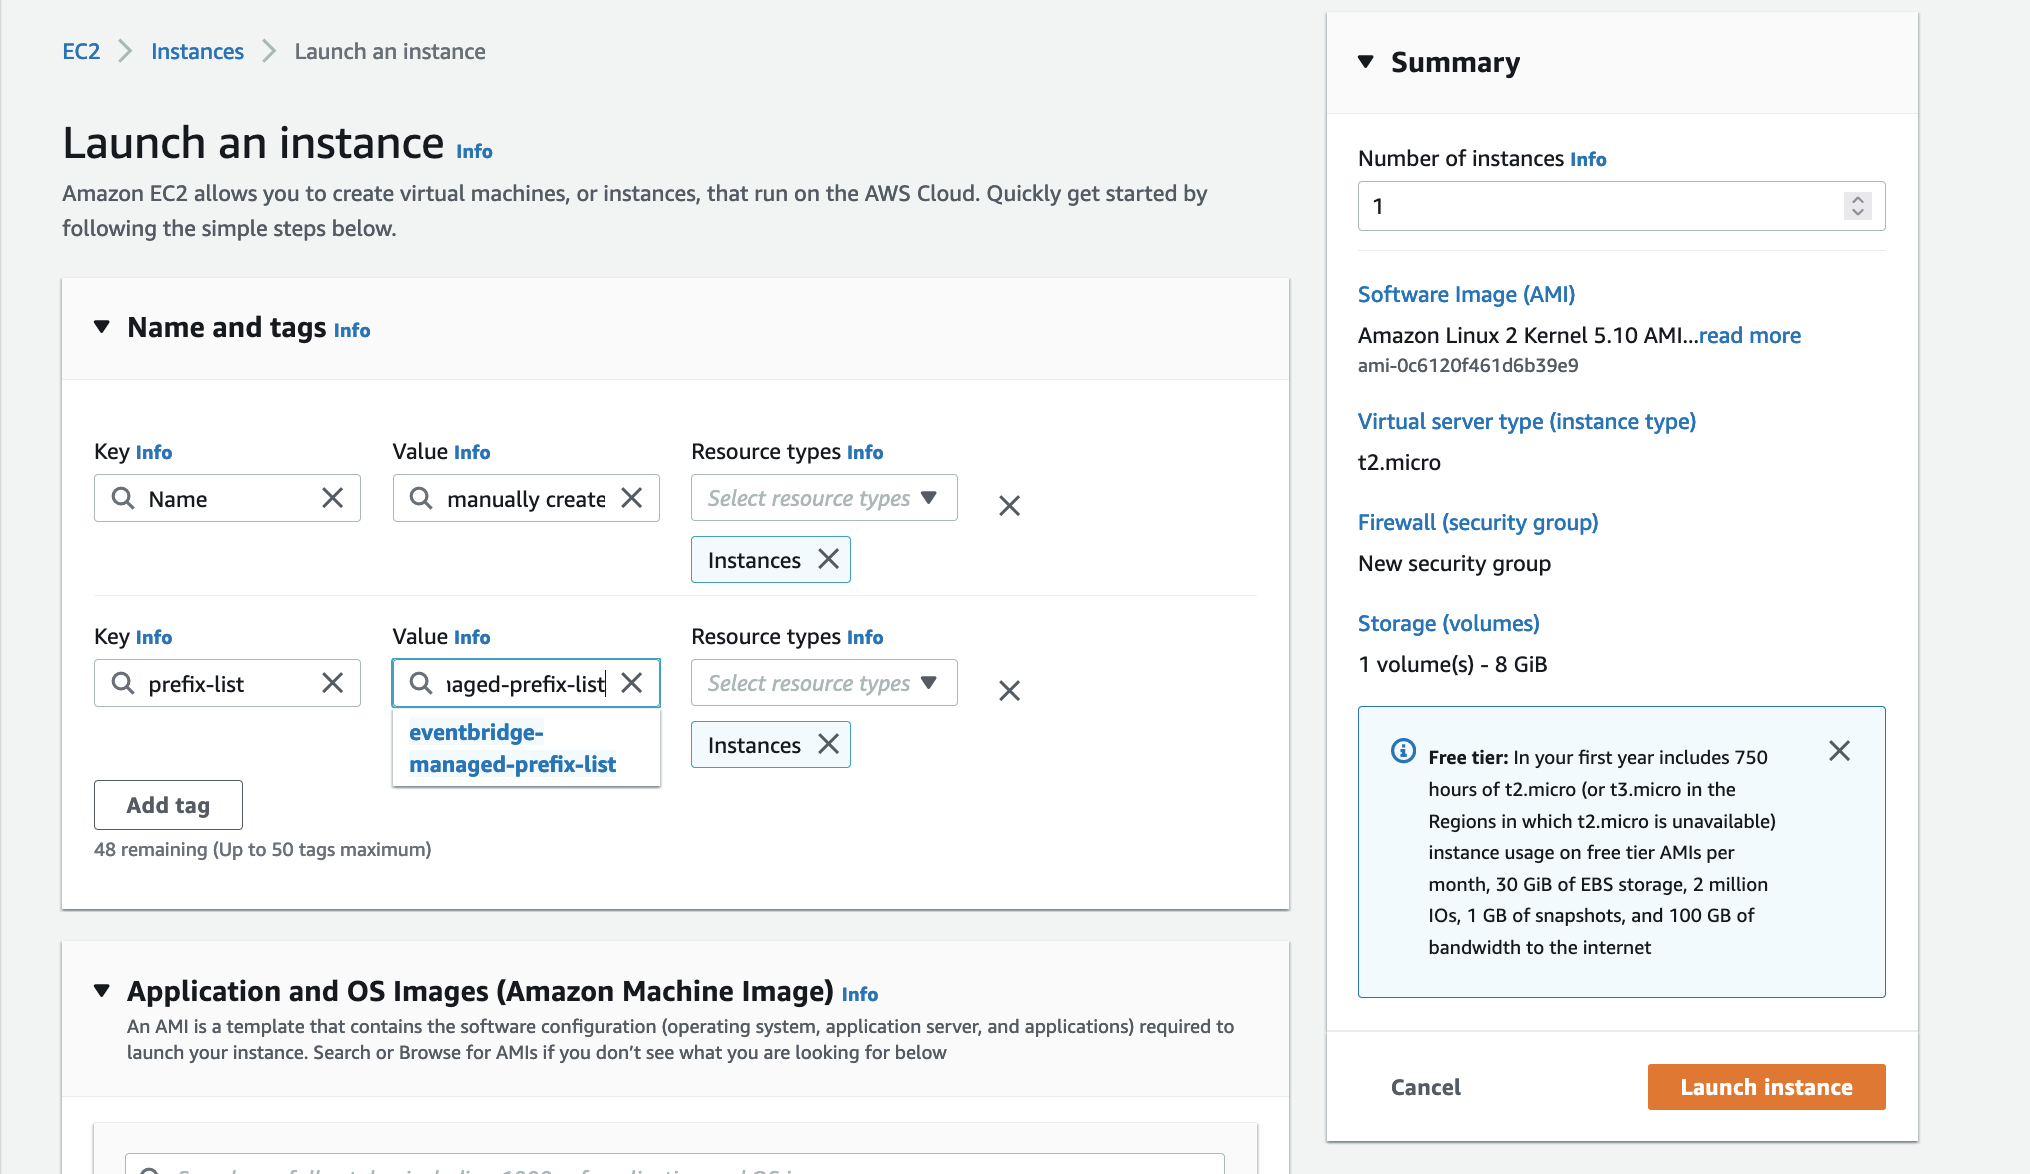
Let's launch a new EC2 instance (using any AMI and deploy it in any Subnet with any Security Group) with a value of "eventbridge-managed-prefix-list" for the "prefix-list" Tag, the EventBridge and Lambda will register the Private IP address of this newly created instance into the Prefix List "eventbridge-managed-prefix-list".

14

15

16

Here we see the Private IP address of the new manually created EC2 instance appear in the Prefix List Entries; also, the Max Entries has been updated to 2 by the Lambda function.

17

FYI, You can adapted this pattern and Lambda function to add or remove Private IP addresses based on the EC2 instance state change value of your choosing.

Clean up

  • Delete the manually created EC2 instance; afterwards, you can see it removed from the Prefix List and the Prefix List's Max Entries decreased back down to 1 by the Lambda function
  • Delete the CloudFormation stack with the name "prefix-list-of-ec2-private-ip-addresses-using-eventbridge"

This solution compliments the use of networking solutions in other blogs I have written:

Smart Cat Feeder – Part 4

· 5 min read
Chiwai Chan
Tinkerer

This is the Part 4 and final blog of the series where I detail my journey in learning to build an IoT solution.

Please have a read of my previous blogs to get the full context leading up to this point before continuing.

  • Part 1: I talked about setting up a Seeed AWS IoT Button
  • Part 2: I talked about publishing events to an Adruino Micro-controller from AWS
  • Part 3: I talked about my experience of using a 3D Printer for the first time to print a Cat Feeder

Why am I building this Feeder?

I've always wanted to dip my toes into building IoT solutions beyond doing what a typical tutorial teaches in only turning on LEDs - I wanted to build something that would used everyday. Plus, I often forget to feed the cats while I am away from home (for the day), so it would be nice to come home to a non-grumpy cat by feeding them remotely any time and from any where in the world using the internet.

What was used to build this Feeder?

  • A 3D Printer using PLA as the filament material.
  • An Arduino based micro-controller - in this case a Seeed Studio XIAO ESP32C3
  • A couple of motors and controllers
  • AWS Services
  • Seeed AWS IoT Button
  • Some code
  • and some cat food

So how does it work and how is it put together?

To simply describe what is built, the Feeder uses an Iot button click to trigger events over the internet to instruct the feeder to dispense food into one or both food bowls.

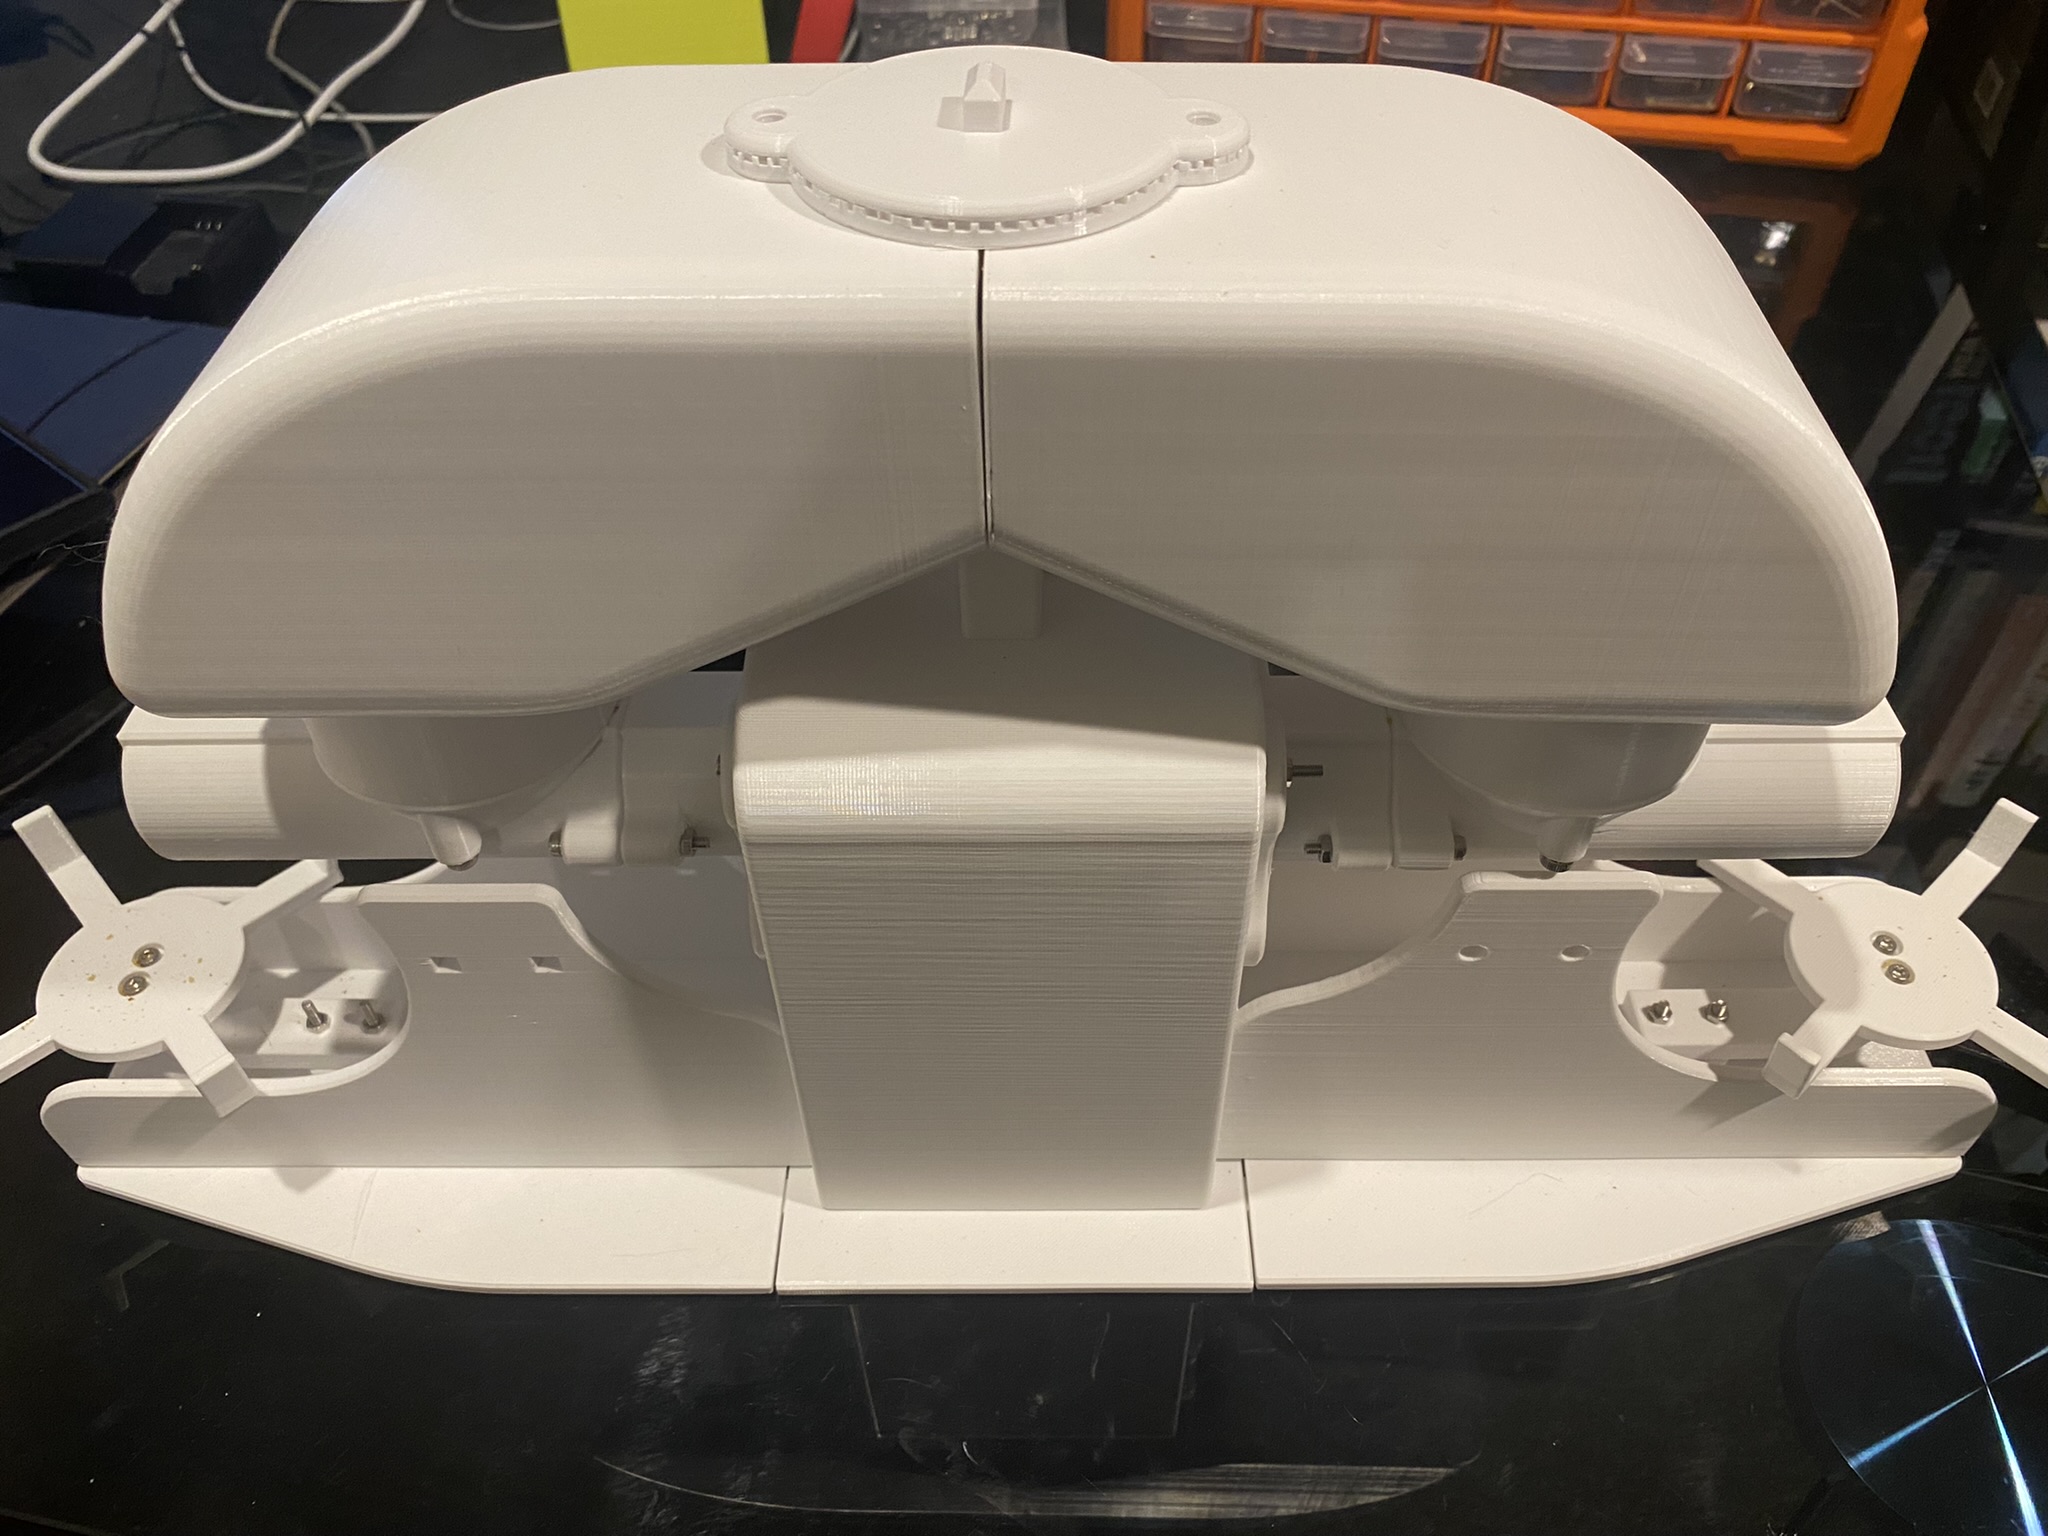
cat feeder

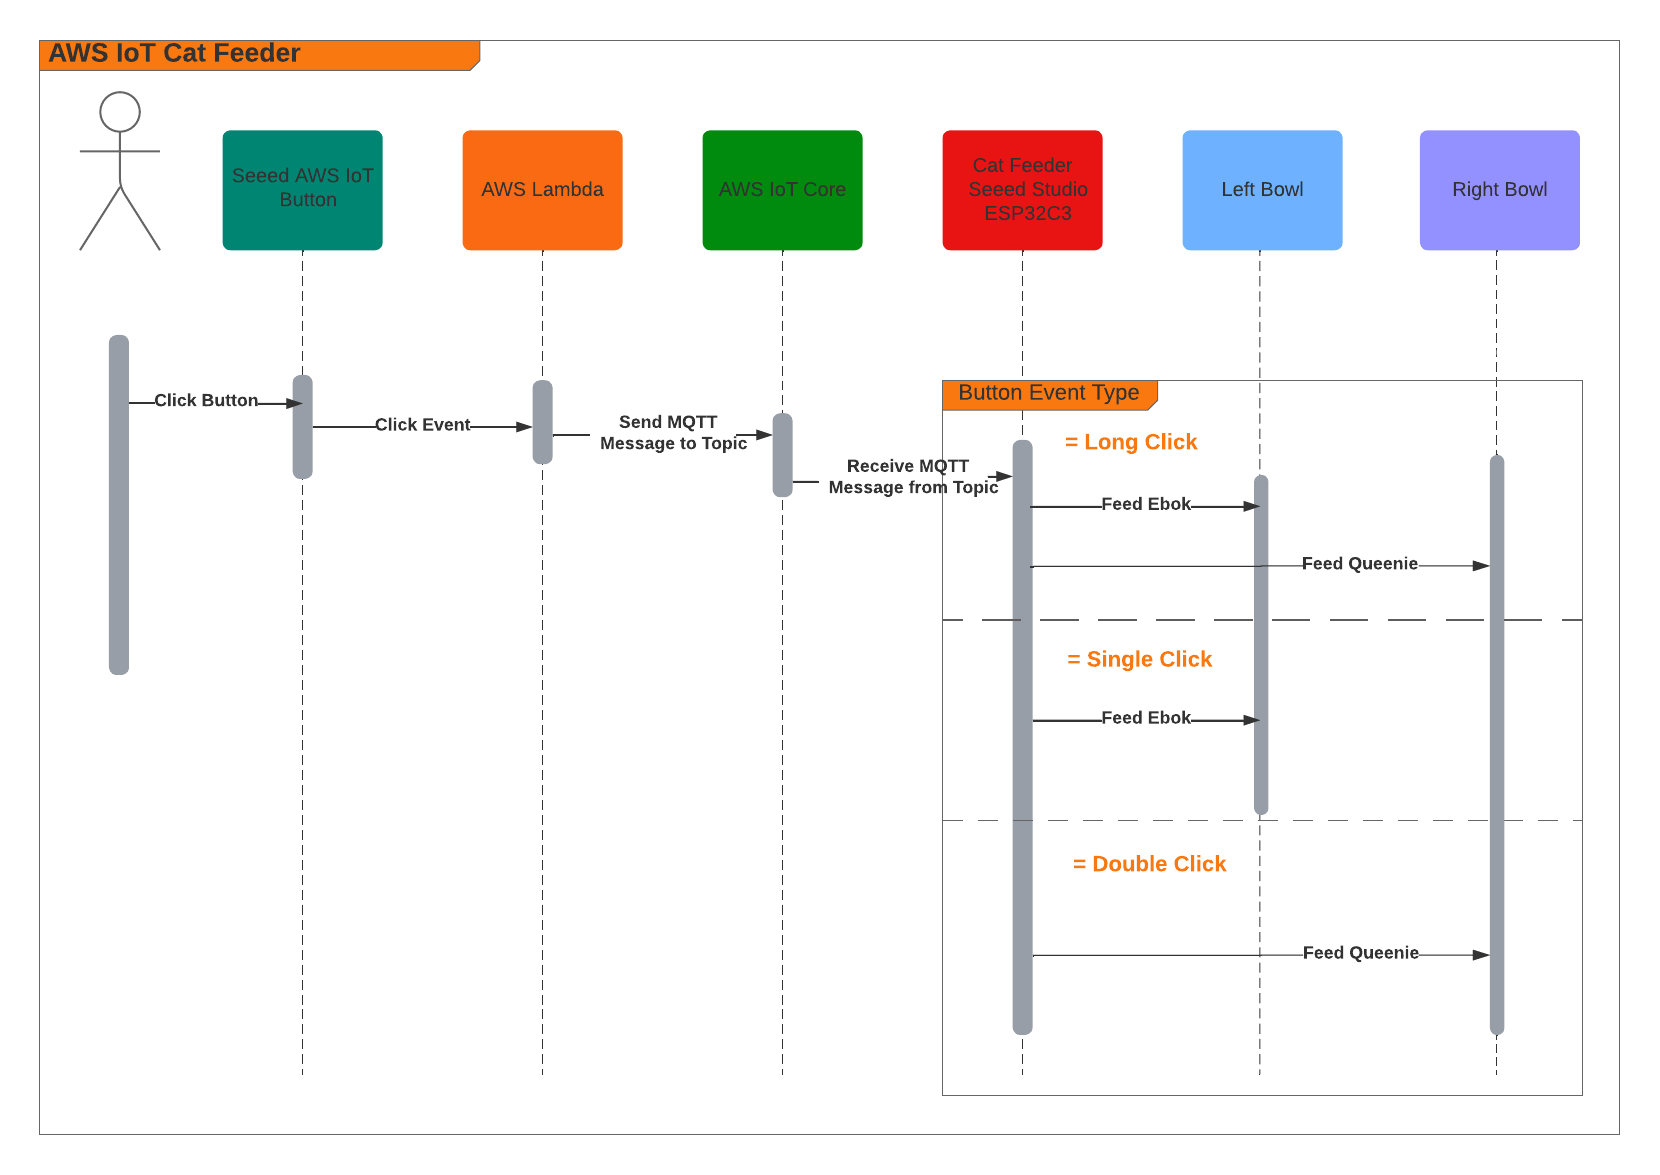
Here are some diagrams describing the architecture of the solution - the technical things that happens in-between the IoT button and the Cat Feeder.

architecture diagram seeed sequence diagram

When the Feeder receives a MQTT message from the AWS IoT Core Service, it runs the motor for 10 seconds to dispense food into either one of food bowls, and if the message contains an event value to dispense food into both bowls we can run both motors concurrently using the L298N controller.

Here's a video of some timelapse picture captured during the 3 weeks it took to 3D print the feeder.

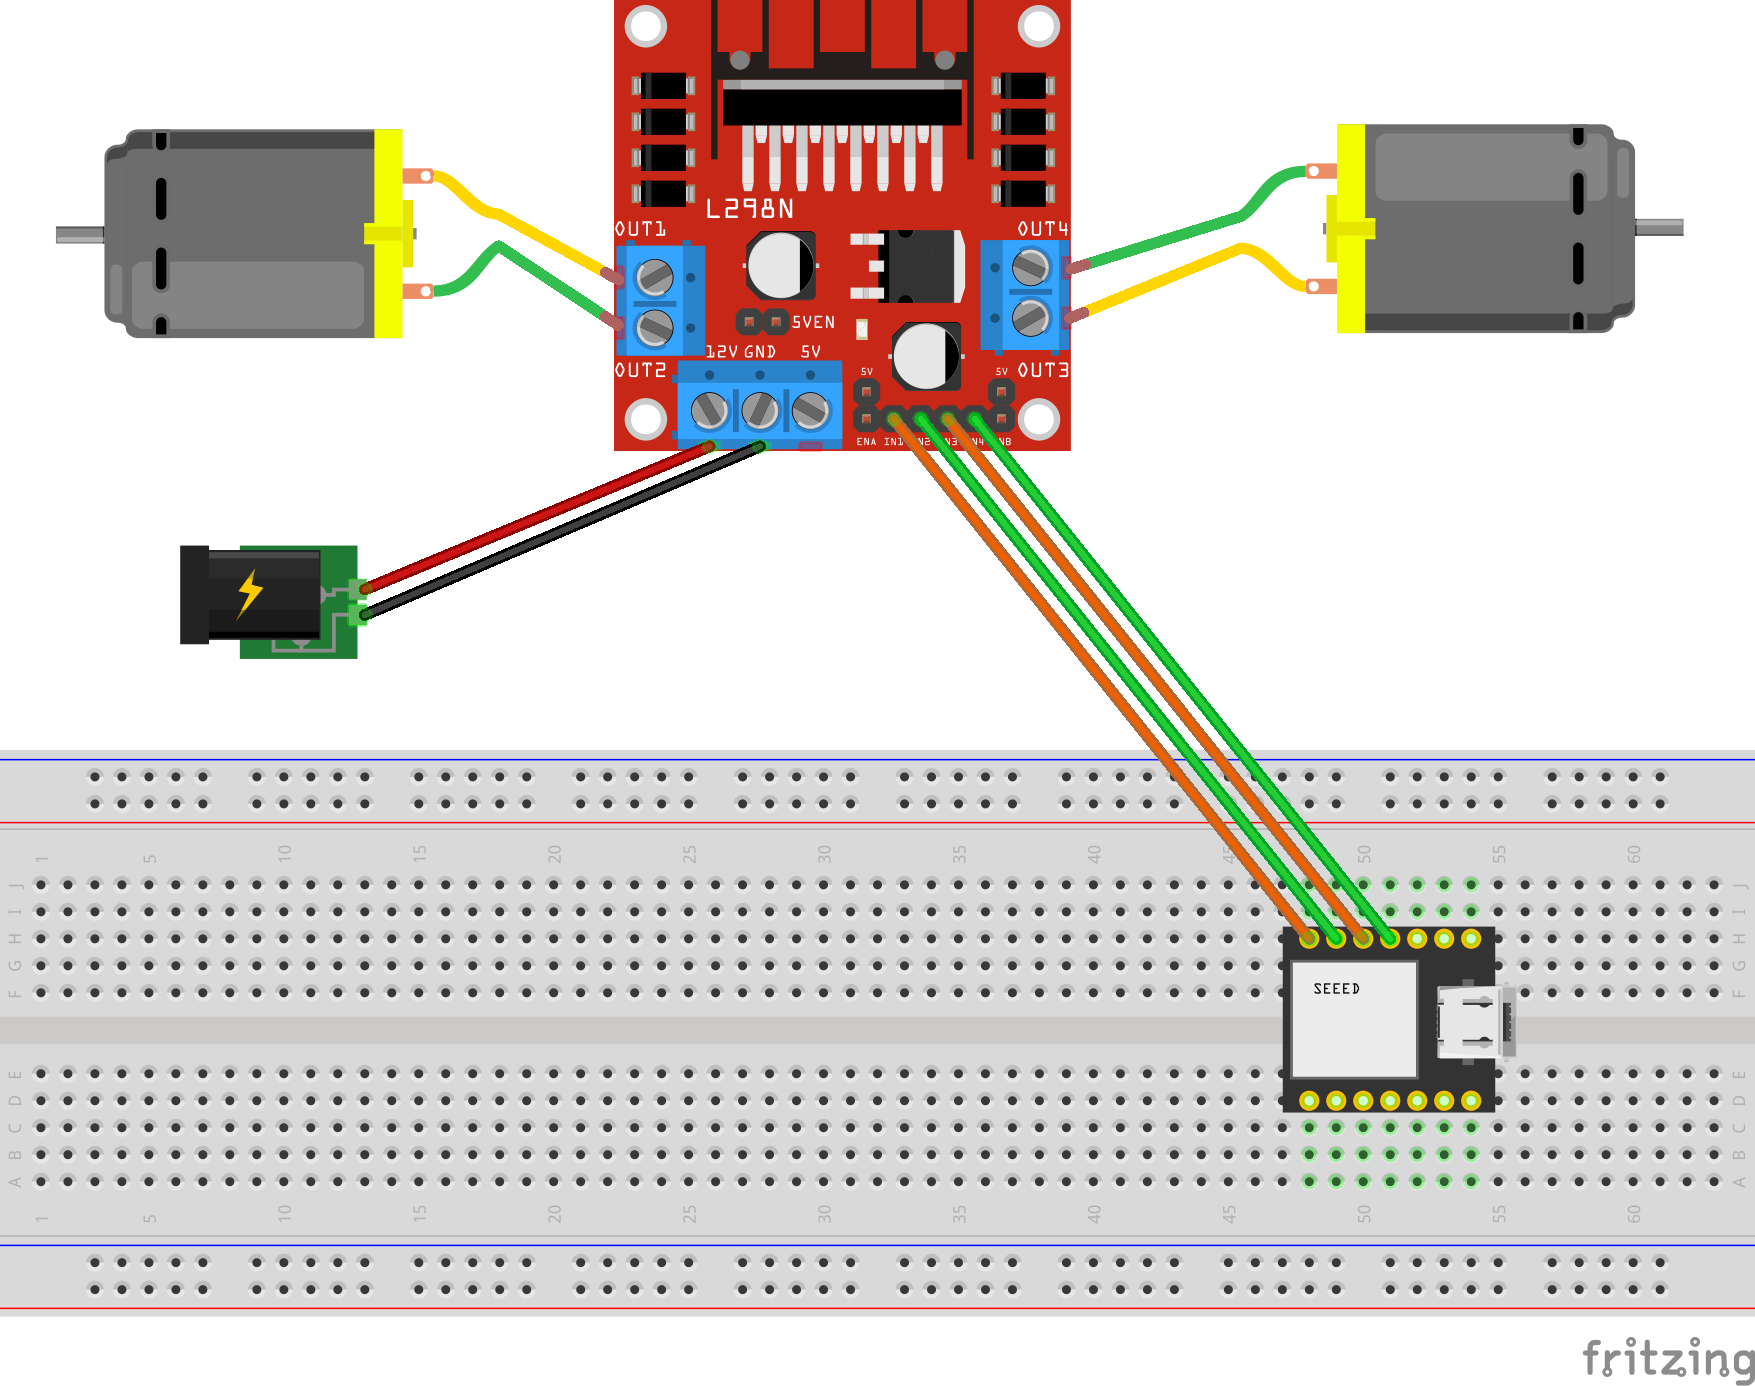
The Feeder is made up of a small handful of basic hardware components, below is a Breadboard diagram depicting the components used and how they are all wired up together. A regular 12V 2A DC power adapter supply is used to power all the components.

breadboard diagram seeed

The code to start and stop a motor is about 10 lines of code as shown below. This is the completed version of the Arduino Sketch shown in Part 2 of this blog series when it was partially written at the time.

#include "secrets.h"
#include <WiFiClientSecure.h>
#include <MQTTClient.h>
#include <ArduinoJson.h>
#include "WiFi.h"

// The MQTT topics that this device should publish/subscribe
#define AWS_IOT_PUBLISH_TOPIC "cat-feeder/states"
#define AWS_IOT_SUBSCRIBE_TOPIC "cat-feeder/action"

WiFiClientSecure net = WiFiClientSecure();
MQTTClient client = MQTTClient(256);

int motor1pin1 = 32;
int motor1pin2 = 33;
int motor2pin1 = 16;
int motor2pin2 = 17;

void connectAWS()
{
WiFi.mode(WIFI_STA);
WiFi.begin(WIFI_SSID, WIFI_PASSWORD);

Serial.println("Connecting to Wi-Fi");
Serial.println(AWS_IOT_ENDPOINT);

while (WiFi.status() != WL_CONNECTED) {
delay(500);
Serial.print(".");
}

// Configure WiFiClientSecure to use the AWS IoT device credentials
net.setCACert(AWS_CERT_CA);
net.setCertificate(AWS_CERT_CRT);
net.setPrivateKey(AWS_CERT_PRIVATE);

// Connect to the MQTT broker on the AWS endpoint we defined earlier
client.begin(AWS_IOT_ENDPOINT, 8883, net);

// Create a message handler
client.onMessage(messageHandler);

Serial.println("Connecting to AWS IOT");
Serial.println(THINGNAME);

while (!client.connect(THINGNAME)) {
Serial.print(".");
delay(100);
}

if (!client.connected()) {
Serial.println("AWS IoT Timeout!");
return;
}

Serial.println("About to subscribe");
// Subscribe to a topic
client.subscribe(AWS_IOT_SUBSCRIBE_TOPIC);

Serial.println("AWS IoT Connected!");
}

void publishMessage()
{
StaticJsonDocument<200> doc;
doc["time"] = millis();
doc["state_1"] = millis();
doc["state_2"] = 2 * millis();
char jsonBuffer[512];
serializeJson(doc, jsonBuffer); // print to client

client.publish(AWS_IOT_PUBLISH_TOPIC, jsonBuffer);

Serial.println("publishMessage states to AWS IoT" );
}

void messageHandler(String &topic, String &payload) {
Serial.println("incoming: " + topic + " - " + payload);

StaticJsonDocument<200> doc;
deserializeJson(doc, payload);
const char* event = doc["event"];

Serial.println(event);

feedMe(event);
}

void setup() {
Serial.begin(9600);
connectAWS();

pinMode(motor1pin1, OUTPUT);
pinMode(motor1pin2, OUTPUT);
pinMode(motor2pin1, OUTPUT);
pinMode(motor2pin2, OUTPUT);
}

void feedMe(String event) {
Serial.println(event);

bool feedLeft = false;
bool feedRight = false;

if (event == "SINGLE") {
feedLeft = true;
}
if (event == "DOUBLE") {
feedRight = true;
}
if (event == "LONG") {
feedLeft = true;
feedRight = true;
}

if (feedLeft) {
Serial.println("run left");
digitalWrite(motor1pin1, HIGH);
digitalWrite(motor1pin2, LOW);
}

if (feedRight) {
Serial.println("run right");
digitalWrite(motor2pin1, HIGH);
digitalWrite(motor2pin2, LOW);
}

delay(10000);
digitalWrite(motor1pin1, LOW);
digitalWrite(motor1pin2, LOW);
digitalWrite(motor2pin1, LOW);
digitalWrite(motor2pin2, LOW);
delay(2000);

Serial.println("fed");
}

void loop() {
publishMessage();
client.loop();
delay(3000);
}

Demo Time

The Seeed AWS IoT Button is able to detect 3 different types of click events: Long, Single and Double, and we are able to leverage this all the way to the feeder so we will have it performing certains actions base on the click event type.

The video below demonstrates the following scenarios:

  • Long Click: this will dispense food into both cat bowls
  • Single Click: this will dispense food into Ebok's cat bowl
  • Double Click: this will dispense food into Queenie's cat bowl

What's next?

Build the nervous system of an ultimate nerd project I have in mind that would allow me to voice control actions controlling servos, LEDs and audio outputs, by using a mesh of Seeed XIAO BLE Sense micro-controllers and TinyML Machine Learning.

Hosting multiple subsites under a serverless website instance

· 7 min read
Chiwai Chan
Tinkerer

Introduction

Recently, I was tasked with coming up with a solution for a single website instance to host various pockets of documentations scattered across a growing number of Git repositories; each repository hosted documentation for a specific subject domain written in Markdown format - you may have come across README.md files all over the internet which is a classic example of Markdown.

Here is a list of requirements based on what the solution has to solve:

  • Website Hosting: the documentation website must be accessible from anywhere over the public internet. Optionally, we could limit access to a list of whitelisted IPs.
  • Authentication: access is only granted to those that should have it. Federating an IdP is ideal, e.g. Azure AD.
  • Serverless.
  • Host multiple sets of documentation scattered across multiple Azure DevOps Git Repositories.
  • Versioning: store each set of documentation in source control for all its goodness.
  • Format: create the documentation in plain text without having to worry much about styling and formatting. This is where Markdown file format comes in.
  • Pipelines to detect changes to documentation that would in turn trigger builds and deployments.
  • Azure AD Federation for SSO, this is especially useful for organisations with many applications and users so existing credentials can be re-used and managed the same way.

Solution

Serverless Website Hosting Infrastructure

website infrastructure chiwaichan

The Serverless Website Hosting Infrastructure I am about to talk about is built on top on an AWS's sample solution found here. I added resources on top of the example to suit our needs.

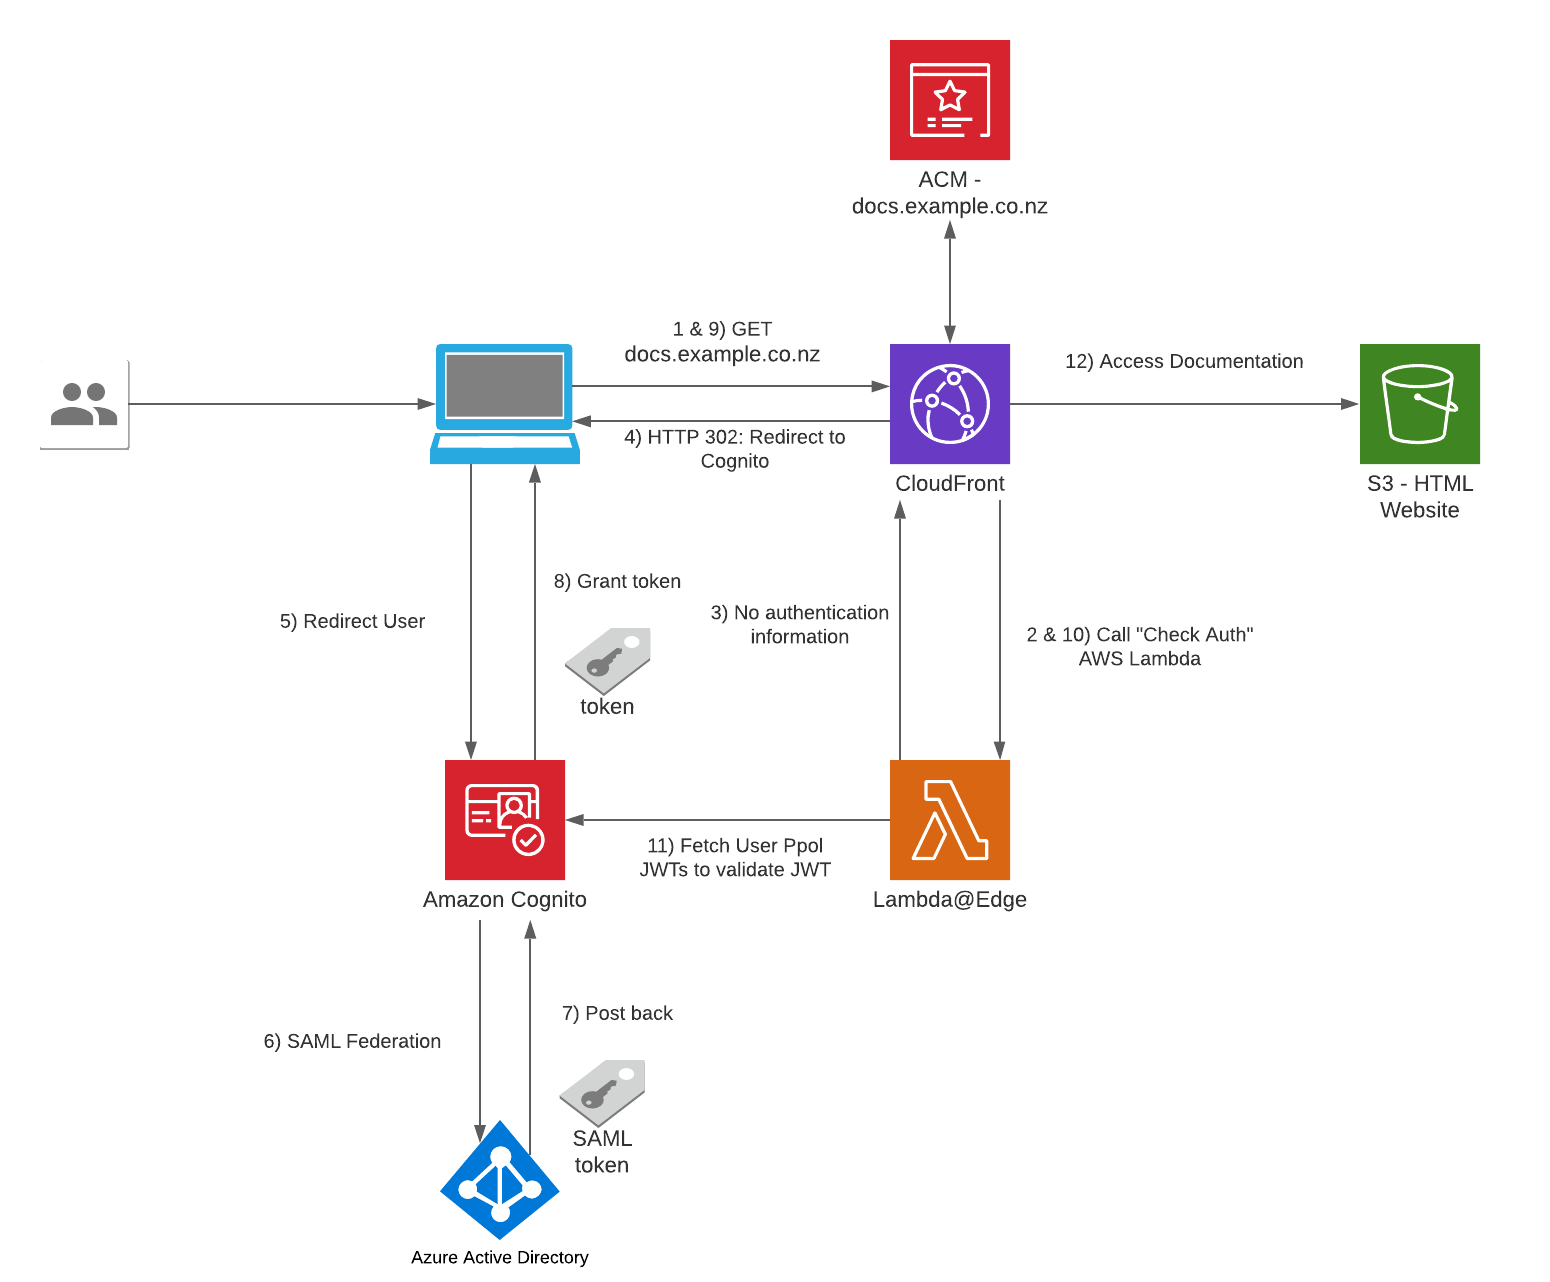
  • The user visits https://docs.example.co.nz from a browser on any device.
  • CloudFront: We are leveraging this component as the Content Distribution Network for the website, using the standard pattern of serving the CDN using an S3 Bucket.
    • Successful Lambda@Edge Check Auth: Static website content stored in S3 will only be served if the user is authenticated - a valid JWT (JSON Web Token) is found in the request.
    • Unsuccessful Lambda@Edge Check Auth: Return an HTTP 302 in the response to the user's browser to redirect user to Cognito so the user can sign in
    • This CloudFront instance is configured with the following settings:
      • Website content is cached for 30 minutes, each expired content file will be retrived from S3 individually.
      • Configured with the Alternative Domain Name: docs.example.co.nz
      • Configured with an SSL certificate for the sub-domain docs.example.co.nz using ACM (Amazon Certificate Manager) Service, the certificate is free and will be automatically renewed and managed by AWS.
  • Lambda@Edge: Validates every incoming request to CloudFront for the existence of a cookie to see if it contains a user's authentication information/JWT.
    • No authentication information: Respond to Cloudfront that the user needs to login.
    • Contains authentication cookie: Exchange the authentication information for a JWT token and store the JWT in the cookies in the HTTP response.
  • S3: This bucket is used as a CloudFront Origin and contains the static content files for the Documentation Website, e.g. HTML/CSS/JS/Images.
  • Amazon Cognito: This is the component used as the entry point for Authentication into the website, we will Federate Azure AD as an IdP using SAML integration - the user will be redirected to Azure AD for authentication.
    • Post back: When Cognito receives a SAML Assertion/Token from Azure AD after a successful login, a user's profile of that user is saved into the Cognito's User Pool by collecting the user attributes (claims) from the SAML Assertion.
  • Azure Active Directory: This solution will Federate Azure AD into Cognito using SAML, I suggest on following this walkthrough if you have a requirement for Azure AD Federation: https://aws.amazon.com/blogs/security/how-to-set-up-amazon-cognito-for-federated-authentication-using-azure-ad/
    • Successful authentication: the IDP posts back a SAML Assertion/Token back to Cognito

Set up instructions - Website Infrastructure

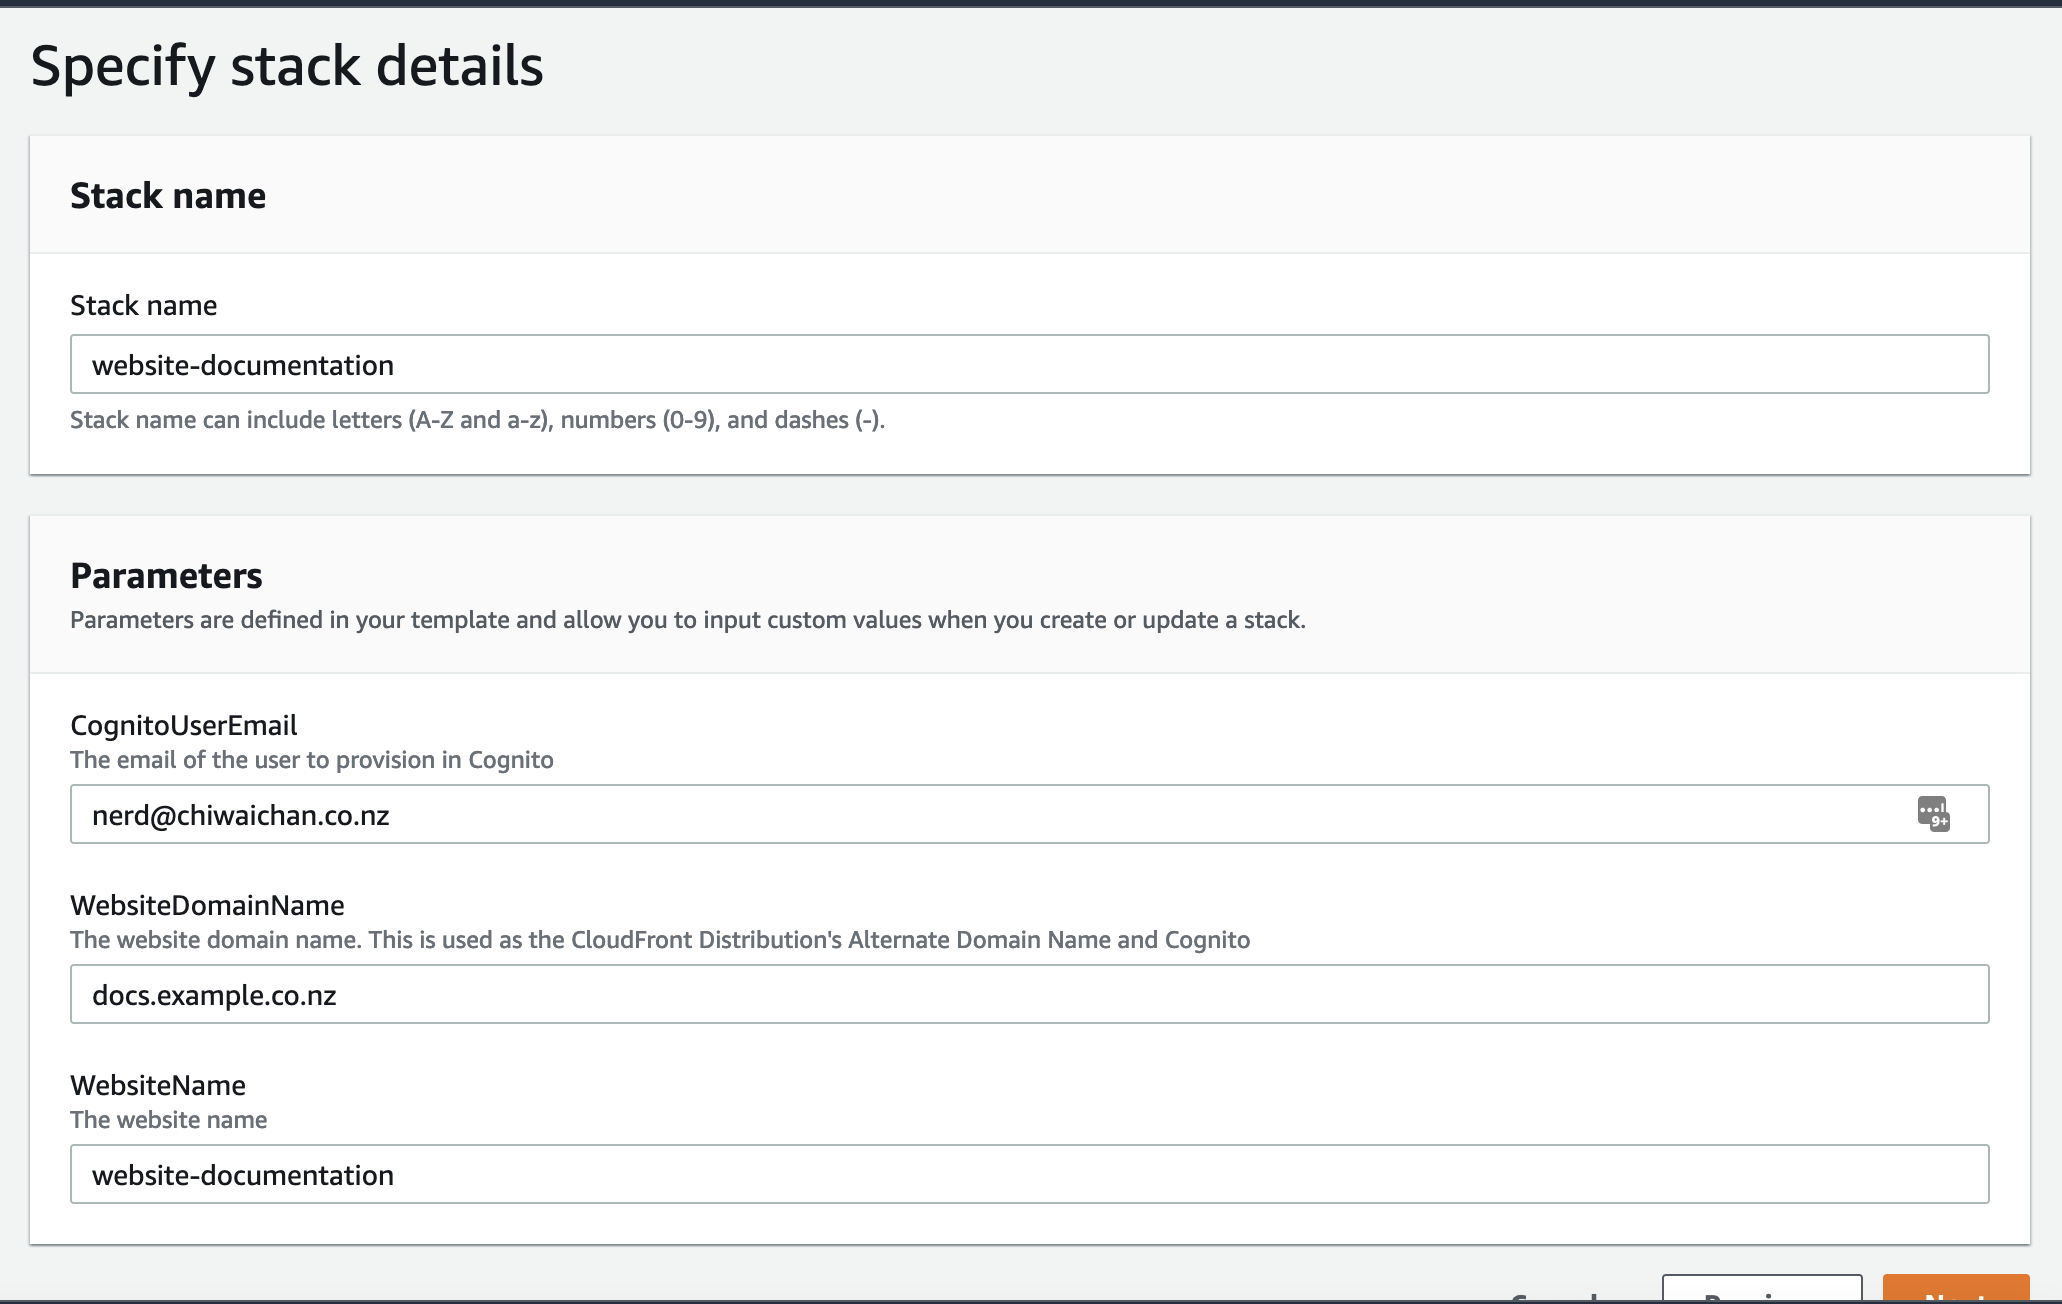
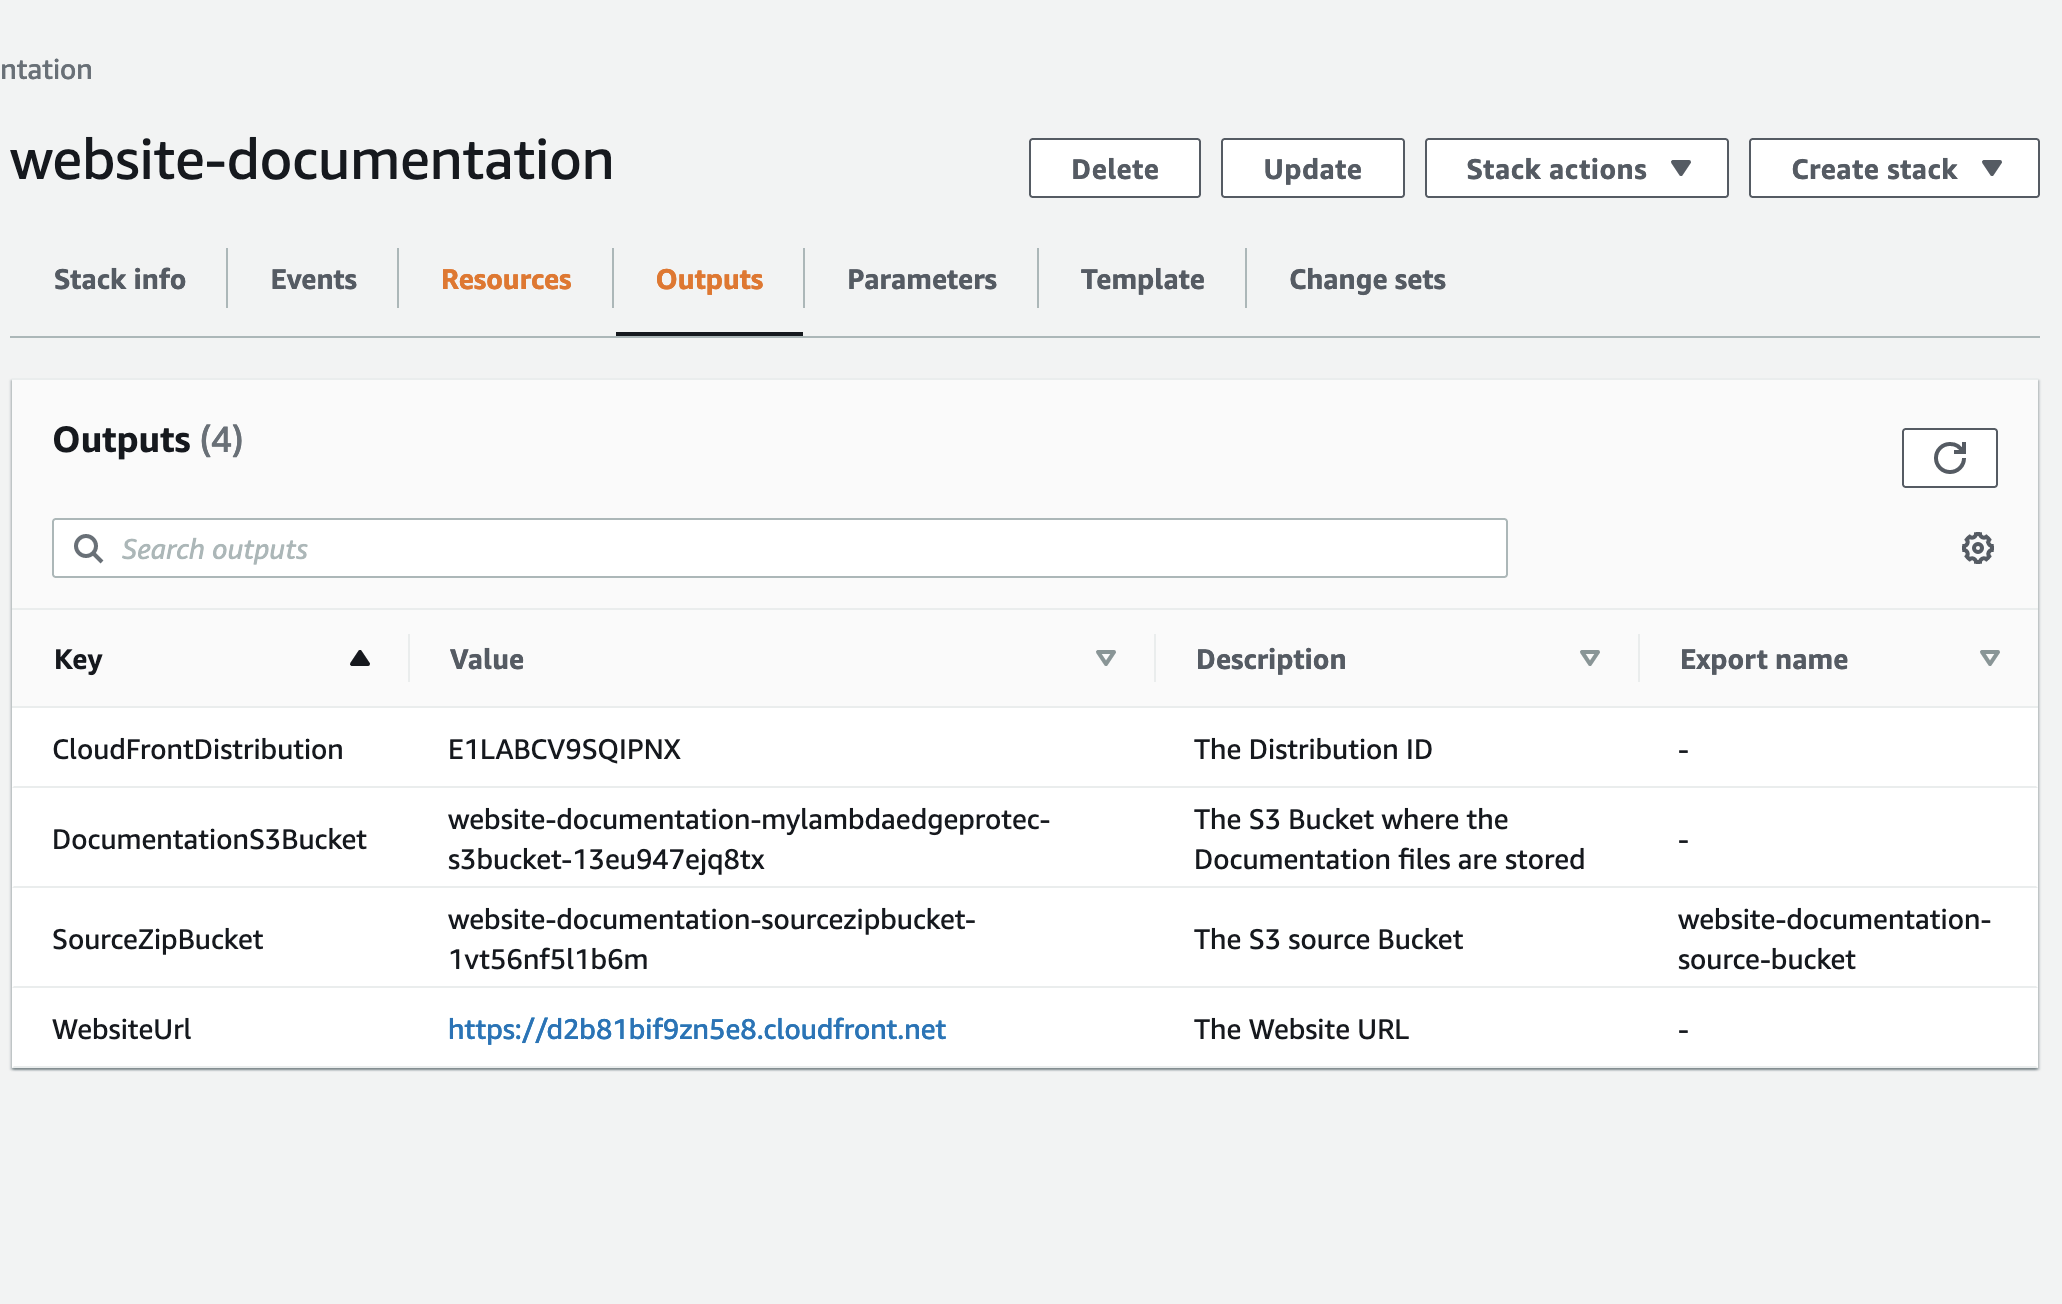
  • Create an AWS CloudFormation stack for the Website Hosting Infrastructure from the existing YML file "templates/aws-website-infrastructure.yml" found in this repository. We'll need the Stack's Outputs later on when we create the AWS Pipeline.

website infrastructure chiwaichan cloudformation create website infrastructure chiwaichan cloudformation outputs

Azure DevOps and AWS CodePipeline

deployment pipeline chiwaichan

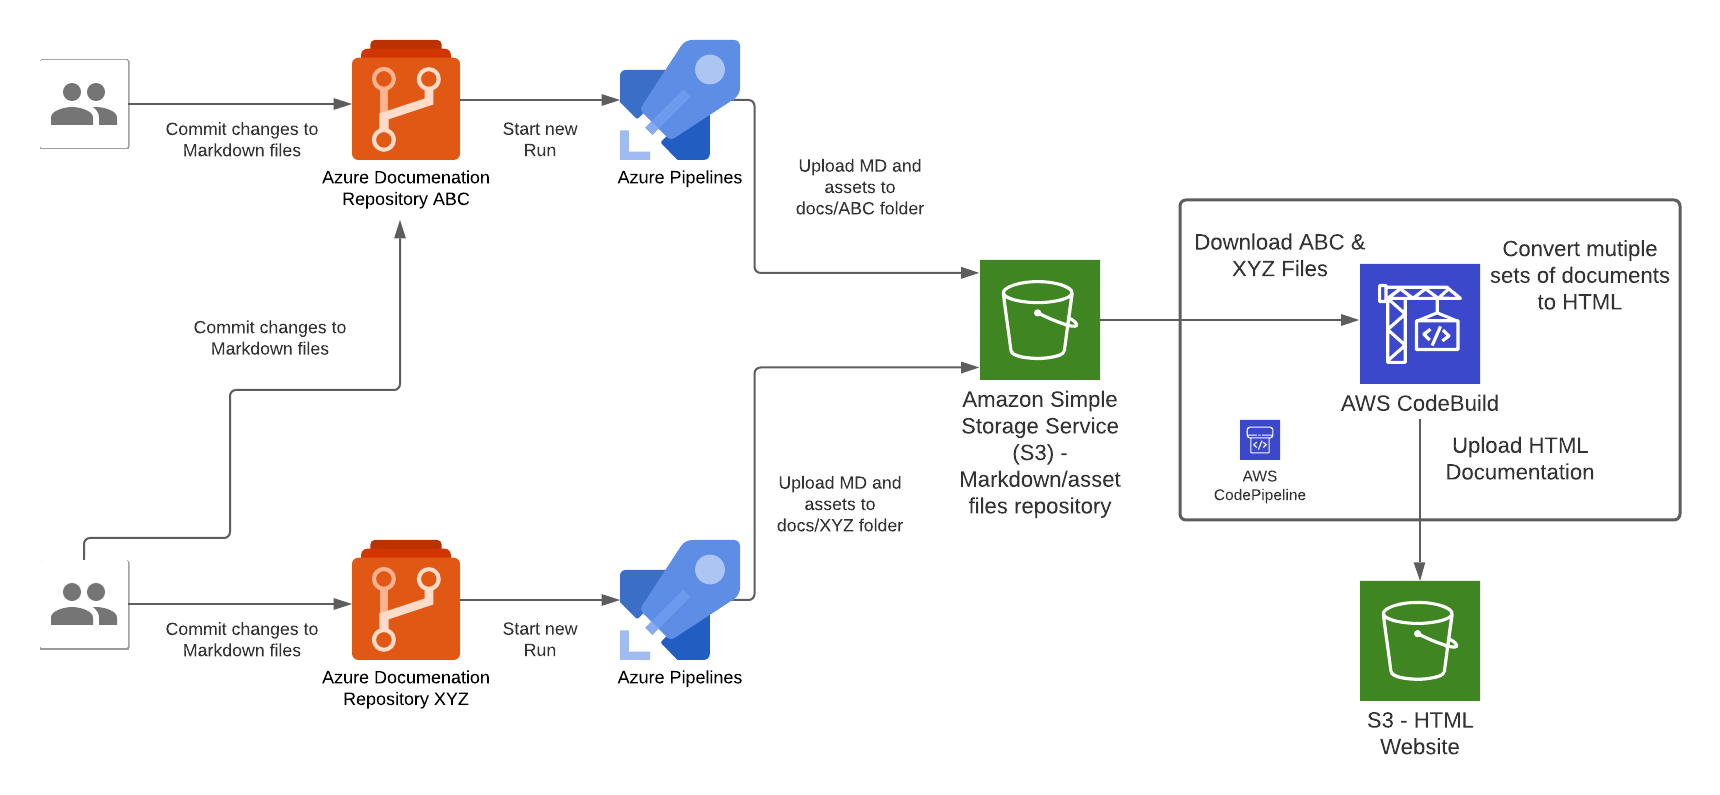
There are 2 types of pipelines that makes up the end-to-end pipeline for this solution, 1st type is for the Azure side to push Markdown files into AWS, the other is for AWS to compile the Markdown files and deploy them into S3 where the Website Content is hosted.

In the Azure pipeline we take the raw documentation (Markdown) from a Git repository hosted in Azure DevOps Git Repositories, each time a set code changes is pushed into any one of the Git repositories will trigger an Azure Pipeline "Run", the Azure Pipeline will upload the Markdown and assets files to a centralised S3 bucket repository (created by the Website Infrastructure CloudFormation Stack earlier).

Each Azure DevOps repository will host documentation for a specific domain topic, this Pipeline pattern is designed to cater for a growing number of repositories that has a requirement to host all documentations within a single Wesbite instance; the Azure Pipeline needs to be configured for each instance of Azure DevOps Git Repository. Once the Markdown files are converted to HTML during the CodeBuild stage of the CodePipeline execution, the output of those files are upload the S3 bucket that is served behind the CloudFront/Website stack.

Set up instructions - Azure & AWS Pipelines

1 This step is skipped if the infrastruture website was previously set up for the another (first) set of documentation, in this case re-use the Access Keys created at that time in subsequent steps. Create a set of Access Keys for an AWS IAM User with a policy to perform the following actions on the "SourceZipBucket" bucket created in the Website Infrastructure CloudFormation stack earlier:

  • s3:PutObject
  • s3:GetObject
  • s3:DeleteObject
  • s3:ListBucket
#example

{
"Version": "2012-10-17",
"Statement": [
{
"Sid": "VisualEditor0",
"Effect": "Allow",
"Action": [
"s3:PutObject",
"s3:GetObject",
"s3:DeleteObject",
"s3:ListBucket"
],
"Resource": [
"arn:aws:s3:::${REPLACE-WITH-SOURCE-ZIP-BUCKET-NAME}/*",
"arn:aws:s3:::${REPLACE-WITH-SOURCE-ZIP-BUCKET-NAME}"
]
},
{
"Sid": "VisualEditor1",
"Effect": "Allow",
"Action": "s3:ListAllMyBuckets",
"Resource": "*"
}
]
}

2 Create a new ADO pipeline from the existing YML file "templates/azure-pipeline.yml" in this repository.

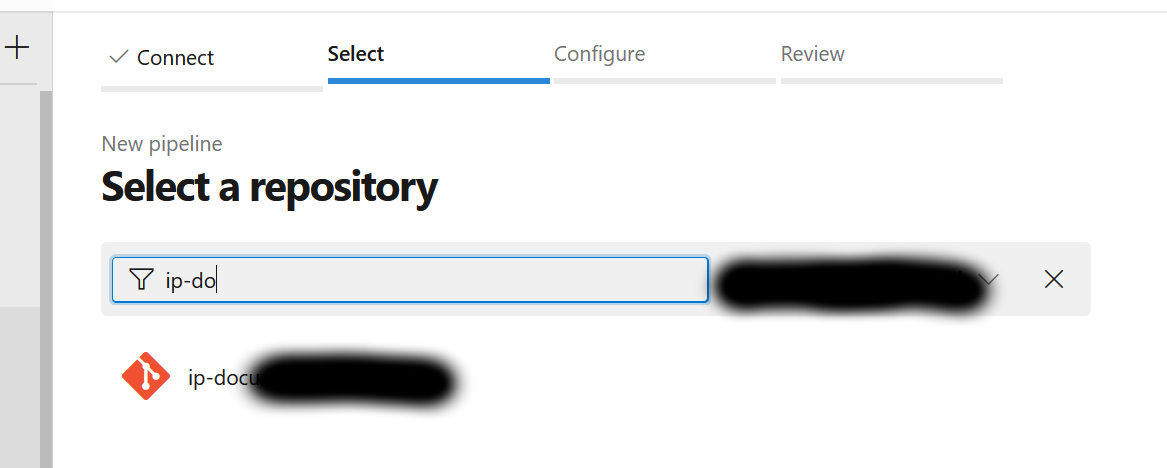
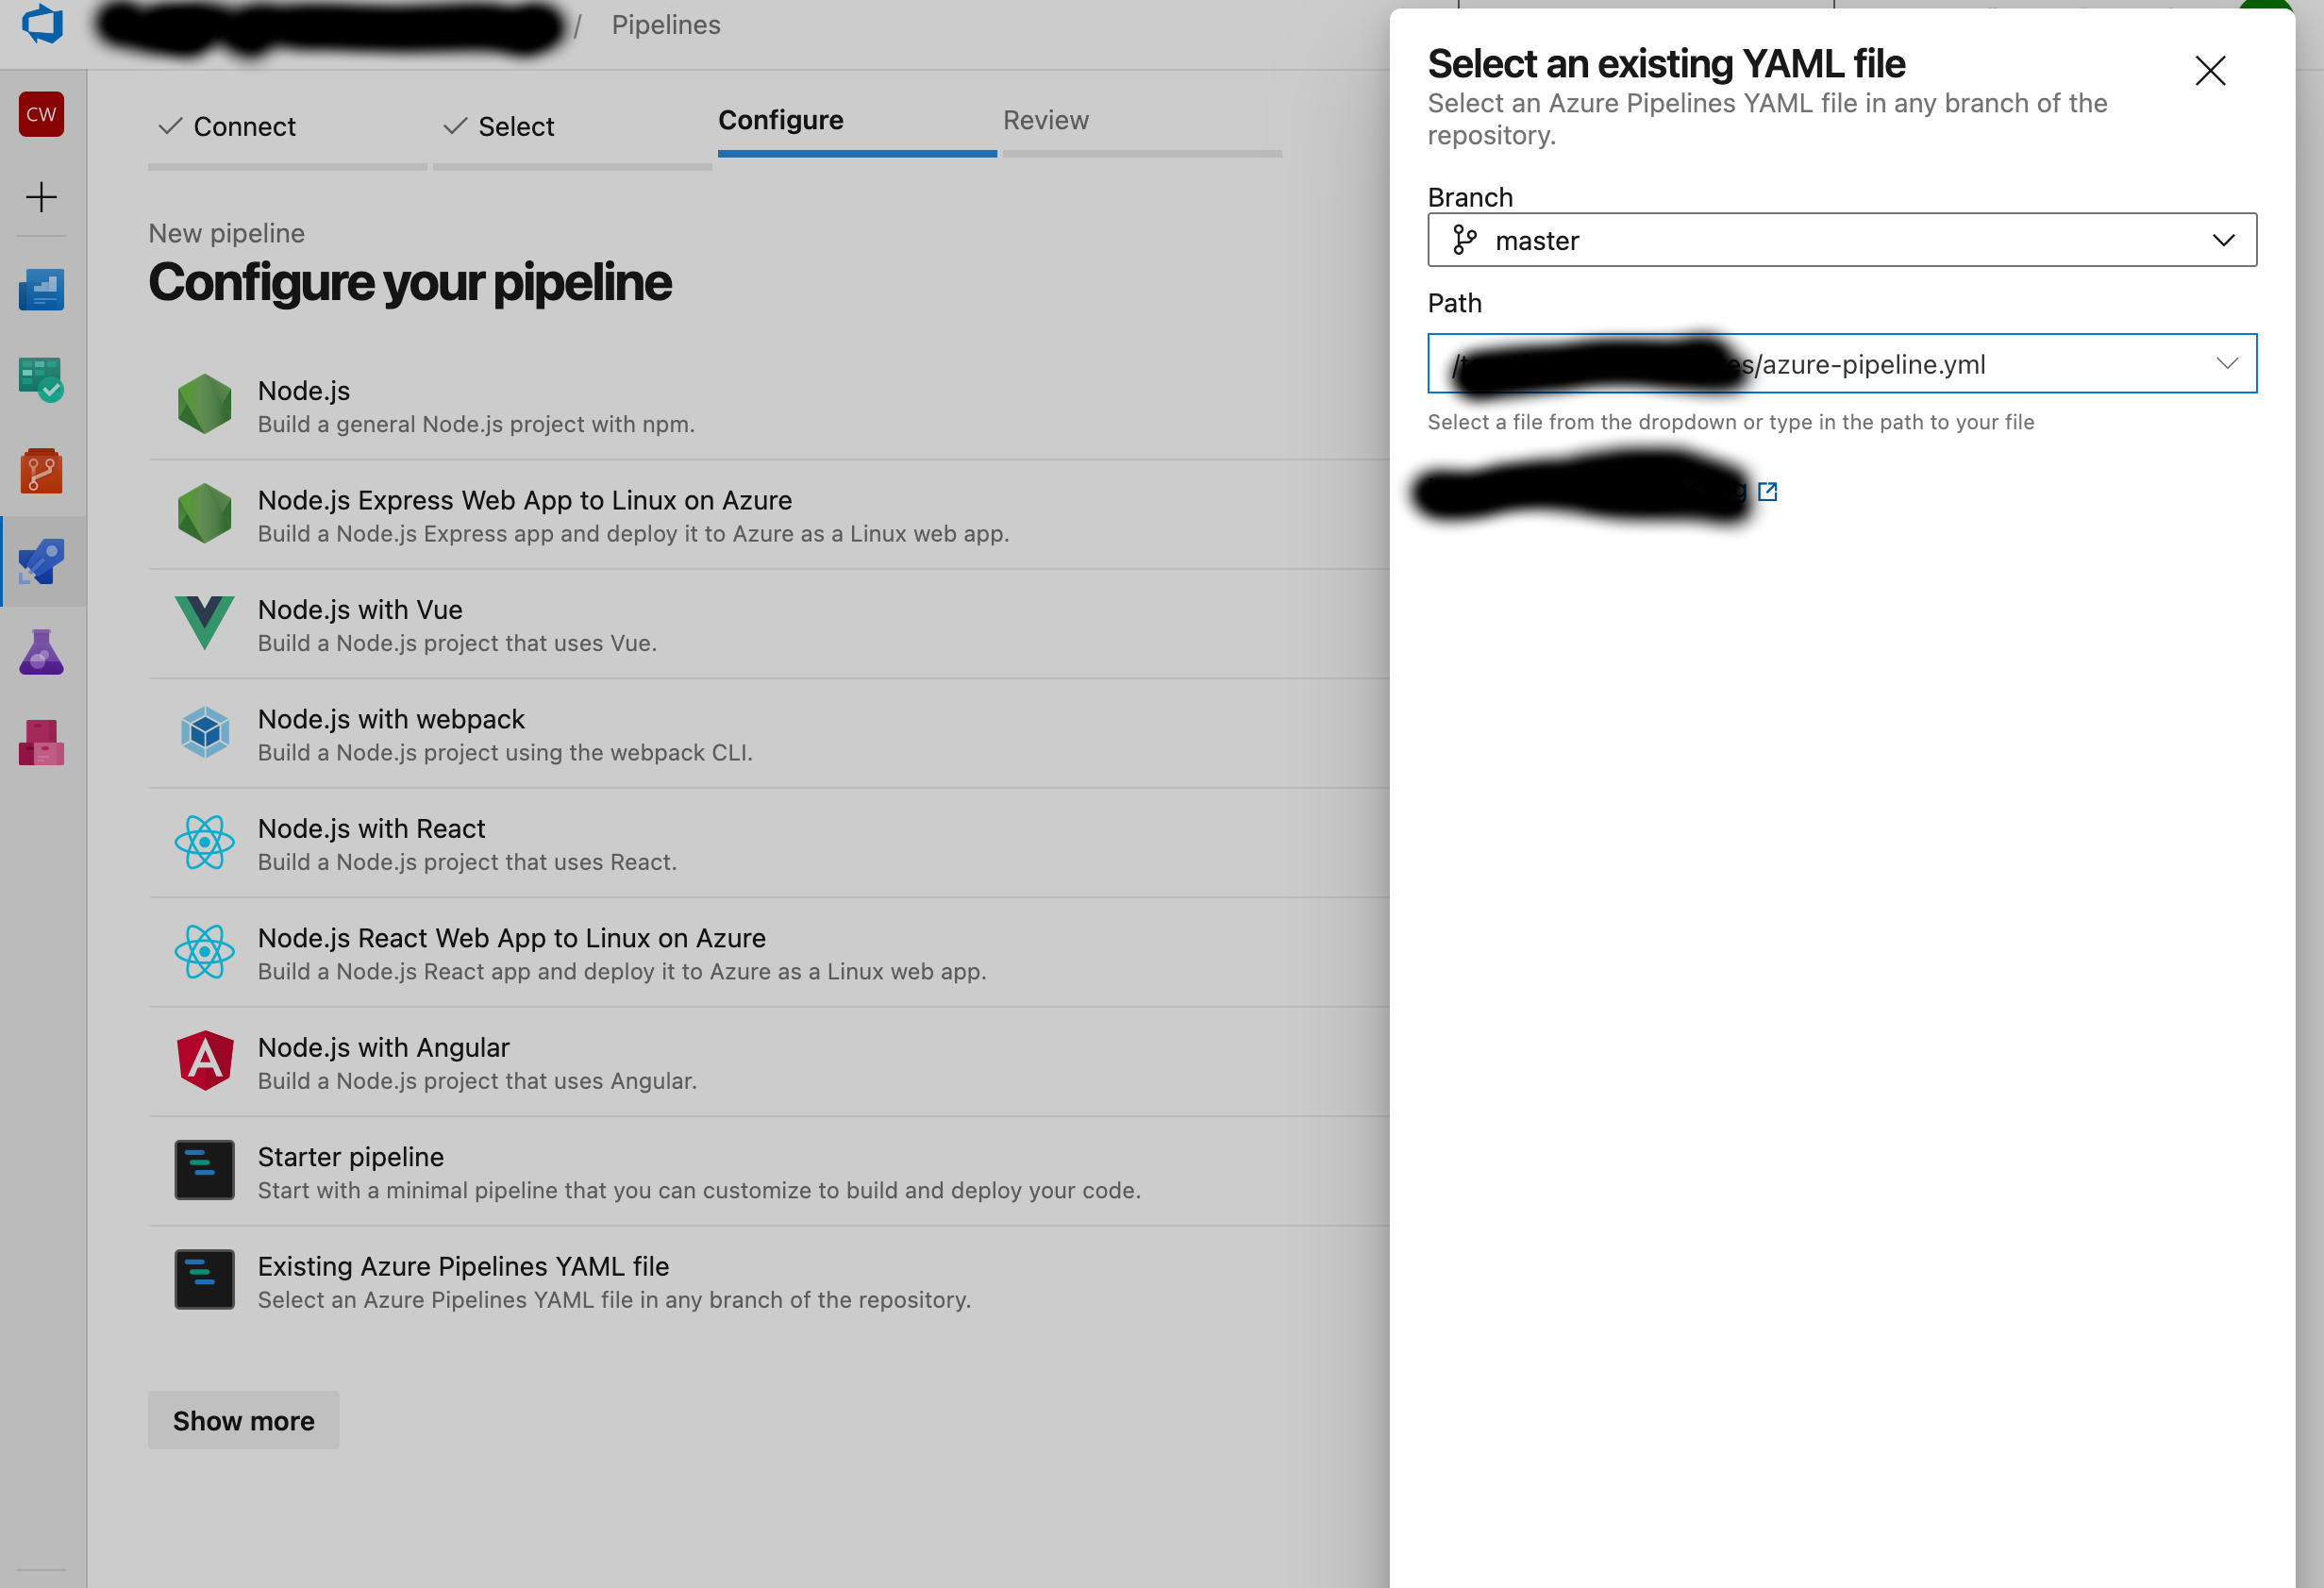
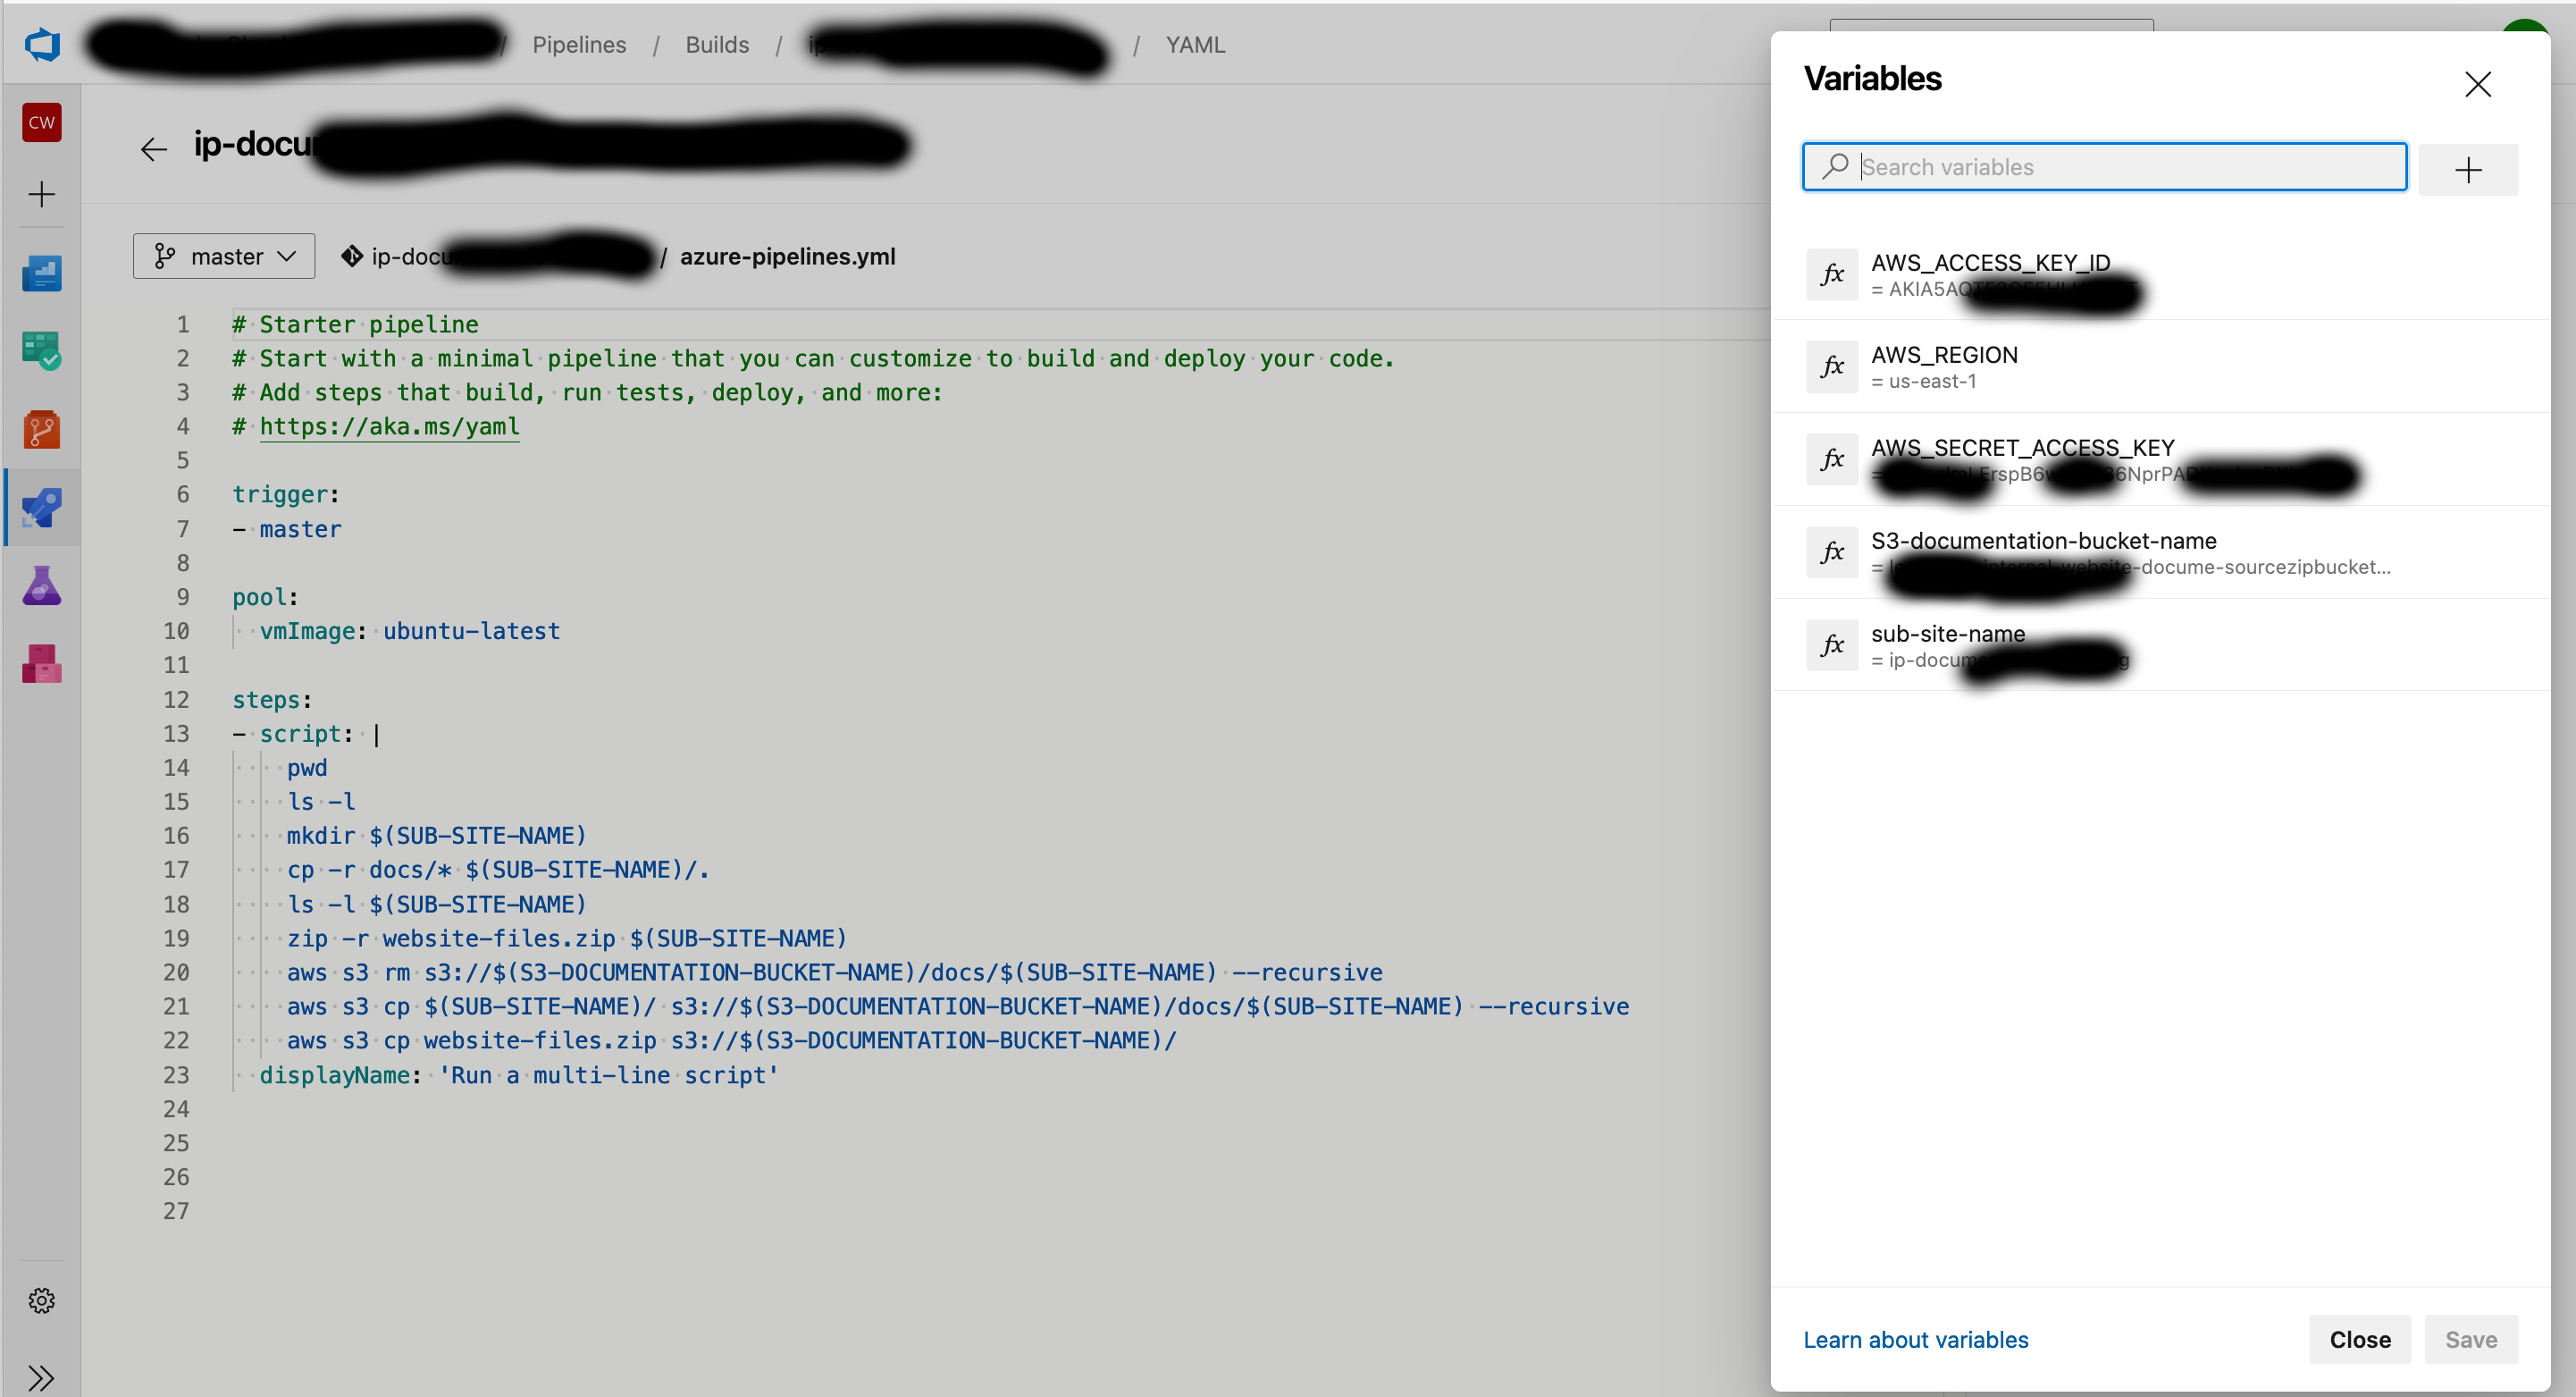
azure devops pipeline 1 azure devops pipeline 2 azure devops pipeline 3 azure devops pipeline 4

Use these as the variables for the Pipeline using the same case:

  • S3-documentation-bucket-name: use the Outputs value of "SourceZipBucket" from the AWS CloudFormation Website Infrastructure Stack created earlier - this is the same S3 bucket name used in the IAM User policy.
  • AWS_ACCESS_KEY_ID: The value of the Access Key ID created earlier.
  • AWS_SECRET_ACCESS_KEY: The value of the Secret Access Key created earlier.
  • AWS_REGION: The region where the SourceZipBucket was created in.
  • sub-site-name: This is the name of the URL path for this set of documentation, it could be the name of the Azure DevOps Repository Name for easy reference. E.g. https://docs.example.co.nz/${sub-site-name}

3 Hit Run to start a pipeline execution

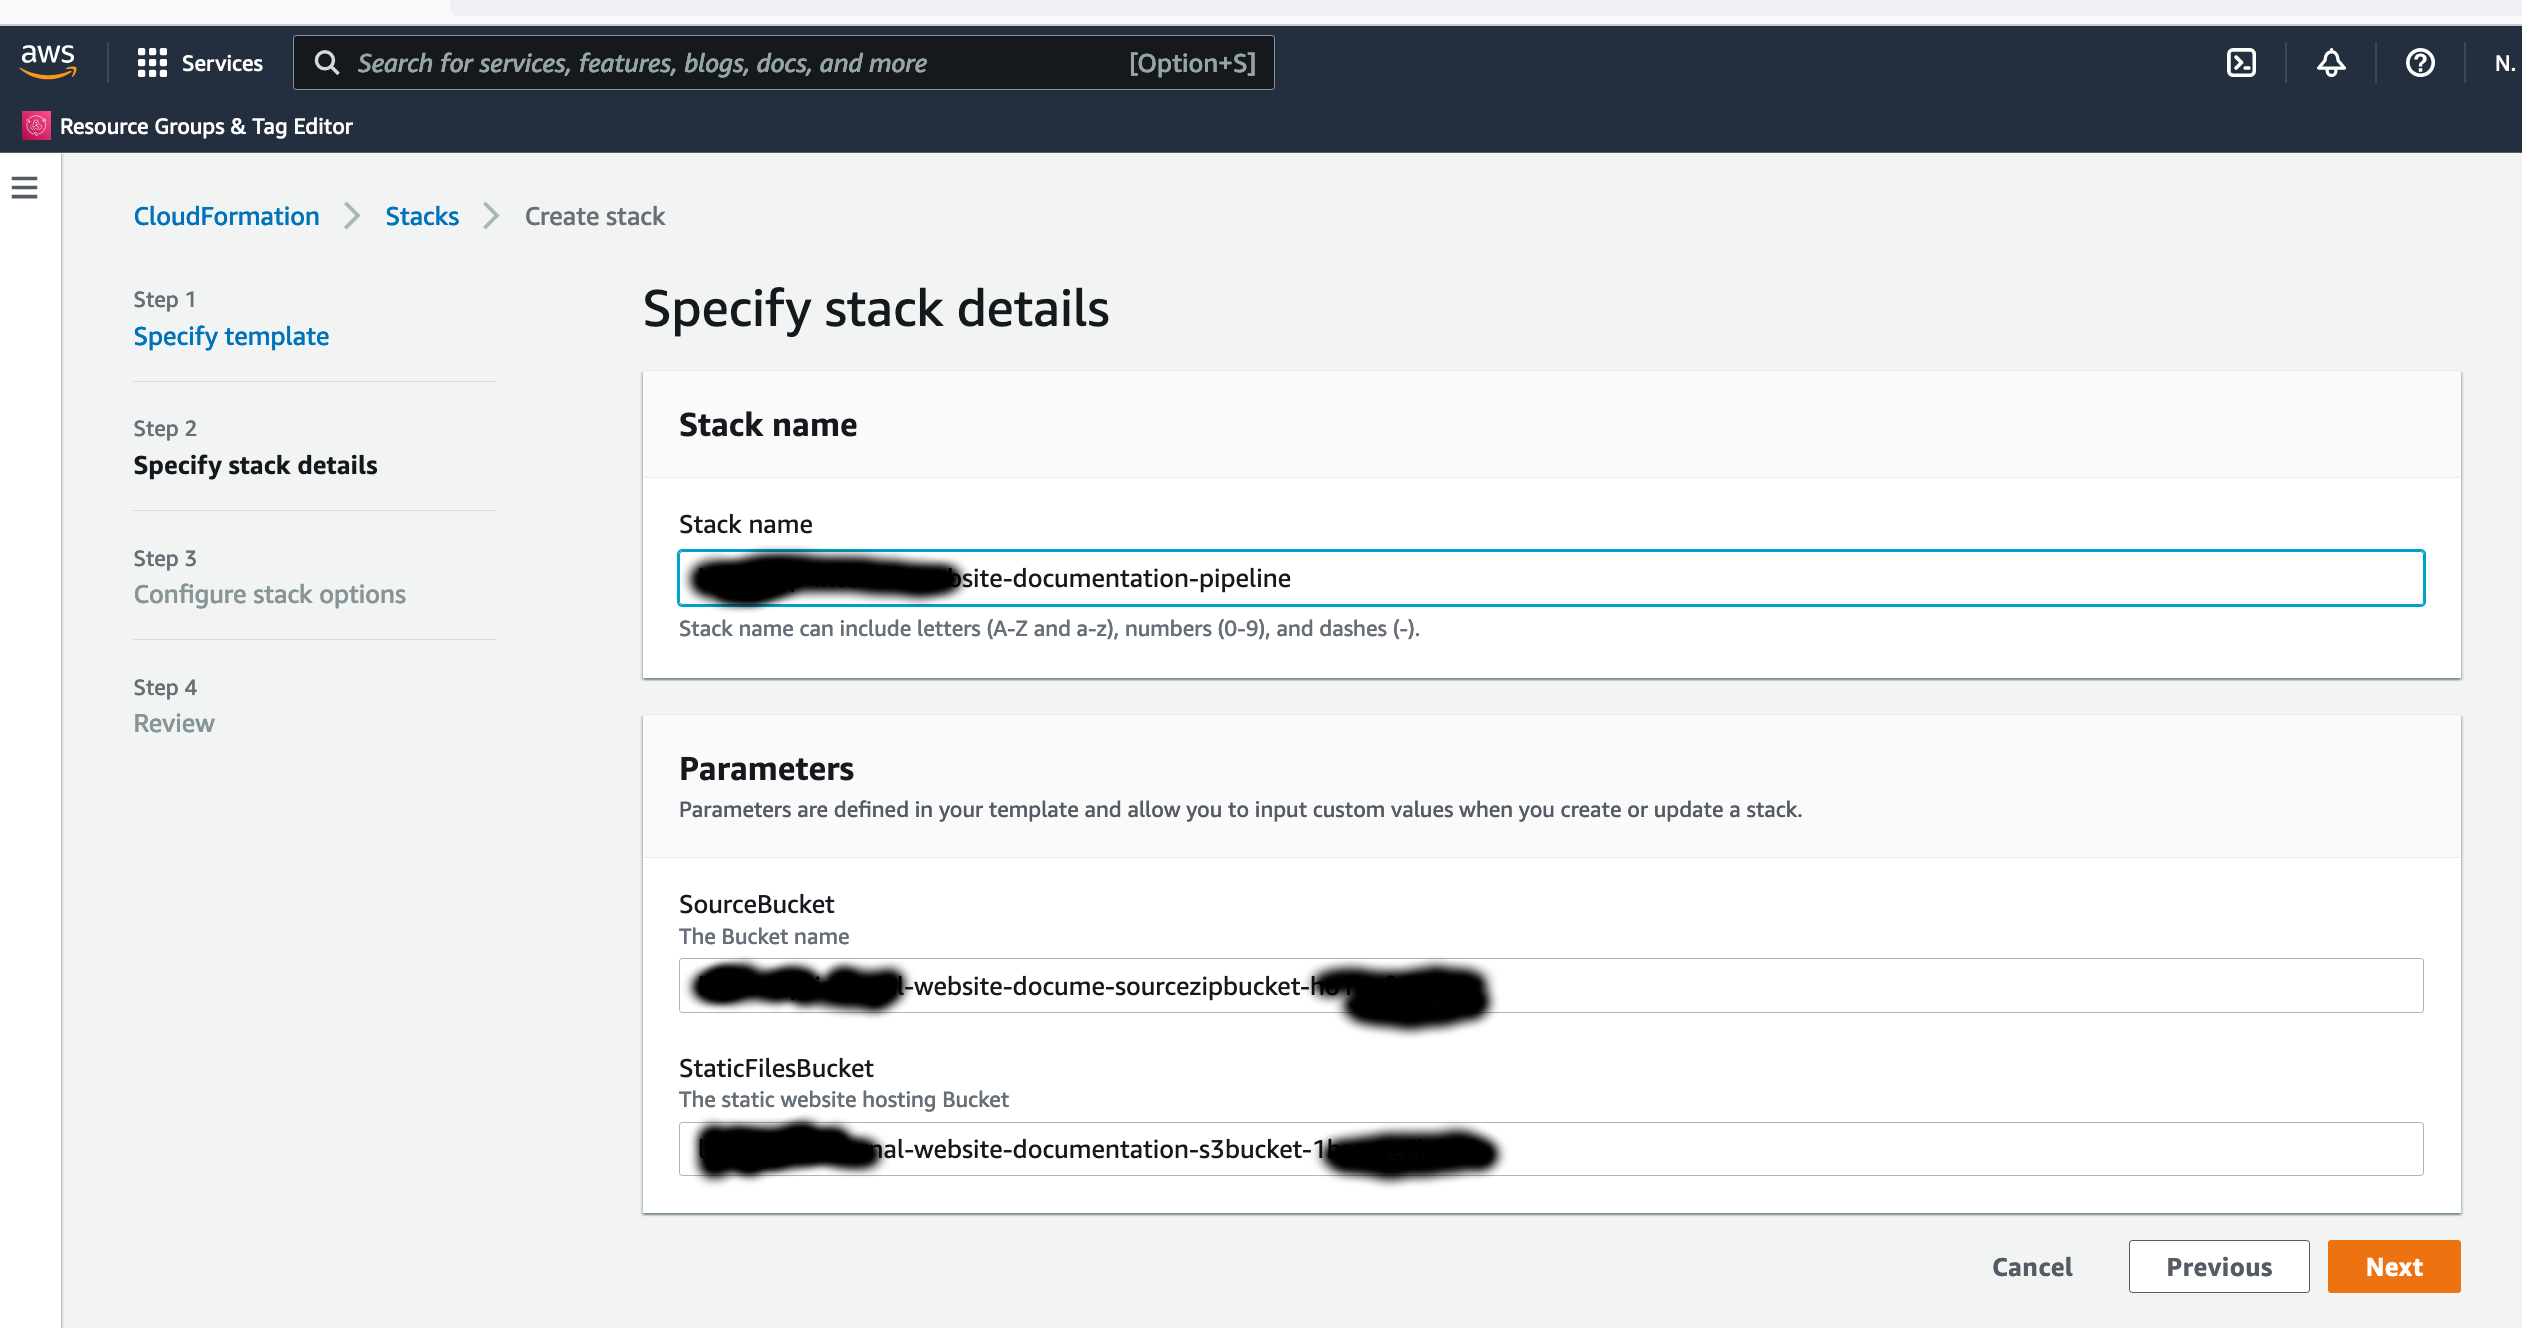
4 Skip this Step if you skipped Step 1. Create a CloudFormation stack for the Pipeline to deploy new Documentation, use the Cloudformation YML file "templates/aws-pipeline.yml" in this repository. Use the following as the Parameter values for the Pipeline:

  • SourceBucket: This is the Outputs value of "SourceZipBucket" from the AWS CloudFormation Website Infrastructure Stack created earlier.
  • StaticFilesBucket: This is the Outputs value of "DocumentationS3Bucket" from the AWS CloudFormation Website Infrastructure Stack created earlier.

aws cloudformation pipeline 1

Populate the website skeleton for Docusaurus

The CodeBuild instance in the pipeline runs a set of commands that takes the Markdown and asset files, then produces as an output the HTML format equivalent files of the entire website for all sub-sites. In order for the CodeBuild instance to run successfully it expects the skeleton files in the root of the "DocumentationS3Bucket" S3 Bucket found in the Outputs of the Website Infrastructure CloudFormation Stack, this is so Docusaurus knows how to render the Markdown files into HTML.

To generate the skeleton files and upload it to the S3 bucket use the following commands on a local machine:

npx create-docusaurus@latest website classic
aws s3 cp website/. s3://${DocumentationS3Bucket}